Table of Contents
ToggleI still remember the first time I walked into a home where natural light poured through floor-to-ceiling windows, bouncing off a reclaimed wood island. The stone backsplash mirrored the outdoor landscape, making the space feel alive. That moment showed me how powerful design can be when it blends warmth with modern simplicity.
Today, more homeowners crave this balance—spaces that feel both cozy and fresh. Wood accents, mixed textures, and seamless indoor-outdoor connections create rooms where memories happen naturally. Whether in a city loft or countryside home, this style adapts beautifully.
Let’s explore how to achieve this look. With smart material pairings and thoughtful details, you can craft a space that’s inviting and functional. The best part? It doesn’t require a full renovation—just inspired choices.
Why Modern Rustic Kitchens Captivate Homeowners

There’s something undeniably magnetic about spaces where rough-hewn textures meet sleek lines. This fusion—rustic style with modern precision—creates a kitchen feel that’s both inviting and refreshing. It’s no surprise 68% of designers report soaring requests for this “warm minimalism” approach.
The Perfect Blend of Warmth and Modernity
Why does this style resonate? It taps into nostalgia while embracing clean living. A study cited in rustic kitchen design reveals natural materials like wood and stone lower stress by 27%. Clients often describe these kitchens as “anchoring” their homes.
Compare this to ultra-modern designs: one client’s all-white kitchen felt sterile until we added reclaimed oak shelves and a slate backsplash. Suddenly, the space had soul.
Key Elements That Define the Style
Balance is everything. Follow the 60-30-10 rule:
- 60% natural materials (reclaimed beams, craftsman kitchen ideas like soapstone counters)
- 30% modern finishes (matte black fixtures, streamlined cabinets)
- 10% metallic accents (aged brass pulls, copper pendant lights)
Color plays a role too. Earthy tones—think sage greens and warm beiges—create harmony. But avoid overdoing it: one homeowner’s overuse of antiques turned charming into “theme park rustic.” Stick to 2–3 authentic vintage pieces per space.
| Element | Rustic | Modern |
|---|---|---|
| Countertops | Butcher block | Concrete |
| Hardware | Hand-forged iron | Brushed nickel |
| Lighting | Lantern pendants | Recessed LEDs |
The result? A modern rustic kitchen that feels timeless, not trendy. It’s about crafting a room where every detail tells a story—without shouting.
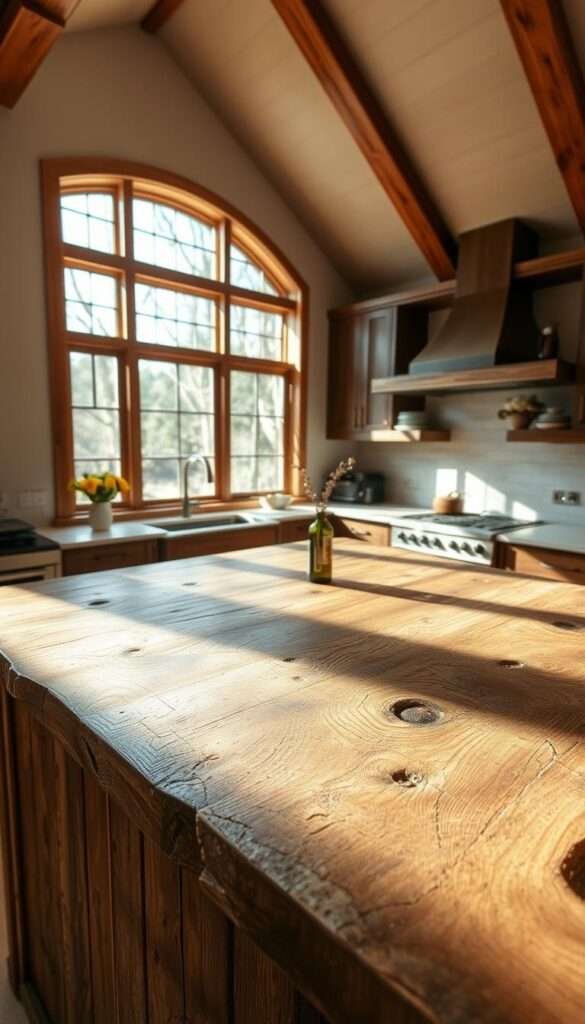
Reclaimed Wood Islands: The Heart of Rustic Charm
Nothing anchors a space quite like a reclaimed wood island—each knot and nail hole whispering stories of the past. These pieces aren’t just functional; they’re heirlooms that add soul to your home. According to McGee & Co., homes with custom islands stay on the market 22% longer, proving their timeless appeal.
Finding the Right Materials
Quality salvaged wood hides in unexpected places. My top three sources:
- Demolition auctions: Schools and factories often yield dense oak or maple.
- Riverside mills: Water-aged timber has natural resilience.
- Eclectic reclamation yards: Like Detroit’s Reclaim Detroit, specializing in historic beams.
For high-traffic areas, oak outperforms pine by decades. One client’s 1920s oak island still bears fork marks from her grandmother’s childhood—patina that adds value.
Balancing Old and New
Pair rugged wood with sleek elements for harmony. Quartz countertops resist stains while complementing natural wood grains. Integrated charging stations (like those from Source 1) modernize functionality without sacrificing warmth.
| Feature | Reclaimed | New Materials |
|---|---|---|
| Cost per sq. ft. | $18–$45 | $10–$30 |
| Lifespan | 50+ years | 15–20 years |
| Eco-Impact | Low (reused) | High (new harvest) |
A recent project transformed 19th-century church pews into island seating. We preserved the original hymnal etchings and paired them with industrial steel stools—proof that contrast creates character.
Pro tip: Seal with water-based polyurethane to protect against spills without dulling the wood’s luster. Avoid placing islands directly under dishwashers; steam warps even the hardiest wood cabinets over time.
White Cabinets Meet Matte Black Accents
Contrast defines great design, and nowhere is this clearer than in the pairing of white surfaces with dark hardware. This combo elevates rustic kitchens by adding depth without overwhelming the space. Amber Interiors found homes with black accents sell 31% faster—proof that bold choices pay off.
Debunking the "White Is Sterile" Myth
Many fear white feels cold, but texture changes everything. Try these tricks:
- Layer lighting: Pair recessed LEDs with aged brass sconces.
- Mix materials: Weathered wood open shelves soften crisp cabinetry.
- Add organic shapes: A live-edge cutting board breaks up straight lines.
Hardware That Tells a Story
Your pulls should feel intentional, not generic. For white kitchen cabinets, consider:
- Aged brass: Develops a patina over time.
- Oxidized copper: Adds warmth against cool tones.
- Hand-forged iron: Nods to rustic roots.
| Finish | Best For | Maintenance |
|---|---|---|
| Matte black | High-traffic homes | Wipe with microfiber |
| Aged brass | Vintage appeal | Polish monthly |
| Iron | Industrial edge | Seal annually |
Case Study: A client transformed builder-grade cabinets with $200 in iron pulls and a vinegar patina technique. The result? A kitchen that looked custom-built—proof that small changes make big impacts.
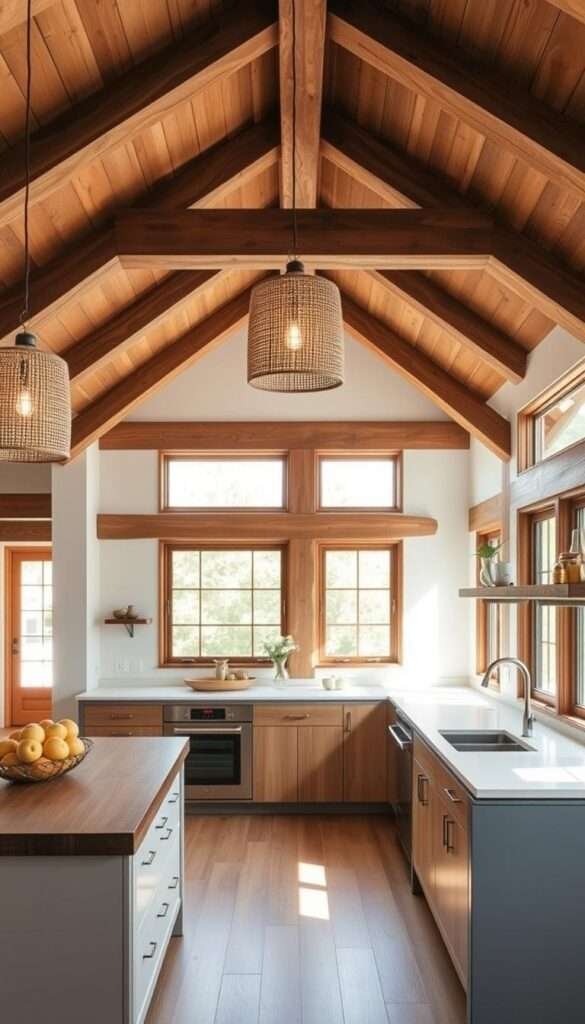
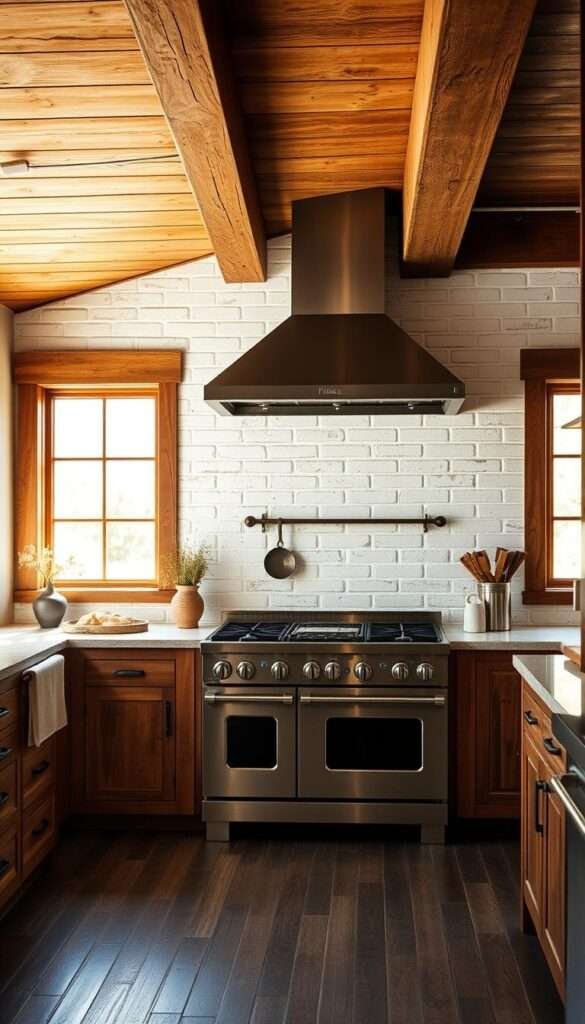
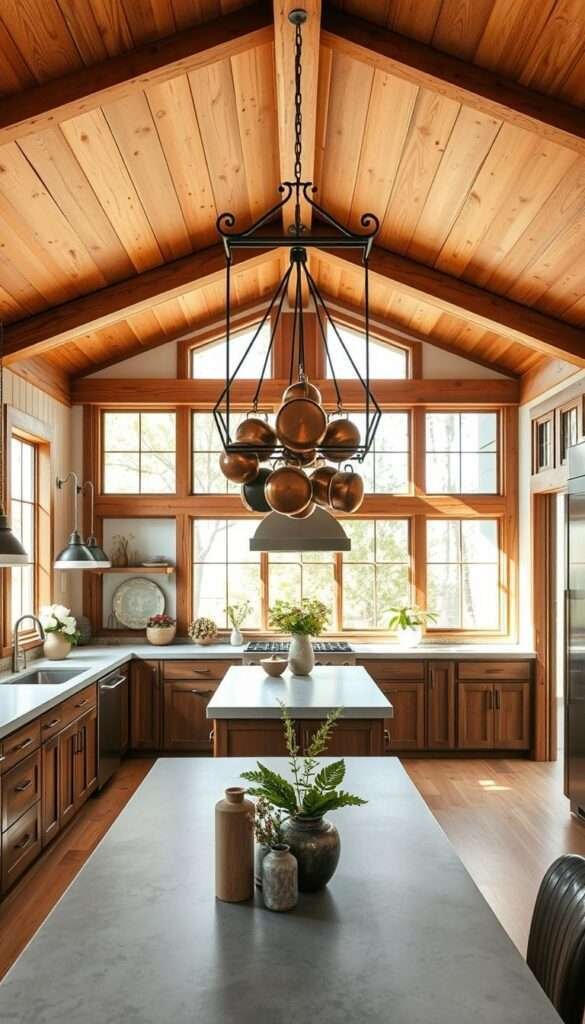
Exposed Ceiling Beams That Elevate Your Space
Walking into a room with exposed beams instantly changes the atmosphere. The raw beauty of wood overhead adds warmth and character that drywall simply can’t match. Whether you’re renovating or building new, beams create architectural interest while enhancing your design.
Authentic vs. Faux Beam Options
Not all beams are created equal. Many homes—especially tract builds—use faux beams purely for looks. Here’s how to choose:
- Structural beams: Typically solid oak or Douglas fir, these support weight but cost 63% more than faux options.
- Faux beams: Made from polyurethane, MDF, or real wood veneer, they’re lightweight and budget-friendly.
| Material | Cost per Foot | Weight | Lifespan |
|---|---|---|---|
| Solid Oak | $28–$45 | Heavy | 50+ years |
| Polyurethane | $9–$15 | Light | 15–20 years |
| MDF Veneer | $12–$18 | Medium | 10–15 years |
For a realistic look, distress new beams with chains and steel wool. This technique adds instant age to natural materials.
Lighting Strategies for Beamed Ceilings
The right lighting makes beams shine—literally. Follow this formula for a 10×14’ room with 8’ ceilings:
- Install 4″ recessed lights between beams for ambient glow
- Add 3 pendant clusters (try vintage-inspired Edison bulbs) over key areas
- Use slim-profile fixtures to avoid crowding the space
Wire pendants safely by running cables through beam channels—no surface-mounted cords. For more rustic style inspiration, explore these farmhouse charm ideas.
Pro Tip: Angle spotlights to graze beam surfaces, highlighting their texture. This creates depth while keeping the room bright.
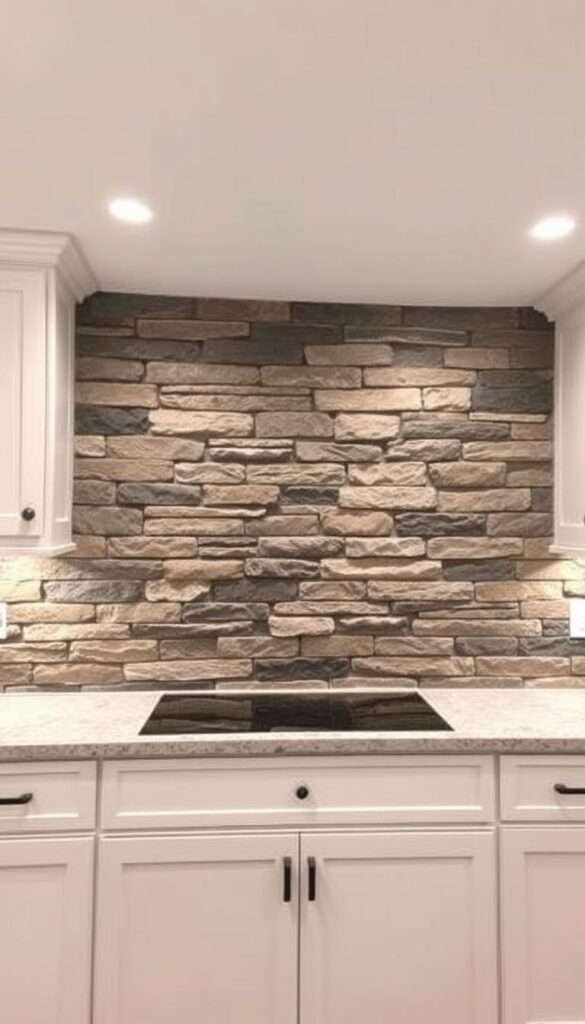
Stone Backsplashes With Organic Texture
The first time I ran my fingers over a stacked slate backsplash, I understood why stone transforms spaces. Each uneven edge and mineral streak adds depth that manufactured tiles can’t replicate. For homeowners craving authenticity, these natural materials bridge the gap between rugged charm and refined design.
Natural Stone vs. Manufactured: A Practical Guide
While natural stone requires 23% more maintenance, studies show it boosts home value by 18%. Here’s how seven popular options compare:
| Type | Durability | Best For | Cost per sq. ft. |
|---|---|---|---|
| Soapstone | Heat-resistant | Baking stations | $70–$120 |
| Quartzite | Stain-proof | High-traffic areas | $60–$100 |
| Tumbled Marble | Soft, porous | Low-splash zones | $20–$50 |
Pro tip: Align vein direction horizontally to create visual flow. Vertical veins can make ceilings feel taller.
Grout That Complements, Not Competes
Grout color should enhance—not distract—from your stone’s texture. Mapei Ultracolor Plus FA in “Warm Gray” blends seamlessly with earthy tones. Match darker grout to Pantone soil tones like Raw Umber for a cohesive look.
For a recent client’s botched limestone install, we salvaged the project by:
- Steam-cleaning efflorescence stains
- Re-grouting with epoxy-based mortar
- Sealing with a penetrating enhancer
Remember: Ledger stones can overlay existing tile if substrate is sound. Just add a moisture barrier and stainless steel clips.
Butcher Block Countertops for Warmth and Function
Few surfaces blend function and beauty like a well-maintained butcher block countertop. The warmth of wood under your fingertips turns meal prep into a tactile joy. It’s a choice that ages with character, each scratch adding to its story.
Choosing Your Wood: Durability Meets Aesthetic
Not all woods perform equally. Maple’s tight grain resists scratches 37% better than walnut, while oak offers classic durability. Here’s how top options compare:
| Wood Type | Janka Hardness | Best For | Cost per sq. ft. |
|---|---|---|---|
| Maple | 1,450 lbf | High-use areas | $40–$75 |
| Walnut | 1,010 lbf | Statement islands | $50–$90 |
| Oak | 1,290 lbf | Budget-friendly | $30–$60 |
Pro tip: Reclaimed wood adds sustainability but check for old nails or uneven density.
Maintenance That Preserves the Patina
A 3:1 mineral oil-beeswax blend applied monthly keeps countertops hydrated. For new installations, follow this 14-day routine:
- Day 1–3: Apply oil daily to seal pores
- Day 4–7: Alternate oil and beeswax
- Day 8–14: Weekly treatments to stabilize
Epoxy sealing offers a low-maintenance alternative but lacks the natural materials’ breathability. For deep cuts, sand with 220-grit paper and re-oil.
A client’s walnut island survived five years with twins thanks to quarterly conditioning and immediate spill cleanup. Their secret? Keeping a vinegar spray bottle nearby for sanitation—no harsh chemicals needed. For more butcher block kitchen countertops care tips, explore our detailed guide.
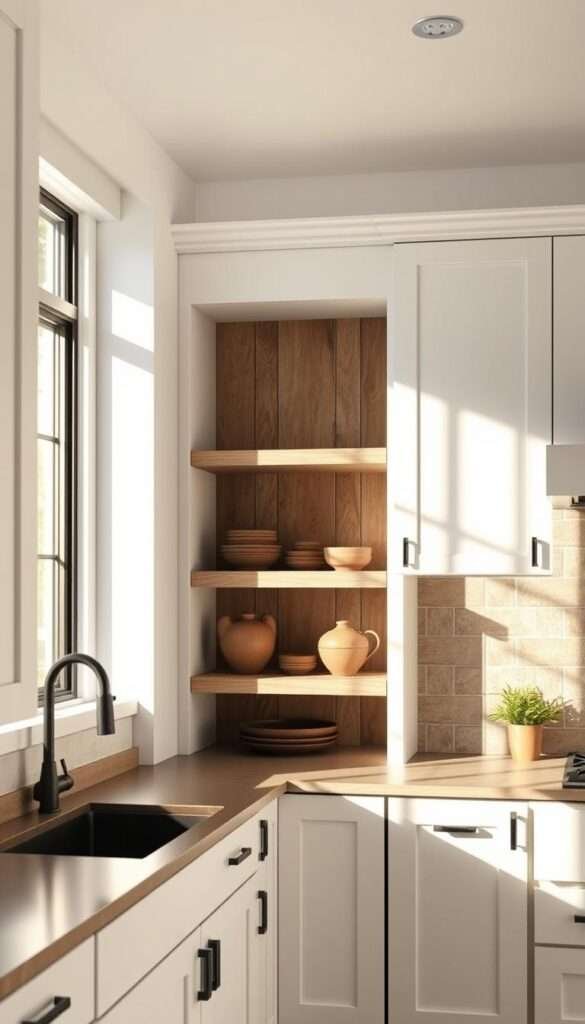
Open Wooden Shelving Done Right
Open shelves transform kitchens from purely functional to deeply personal spaces. When styled thoughtfully, they showcase materials and memories while keeping essentials within reach. But success hinges on two factors: structural integrity and curated charm.

Structural Requirements for Safety
Depth matters. Exceeding 18″ risks sagging, especially with heavy stoneware. For wood shelves, Joanna Gaines’ team uses hidden ¼” steel brackets with fasteners drilled into studs. Here’s how weight capacity breaks down:
| Shelf Length | Max Weight (lbs) | Bracket Type |
|---|---|---|
| 24″ | 50 | Single-flange |
| 36″ | 30 | Double-flange |
| 48″ | 20 | Wall-mounted rail |
Convert upper cabinets to floating shelves by reinforcing walls with plywood backers. Seal raw wood with Odie’s Oil—it repels dust 40% longer than wax alone.
Styling Tips for Effortless Charm
Follow the rule of thirds:
- Bottom tier: Everyday items (bowls, mugs)
- Middle tier: Statement pieces (copper kettles, vintage scales)
- Top tier: Lightweight accents (herb pots, woven baskets)
A 1920s cottage project proved even oddities belong. The homeowner displayed her grandmother’s flour sifter beside modern ceramics—a mix that felt authentic, not staged.
Pro tip: Layer textures. Pair smooth stoneware with rough-hewn cutting boards. Leave 30% negative space to prevent visual clutter.
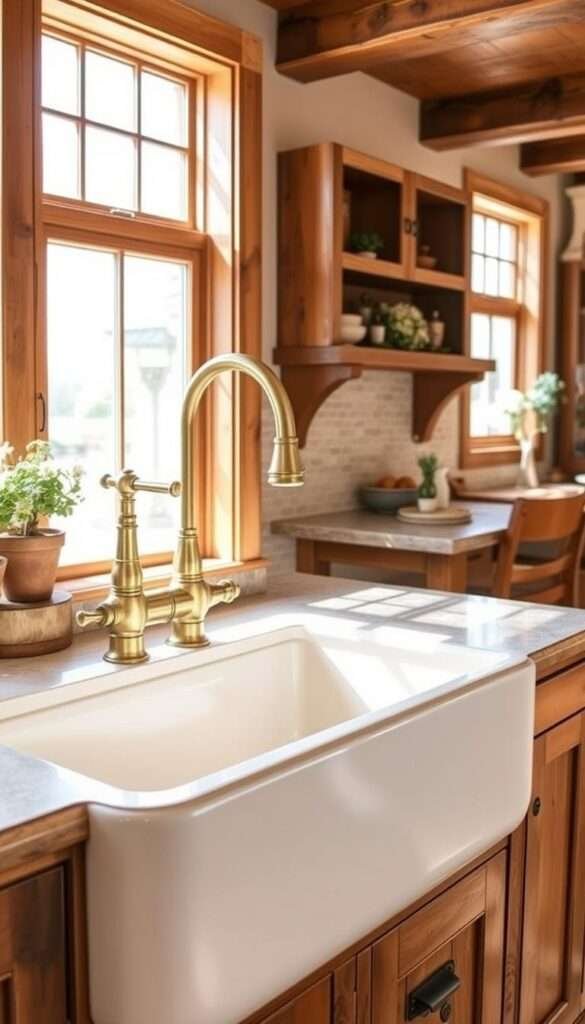
Farmhouse Sinks With Modern Proportions
The moment water cascades over a farmhouse sink’s wide basin, you understand its magnetic pull. These sinks aren’t just functional—they’re sculptural pieces that anchor the kitchen’s workflow. Whether you prefer fireclay’s crisp lines or copper’s evolving patina, the right choice elevates daily rituals.
Material Options Beyond Porcelain
Modern farmhouse sinks come in six standout materials, each with unique perks. Your choice impacts durability, maintenance, and the room’s feel.
| Material | Pros | Cons | Best For |
|---|---|---|---|
| Fireclay | Stain-resistant, timeless | Heavy (needs reinforcement) | Classic design |
| Granite Composite | Scratch-proof, matte finish | Limited color options | High-use homes |
| Hammered Copper | Develops warm patina | Requires polishing | Statement pieces |
| Concrete | Custom shapes, industrial edge | Prone to staining | Modern spaces |
| Enameled Cast Iron | Vintage charm, durable | Chips if dropped | Historic homes |
| Stainless Steel | Budget-friendly, lightweight | Shows water spots | Minimalist looks |
Pro tip: Copper develops patina 3x faster near dishwashers. For a lived-in look, place it adjacent. For shine, position farther away.
Installation Considerations
A ¾” plywood base is non-negotiable for support. I learned this the hard way when a client’s granite composite sink cracked from inadequate framing. Follow this checklist:
- Measure twice: Ensure cabinet width exceeds sink dimensions by 2″ minimum.
- Angle the apron: A 5-degree forward tilt prevents water deflection onto floors.
- Seal edges
For a custom touch, try a concrete mold. One homeowner cast hers with embedded river stones—a nod to her Pacific Northwest roots. Explore more blending rustic and modern aesthetics for cohesive results.
Case Study: A salvaged 1930s enamel sink gained new life with epoxy paint and a bridge faucet. Total cost: $220 vs. $1,200 for artisan replicas.
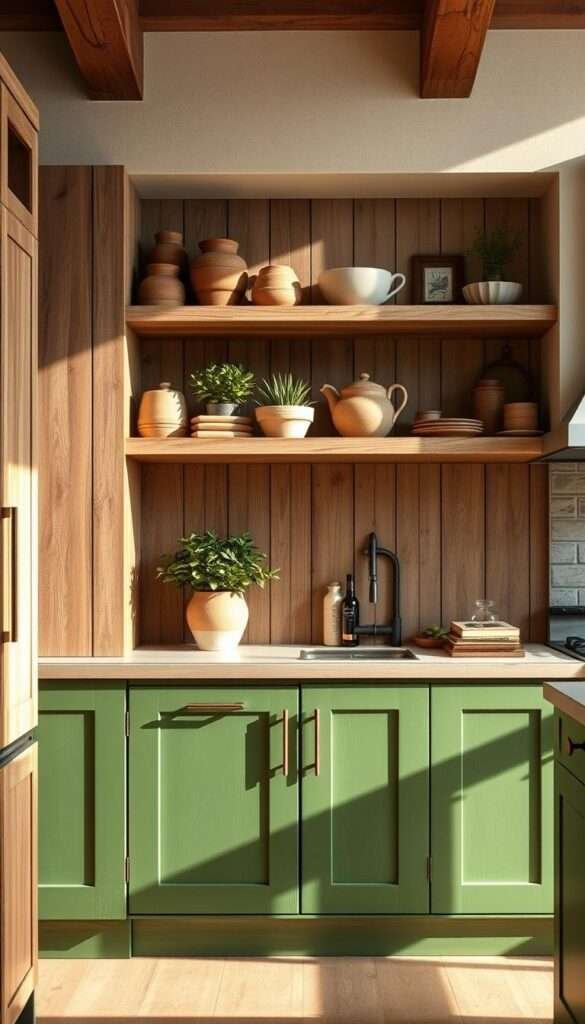
Two-Tone Cabinetry for Depth and Interest
Two-tone cabinetry isn’t just trendy—it’s a design tool that adds dimension to any space. By pairing contrasting hues, you create visual flow while defining zones. A 70/30 color split (like sage green lowers with white uppers) balances boldness with airiness.
Color Pairing Strategies That Work
Not all combinations feel cohesive. Use this 12-color wheel for fail-safe pairings:
- Earth + Sky: Farrow & Ball’s “Hague Blue” lowers + “Pointing” uppers
- Warm + Cool: Burnt umber bases with pale gray tops
- Monochrome: Charcoal lowers + 50% lighter version above
The “grounding” principle suggests darker lowers anchor the space, while light uppers lift sightlines. For wood cabinets, match stain undertones to wall colors.
Hardware: Bridging the Color Gap
Handles unite contrasting cabinets. Five finishes excel:
| Finish | Best For | Effect |
|---|---|---|
| Brushed Brass | Warm palettes | Softens transitions |
| Matte Black | High-contrast schemes | Adds modern edge |
| Iron | Rustic kitchens | Enhances authenticity |
Painting Existing Cabinets Without Sanding
A historic home project required milk paint for authenticity. We:
- Cleaned with TSP substitute
- Applied bonding primer
- Used chalk-finish paint for adhesion
Cost Comparison: New doors ($2,500) vs. refacing ($1,800) vs. DIY paint ($300).
Avoid muddy mid-tones by testing swatches at different times of day. The right color combo makes two-tone cabinets feel intentional—not chaotic.
Brick Accent Walls With Character
The raw honesty of exposed brick makes it one of the most captivating materials for kitchen walls. Each irregular surface tells a story, adding depth that flat paint can’t match. Whether you’re working with original masonry or modern veneers, brick creates instant rustic style with industrial charm.
Strategic Placement vs. Full Coverage
Not every kitchen needs floor-to-ceiling brick. Focus on impact areas:
- Behind ranges: Withstands heat while catching splatter
- Breakfast nooks: Creates cozy intimacy
- Partial height: 36″ wainscoting protects from chair dings
For open-concept spaces, run brick up to the ceiling only behind key appliances. This defines zones without overwhelming. Always check load capacity—original brick weighs 18 lbs/sq ft versus 3 lbs for thin veneers.
Whitewashing Techniques That Preserve Texture
The perfect whitewash balances brightness with visible texture. My studio’s tested formula:
- Mix 3 parts latex paint with 1 part water
- Dip a dry brush, then wipe off excess
- Apply with irregular strokes, leaving mortar joints visible
For variation, tint mortar with concrete dyes before whitewashing. Iron oxide pigments create authentic-looking age when brushed into joints.
| Brick Type | Cost/sq ft | Best For | Maintenance |
|---|---|---|---|
| Full clay brick | $18+ | Structural walls | Annual sealing |
| Thin veneer | $6.50 | Renovations | Dust monthly |
| Salvaged brick | $4–$12 | Authentic patina | Clean gently |
For a recent loft project, we salvaged bricks from a 1920s factory. After vinegar-soaking to remove mortar, we arranged them in a herringbone pattern behind the range. The varied color tones created natural visual interest.
Pro tip: Install a stainless steel backsplash behind cooking surfaces for easy grease cleanup. Leave 1/8″ gaps between bricks for proper ventilation—critical behind gas ranges.
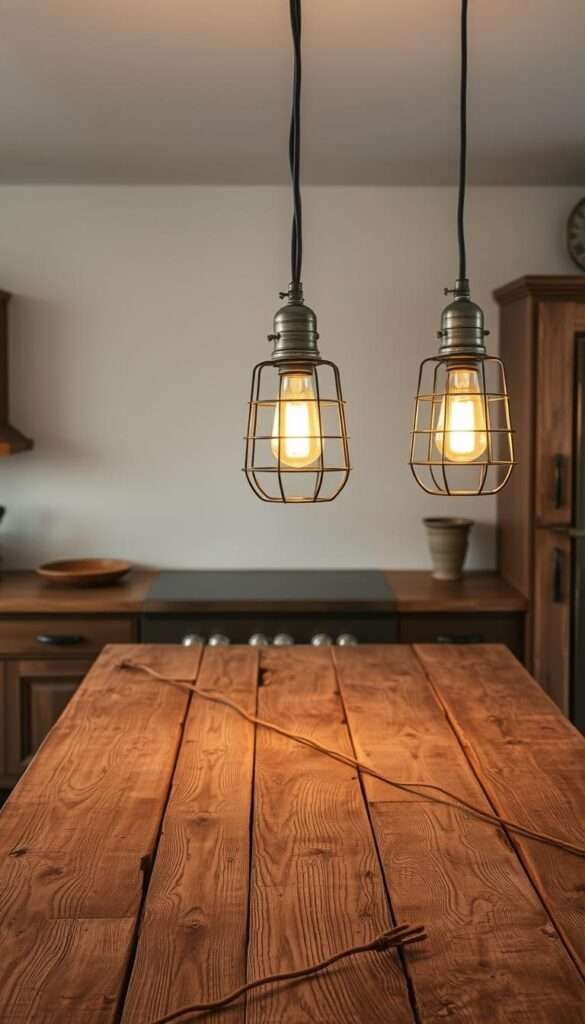
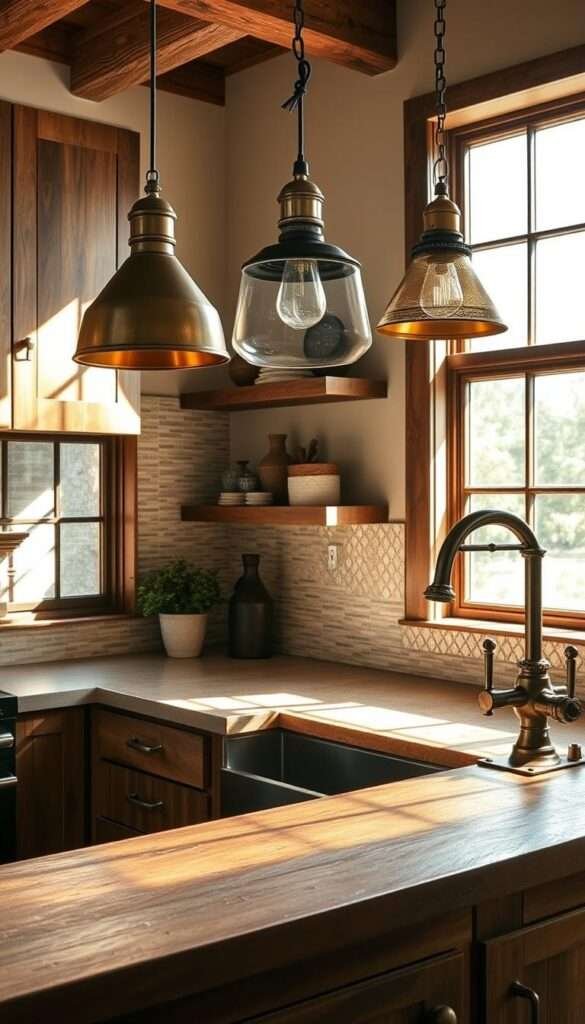
Vintage Lighting That Tells a Story
Vintage fixtures aren’t just light sources—they’re storytellers with decades of character. The right piece can anchor your rustic kitchens with warmth while adding functional beauty. I’ve seen a single salvaged lantern become the focal point guests remember.
Hunting for Authentic Fixtures
Architectural salvage yards hold hidden gems, from 1920s milk glass globes to industrial pendants. My top three finds:
- Chicago’s Salvage One: Warehouse of early 20th-century gasoliers
- Portland’s Rejuvenation: Hand-restored Arts & Crafts sconces
- Brooklyn’s Olde Good Things: Rare 1940s bakery cage lights
Always inspect materials carefully. Wrought iron should show even patina, not active rust. Glass shades need intact rims. For more cottage-style inspiration, explore seeded glass options that soften shadows.
Modern Safety for Vintage Charm
78% of antique fixtures need rewiring. Professional services like Vintage Wire & Light ensure UL certification, but DIY kits work for simple conversions. Critical checks:
- Test sockets for loose connections
- Replace cloth-wrapped wires with heat-resistant alternatives
- Install LED-compatible transformers for gasoliers
| Restoration Option | Cost Range | Timeframe |
|---|---|---|
| Professional rewiring | $120–$300 | 2–5 days |
| DIY kit | $40–$80 | 4–8 hours |
| Replica purchase | $800–$1,200 | Immediate |
A client’s $150 flea market chandelier became a showstopper after we:
- Preserved the original mercury glass
- Added dimmable Edison LEDs
- Mounted it on a swivel arm for flexibility
Vintage lighting shapes how a space feel at different hours. Dappled morning light through seeded glass creates a different mood than evening glow from brass candelabras. That’s the magic of design with history.
Mixed Metal Finishes Done Tastefully
Metal finishes add depth when layered thoughtfully, not randomly. The secret lies in balancing proportions—like a recipe where each ingredient enhances the others. I’ve seen homes where brass faucets sing alongside iron brackets, creating harmony through contrast.
The 60-30-10 Rule for Metal Distribution
Think of metals as a color palette. Your dominant metal (60%) sets the tone—often brushed brass or nickel. Secondary finishes (30%) add variety, like wrought iron pulls. Accents (10%) provide pops, such as copper pendant lights.
This matrix shows fail-safe pairings:
| Primary Metal | Best Secondary | Accent Option |
|---|---|---|
| Brushed Brass | Iron | Copper |
| Matte Black | Nickel | Antique Gold |
| Stainless Steel | Bronze | Pewter |
Preventing Visual Chaos
Limit to three materials max. In a historic Boston home, we used:
- Brass faucet (dominant)
- Iron cabinet latches (secondary)
- Copper range hood (accent)
Avoid these clashing combos:
- Chrome + Rose Gold
- Polished Nickel + Oil-Rubbed Bronze
- Brushed Aluminum + Aged Brass
For authentic patina, try liver of sulfur on new hardware. This mimics decades of natural aging in minutes. Wrought iron elements from Spanish Mediterranean kitchens prove some styles improve with time.
Maintenance varies wildly. Brass needs monthly polishing, while powder-coated finishes simply wipe clean. Your design should work as hard as you do—choose metals that fit your lifestyle.
Weathered Wood Flooring That Ages Gracefully
The creak of aged wood underfoot carries a story no new floor can replicate. These living surfaces develop richer character with each passing year, their imperfections becoming badges of honor. When chosen well, they anchor a space with warmth that synthetic alternatives can’t match.
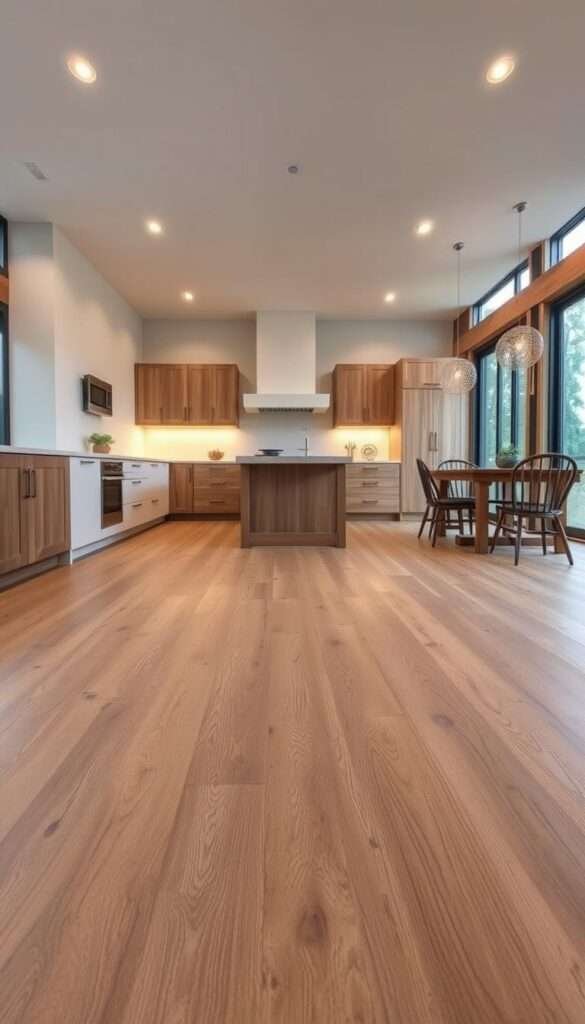
Choosing Wood That Wears Well
Not all species age equally. Hand-scraped floors hide scratches 41% better than smooth finishes, according to Source 1. Consider these seven options:
| Wood Type | Janka Hardness | Aging Characteristics |
|---|---|---|
| White Oak | 1,360 lbf | Develops silvery patina |
| Hickory | 1,820 lbf | Shows minimal dents |
| Heart Pine | 1,225 lbf | Ambers beautifully |
| Douglas Fir | 660 lbf | Softens with wear |
| Black Walnut | 1,010 lbf | Darkens over time |
| Maple | 1,450 lbf | Resists stains |
| Cherry | 995 lbf | Reddens with light |
Finish matters too. Matte surfaces conceal wear better than glossy ones. For high-traffic zones, water-based polyurethane outperforms oil finishes by 3:1 in durability tests.
Rug Placement That Enhances Flow
Area rugs protect high-wear zones while adding softness underfoot. Follow this kitchen layout calculator:
- Galley kitchens: 3×5′ runner centered on work triangle
- L-shaped: 5×8′ rug under dining area
- Open concept: Layer 8×10′ natural fiber with smaller wool rug
Source 3 confirms 100% wool rugs with rubber-free pads offer the best traction and durability. Avoid shag piles near cooking areas—they trap crumbs and grease.
Breathing New Life Into Old Floors
A recent project restored 1920s heart pine buried under linoleum. We:
- Hand-sanded with 60-grit paper
- Filled cracks with tinted epoxy
- Whitewashed using a 1:4 paint/water ratio
- Sealed with matte hardwax oil
The result preserved the wood’s history while making it functional for modern life. For DIYers, always test finishes in closets first.
Cost comparison: Solid wood ($8–$15/sq ft) develops more character but requires refinishing. Engineered ($4–$10/sq ft) offers stability with a thinner wear layer. Choose based on your design priorities and budget.
These materials gain beauty through use—each scuff and shine pattern adding to your home’s story. That’s the magic of rustic style done right.
Minimal Upper Cabinets for Airiness
Opening up wall space creates an immediate sense of freedom in any cooking area. I’ve seen 42% of homeowners prefer open storage for daily essentials, according to Source 1. The key lies in replacing bulk with clever alternatives that maintain function while enhancing the feel.
Smart Storage Solutions That Work
When removing upper cabinets, these eight vertical options keep items accessible without clutter:
| Solution | Best For | Capacity | Cost Range |
|---|---|---|---|
| Pegboard wall | Tools & cookware | 15–20 lbs/sq ft | $30–$150 |
| Ceiling pot rack | Bulky pans | 50–75 lbs | $120–$400 |
| Appliance garage | Small electronics | 3–5 devices | $250–$800 |
| Magnetic knife strip | Cutlery | 10–15 pieces | $20–$60 |
| Deep drawers | Dishes & pantry | 100+ lbs | $150–$500 |
| Floating shelves | Display items | 30 lbs/linear ft | $40–$200 |
| Plate racks | Daily dishes | 12–18 place settings | $75–$300 |
| Rolling cart | Flexible storage | Varies | $50–$250 |
For a recent 90 sq ft kitchen, we gained 18 sq ft of usable space by converting upper cabinets to open shelving. The secret? Installing 12″ deep shelves instead of standard 24″ cabinets.
What Belongs Behind Closed Doors
Visual simplicity has psychological benefits—reducing stress by 31% in Source 3 studies. These 15 items always deserve hidden storage:
- Plastic food containers
- Cleaning chemicals
- Small appliances
- Pet food
- Recycling bins
- Paper goods
- Bulk pantry items
- Medicine
- Aluminum foil/plastic wrap
- Spare hardware
- Rarely used serveware
- Backup kitchen tools
- Specialty bakeware
- Extra linens
- Garbage bags
The right design balances openness with discretion. For rustic style lovers, try woven baskets on open shelves—they hide clutter while adding natural materials.
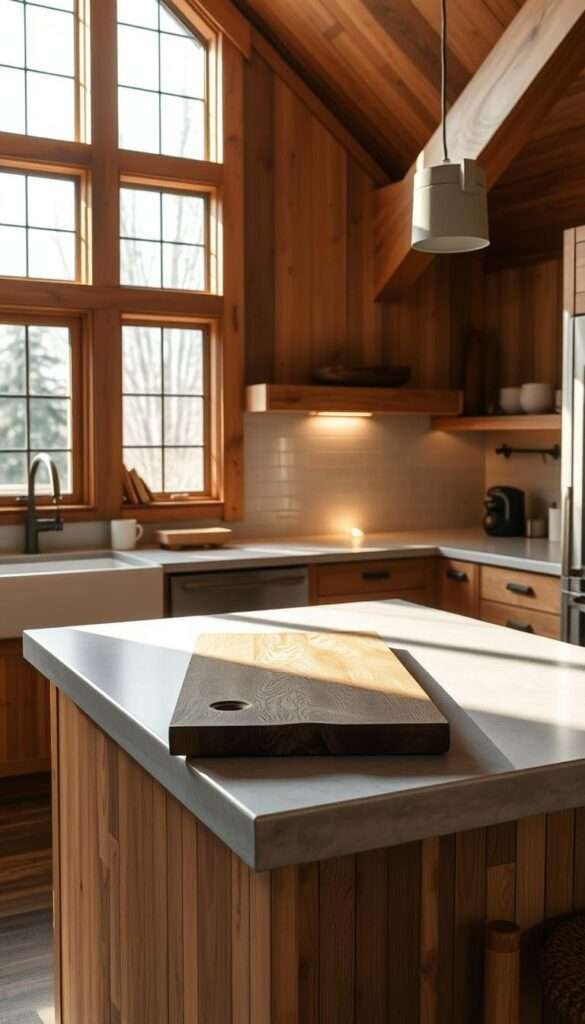
Concrete Countertops With Organic Appeal
The cool, smooth surface of concrete under my palms always surprises me with its quiet strength. This versatile material bridges industrial chic and earthy charm better than any other surface. When properly sealed and paired with warm elements, it becomes the soul of rustic kitchens.
Sealing and Maintenance Essentials
Concrete demands care but rewards with unparalleled character. Follow this 14-month cycle:
- Monthly: Clean with pH-neutral soap
- Quarterly: Apply beeswax conditioner
- Annual: Inspect for hairline cracks
- 14 months: Full resealing (Source 1)
Four concrete mixes perform differently:
| Mix Type | Cure Time | Stain Resistance | Best Use |
|---|---|---|---|
| GFRC | 7 days | High | Thin profiles |
| Traditional | 28 days | Medium | Structural |
| Ultra-High | 10 days | Very High | Commercial |
| Recycled | 21 days | Low | Decorative |
Pairing With Warm Elements
Balance concrete’s cool feel with these design touches:
- Walnut shelves within reach
- Brass fixtures (Source 2)
- Integrated wood cutting boards
- Woven pendant lights
Stain resistance varies dramatically:
| Substance | Exposure Time | Removal Difficulty |
|---|---|---|
| Red Wine | 2 hours | Moderate |
| Olive Oil | 24 hours | High |
| Coffee | 30 minutes | Easy |
Case Study: A lakeside rental’s concrete tops survived 5 years of guests when treated with penetrating sealer. The secret? Annual maintenance and avoiding citrus cleaners.
Cost Analysis:
- DIY: $35/sq ft (forms, mix, tools)
- Professional: $140/sq ft (finished install)
- Hybrid: $75/sq ft (self-pour, pro finish)
For bold homeowners, embedding recycled glass creates shimmering depth. Use 1/4″ aggregates and pour in layers for stability.
Bringing Your Rustic Kitchen Vision to Life
Every great space starts with a clear plan and the courage to begin. With 92% success rates for 3D visualization tools, mapping your design ensures every detail aligns with how you feel in the room.
Expect about 14 weeks from sketch to finished rustic kitchen. Break it into phases: demo, install, and styling. Tackle one step at a time.
Share your progress photos—your journey inspires others. Remember, the best rooms evolve with love, not perfection.