Table of Contents
ToggleI still remember the night I needed a quick, cozy fix after a long day. I wanted something warm, sticky, and simple that felt like a hug. That memory led me to this rich peanut-chocolate treat I make when life gets busy.
This one-bowl recipe shines because it keeps cleanup tiny. I mix the batter in a single bowl, spread it into a greased 9×13 pan, and slide it into a 350°F oven. Prep takes about 10–15 minutes and the bake is roughly 30–40 minutes, so you get warm slices fast.
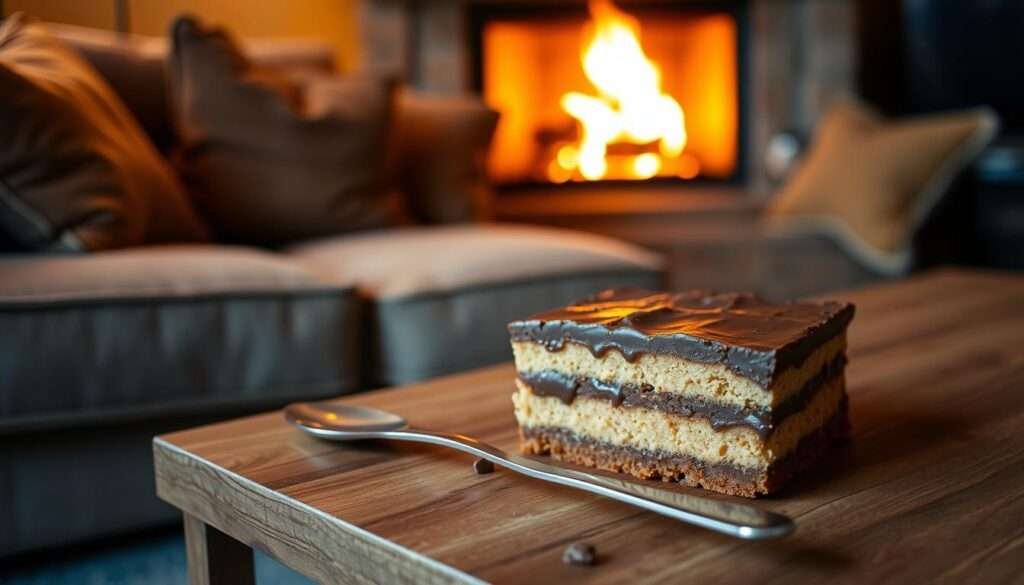
Every bite hides melty pockets of mini peanut butter cups and glossy chocolate chips that turn the top into a gooey layer. The method is forgiving, and I use it for weeknight desserts or last-minute guests.
Stick around for pro tips, easy variations, and storage ideas so you can make this your go-to dessert without fuss.
Intro: A Warm, Gooey Chocolate-Peanut Butter Hug in One Bowl
I crave a quick, melty treat when the evening calls for comfort. I pull together a single-dish batter that fills the house with warm chocolate and roasted peanut butter aromas.
The result is a gooey slice with a fudgy crumb and a ribbon of creamy spread through the middle. Mini peanut butter cups on top melt into little pockets you’ll chase in every bite.
I love that this dump cake keeps dishes to a minimum. Prep takes minutes, the oven does the rest, and you get a cozy dessert that tastes like nostalgia in under an hour.
- Warm, gooey texture with rich chocolate notes.
- One-bowl ease so the sink stays clean.
- Balanced flavor — fudgy base with a creamy ribbon and melty pockets on top.
If you want a vegan spin or a smoothie-style riff, try this vegan peanut butter chocolate smoothie bowl for a similar pairing in a lighter form.
Why You’ll Love It
There are evenings when an easy, crowd-friendly treat saves the day. This one blends rich peanut butter flavor with molten chocolate and a tender cake top.
Benefits at a Glance
- I keep it easy: one-bowl prep and pantry staples mean anyone can follow this recipe.
- I keep it quick: minimal hands-on work, then a 30–40 minute bake fills the house with aroma.
- I keep cleanup minimal: a single mixing dish and one pan frees up the rest of the evening.
- I keep it crowd-ready: fudgy slices studded with peanut butter cup pieces vanish at potlucks.
- I keep it flexible: swap chips, add salt, or tweak the cake mix for your ideal flavor.
| Benefit | Why it matters | Quick note |
|---|---|---|
| Easy prep | Saves stress before guests arrive | One bowl, few steps |
| Fast bake | Ready in under an hour | 30–40 minute bake |
| Crowd-pleasing | Great for potlucks and movie nights | Forgiving recipe |
Ingredients with Exact Measurements
Clear measurements stop guesswork and get this treat in the oven fast. Below I list every ingredient with precise amounts so you can scan and shop quickly.
Cake Base
- 1 box chocolate cake mix (standard 15.25 oz)
- 1/2 cup melted butter
- 1 1/2 cups milk (whole milk or dairy alternative)
Peanut Butter Layer
- 1 cup creamy peanut butter, room temperature for easy spreading
Toppings
- 1 cup mini peanut butter cups, roughly chopped for pockets of flavor
- 1/2 cup chocolate chips for an extra glossy top
- Tip: scale toppings up to taste, but the amounts above keep balance
| Component | Amount | Note |
|---|---|---|
| Cake base | Box chocolate cake mix, 1/2 cup butter, 1 1/2 cups milk | Use a 15.25 oz boxed mix for consistent texture |
| Spread | 1 cup creamy peanut butter | Room-temp spreads more evenly while baking |
| Toppings | 1 cup mini peanut butter cups, 1/2 cup chocolate chips | Chocolate chips add shine; chop cups for melty pockets |
Instructions: Simple, One-Bowl, Step-by-Step
Start by setting your oven to a steady 350°F so the dish heats evenly. Gather the pan, a large mixing bowl, and your measured ingredients before you begin.
Prep and Pan Setup at 350°F
- I preheat oven 350°F and grease a 9×13-inch baking dish for easy release.
- I spread 1 cup peanut butter evenly across the bottom so it bakes into a luscious layer.
Mix, Layer, and Bake
- I combine chocolate cake mix, 1/2 cup melted butter, and 1 1/2 cups milk in one bowl until smooth.
- I pour the batter over the spread and smooth the top to level.
- I sprinkle mini peanut butter cups and chocolate chips across the surface for melty pockets.
- I bake for 35-40 minutes, checking near the end so it doesn’t overbake; cool briefly before slicing to set the layers.

| Step | Purpose | Quick Tip |
|---|---|---|
| Preheat & grease | Even bake, easy release | Use room-temp pan for steady heat |
| Spread filling | Creates creamy middle | Smooth with an offset spatula |
| Pour batter | Forms the top cake layer | Tap pan to remove air pockets |
| Bake & cool | Set layers and meld flavors | Check at 35 minutes, then judge doneness |
Bake Time, Doneness Cues, and Cooling
When the oven hums and the house smells like chocolate, I know the finish line is near. My usual bake window lands between 30 and 40 minutes, but I start checking a few minutes early to avoid overbaking.
The Toothpick Test and Edge Pull-Away
I watch the edges for a gentle pull-away from the pan. That is my first reliable sign the cake is close to done.
- I set expectations: most bakes finish between 35 and 40 minutes in a standard oven.
- I use a toothpick in the center; it either comes clean or has a few moist crumbs—both are acceptable.
- I check the top; it should look set with a light sheen and no wet spots.
- I let the pan rest 10–15 minutes so slices cut cleanly while staying warm and fudgy.
| Check | What to look for | Why it matters |
|---|---|---|
| Edge pull-away | Edges slightly pull from pan sides | Shows structure is set and not underbaked |
| Toothpick | Comes clean or with moist crumbs | Confirms center is baked without drying out |
| Top appearance | Set surface, faint sheen, no wet spots | Indicates even baking and melted chocolate pockets are stable |
| Resting | Cool 10–15 minutes before slicing | Helps layers firm for neat portions |
Pro Tips to Nail Texture and Flavor
Nailing the right texture comes down to a few small choices that change everything. I focus on balance so each slice stays tender and rich.
I use creamy peanut for even spreading. Room-temperature spread glides across the pan and bakes into a consistent layer that keeps crumbs soft.
I avoid overmixing the batter. Stir just until combined so the cake stays light instead of dense. If the spread feels stiff, I warm it briefly so it spreads easily.

- I pick quality chocolate chips so they melt into glossy pockets without seizing.
- I level the top so it bakes evenly; tap the pan to remove air bubbles before it goes in.
- If your oven has hot spots, I rotate the pan once mid-bake for a uniform rise.
- For a fudgier swirl, try adding a spoonful of instant pudding mix or a thin fudge ribbon before baking.
- Pull the pan when the center is just set for a gooey, chocolate peanut butter finish.
| Tip | Why it helps | Quick action |
|---|---|---|
| Use creamy spread | Even melt and texture | Warm slightly if needed |
| Avoid overmixing | Prevents dense crumb | Fold until just combined |
| Quality chips | Glossy pockets, better flavor | Choose high-cocoa chips |
| Mid-bake rotate | Uniform color and rise | Turn at 20 minutes |
Easy Variations and Mix‑Ins
A few small swaps and add-ins take this pan from basic to show-stopping. I keep the core method but change the mix, chips, or toppings to suit the mood and ingredients on hand.
Flavor swaps with cake mix and chips
I often swap the chocolate box cake for yellow or devil’s food cake mix to adjust sweetness and depth. For a denser, fudgier result I stir in a packet of instant chocolate pudding mix before baking.
- I change chips depending on the mood: semi-sweet, milk, white, or peanut butter chips each add a different note.
- I fold chopped butter cups or peanut butter cups into the batter so candy is in every slice.
- For a chocolate peanut boost, sprinkle extra chocolate chips across the top before baking.
Toppings and texture boosters
A crunchy or creamy finish turns slices into a memorable treat. I scatter crushed pretzels for salt, or I swirl extra spread across the batter for bold ribbons.
- Serve warm with ice cream, a drizzle of caramel or chocolate syrup, or whipped cream.
- Dust powdered sugar for a quick, pretty top after cooling.
- Try crushed pretzels before baking for salt crunch, or fold in nuts for chew.
| Swap | Effect | When I use it |
|---|---|---|
| Yellow or devil’s food cake mix | Tunes sweetness and cocoa depth | When I want lighter or richer flavor |
| Instant chocolate pudding mix | More fudgy, moist crumb | For an ultra-rich, indulgent slice |
| Crushed pretzels or nuts | Salty crunch and texture contrast | When I want balance to sweet toppings |
Utensils and Tools I Use
I always gather my essentials first so the bake flows without scrambling. Laying out tools saves seconds and keeps the bench tidy.
Below I list each item and exactly how I use it so you can stage your workspace. I keep nonstick spray or butter nearby to grease the pan well.

Tool list and how I use each one
| Tool | How I use it | Quick tip | Why it matters |
|---|---|---|---|
| Mixing bowl | Combine dry mix and wet ingredients, whisk until smooth | Use a large, deep bowl to cut splatter | Fewer spills make clean-up faster |
| Balloon whisk | Smooth batter and break lumps | Whisk gently to avoid overmixing | Light texture keeps the top tender |
| 9×13-inch baking dish | Holds the layered batter and fillings for baking and serving | Choose a scalloped-edge oven-to-table dish for looks | Even heat and presentation in one dish |
| Measuring cups & spoons | Portion milk, spread, and mix-ins accurately | Level dry ingredients for consistent hydration | Consistent results every bake |
| Flexible spatula | Spread the filling and smooth the batter surface | Use a silicone spatula for scraping the bowl clean | Gives even layers and neat slices |
My go‑to dish and bowl picks
I prefer a sturdy scalloped-edge 9×13 ceramic that moves from the oven to the table. It heats evenly and looks presentable.
For the bowl, I pick a large stainless steel or glass mixing bowl. It keeps splatter down and gives room to whisk without mess.
Make‑Ahead, Storage, and Reheating
Leftovers are my secret for fast, warm servings on busy weeknights. I store slices to keep flavor and texture ready when I want a quick dessert.
Room Temperature Stash
I keep the cake airtight at room temperature for 2–3 days to retain moisture. This works well if you plan to eat within a short time and want soft, gooey slices.
Refrigerator and Freezer Tips
If I need to stretch servings, I refrigerate portions up to 5 days. For make-ahead desserts, I wrap individual pieces tightly and freeze them for up to 2–3 months.
When freezing, I wrap in plastic and then foil to prevent freezer burn. Thaw in the fridge or at room temperature before reheating.
Quick Reheat: Oven and Microwave
To revive a warmed top, I reheat slices in the oven at oven 350 for 10–15 minutes. That brings back the goo without drying the center.
For one serving, I microwave a piece 30–45 seconds. I sometimes add a teaspoon of water to keep steam and softness.
| Storage Method | Duration | Best Use |
|---|---|---|
| Room temperature, airtight | 2–3 days | Quick snacks, keep soft and moist |
| Refrigerator | Up to 5 days | Stretch servings over the week |
| Freezer, wrapped | 2–3 months | Make-ahead portions for busy days |
| Reheat — oven 350 | 10–15 minutes | Restores gooey top, best for multiple pieces |
| Reheat — microwave | 30–45 seconds | Fast, single-serve warm treat |
How I Serve It: From Movie Night to Potlucks
For casual gatherings, I choose recipes that travel well and taste even better warm. I keep presentation simple so guests can help themselves and the pan does the serving work.
A La Mode Ideas
I serve warm squares with vanilla ice cream for a hot–cold contrast that everyone loves. A scoop of chocolate or peanut butter ice cream doubles down on the chocolate and peanut butter profile for richer bites.
Finishing Touches and Garnishes
- I drizzle chocolate or caramel sauce across the top for shine and extra sweetness.
- I add whipped cream clouds and a sprinkle of chopped peanuts or pecans for crunch.
- I slice bananas or scatter fresh berries to cut the richness with bright, fresh flavor.
- I plate for potlucks right in the pan — easy to transport and serve to a crowd.
- I finish with a tiny pinch of flaky salt to sharpen the chocolate notes and lift the overall taste.
| Serve | Why it works | Quick tip |
|---|---|---|
| Vanilla ice cream | Hot-cold contrast | Place scoop on warm slice |
| Drizzle sauce | Extra shine and sweetness | Use warmed sauce for smooth pour |
| Fresh fruit | Balances richness | Bananas or berries add acidity |
Nutrition Facts: Per Serving Snapshot
A quick nutrition snapshot helps you plan portions before you cut a slice. I share an estimated per-serving view so you can judge portions and menu balance.
Calories, Macros, and Sodium at a Glance
Below is my estimate for one serving (about 1/12 of the pan). Numbers vary with ingredients and brands, but this gives practical guidance.
- Calories generally land between 320 and 370 per slice depending on brands used.
- Protein is modest — roughly 6 g thanks to milk and peanut butter in the mix.
- Total fat averages near 17 g, including a mix of saturated and unsaturated fats.
- Carbohydrates range from about 38 to 53 g based on cake mix and added chips.
- Sodium varies widely by boxed cake mix and toppings — expect roughly 200–385 mg per serving.
- Exact totals change with portion size and the specific ingredients you choose.
| Nutrient | Estimated per serving | Notes |
|---|---|---|
| Calories | 320–370 kcal | Depends on brand of cake mix and amount of chocolate |
| Protein | ~6 g | Milk and peanut butter provide most protein |
| Total Fat | ~17 g | Includes butter and spread; varies by product |
| Carbohydrates | 38–53 g | From cake base, sugar, and chips |
| Sodium | 200–385 mg | Boxed mixes differ most in sodium content |
Troubleshooting Common Slip‑Ups
When a bake goes sideways, quick fixes save both flavor and mood.
I prevent sticking by greasing the pan well, focusing on edges and corners. A solid spray or a thin pad of butter does the trick.
I keep the texture tender by mixing just until combined. Heavy beating tightens gluten and makes the cake dense.
I test early with the toothpick method. If it doesn’t come clean after the first check, I add a couple more minutes and retest.
If the top browns unevenly, I rotate the dish halfway through baking to even out hot spots in the oven.
- I let the pan cool 10–15 minutes before slicing so pieces hold together and layers set.
- I double-check dates on the cake mix and chips; stale ingredients lower rise and dull chocolate flavor.
- I smooth the batter evenly in the pan to avoid underbaked pockets in the center.
| Problem | Likely cause | Quick fix (minutes) | Preventive step |
|---|---|---|---|
| Sticking to pan | Insufficient grease | 0–1 | Grease corners well; use nonstick spray |
| Dense texture | Overmixing batter | 0 | Stir gently until just combined |
| Underdone center | Uneven spread or early removal | 2–5 | Smooth batter; use toothpick test |
| Uneven browning | Oven hot spots | 0 | Rotate pan midway through baking |
1 Bowl Peanut Butter Cup Dump Cake Delight Devours Time
If you want indulgence without fuss, this quick method gets warm slices on the table fast. I mix everything in one bowl, grease a 9×13 pan, and the oven at 350°F does the rest.
The candy-studded top melts into pockets of glossy chocolate and soft spread. Tiny peanut butter cup pieces make each bite a surprise. The center sets while the edges stay gooey for the perfect contrast.
This dump cake is my go-to for parties, last-minute guests, and weeknight cravings. It bakes reliably at 350°F and needs only minutes of prep. Swap chips, add a ribbon of caramel, or scatter nuts for quick tweaks.
Bring it to potlucks and it disappears fast. I call it my most requested bring-along dessert because it travels well and tastes like more effort than it takes.
| Feature | Prep | Bake | Best use |
|---|---|---|---|
| Speed | Minutes | 35–40 minutes at 350°F | Weeknights, potlucks |
| Texture | Layered | Set center, gooey edges | Warm slices with ice cream |
| Flexibility | Easy swaps | Stable results | Custom toppings and mix-ins |
Ready to Bake? Join Me and Share Your Slice
Grab your pan and let’s turn pantry staples into an easy, crowd-pleasing slice. Preheat the oven, gather the ingredients and the boxed mix, and have a bowl ready so you can start baking in minutes.
When you bake this recipe, snap a photo of your first warm slice and share how you served the dessert. Tag any ice cream pairings or creative toppings you tried — I love seeing extra chocolate swirls, salty pretzels, or an extra peanut butter ribbon.
Leftovers store well in an airtight dish, so make extra for the next get-together. Tell me which variation you’ll try next and leave a comment or share on social so I can see how your pan turned out. Thanks for baking with me — I can’t wait to hear about your flavor wins!