
Table of Contents
ToggleLast year, I stood in my kitchen on a snowy afternoon. I wanted a treat that looked fancy but remained simple to prepare. I decided to incorporate the signature crimson color of a red velvet cake into a batch of brownies.
The first bite provided a revelation of rich chocolate and tangy buttermilk. These fudgy brownies offer a superior experience compared to a standard boxed mix. This treat captures a velvet texture while remaining very chewy and soft.
I enjoy making this brownie recipe for Valentine’s Day or casual weekend baking. This guide covers every step to ensure your red velvet brownies come out perfectly. I will explain the necessary tools and the resting method for the best flavor.
The velvet crumb feels more indulgent than a traditional cake. I love how the velvet color looks when paired with white cream cheese frosting. These brownies are my favorite way to impress my guests, and this brownie style is a true crowd-pleaser. These brownies never last long in my house, especially when I bake brownies for parties.
What Makes Red Velvet Brownies Special
I believe there is something truly distinctive about how red velvet brownies combine cake-like flavors with a dense, chewy bite. While I enjoy many desserts, these treats occupy a unique space between a standard snack and red velvet cake. I appreciate how the subtle cocoa flavor distinguishes these from intensely chocolatey brownies.
I’ve discovered that the secret to their unique flavor lies in the chemistry between buttermilk and a touch of vinegar. These components provide a signature tang that separates a fudgy red velvet treat from a standard cocoa-based bar. The vibrant red color also provides an immediate visual impact that makes them perfect for any celebration.

To me, the experience isn’t complete without the addition of cream cheese to the recipe. Whether it is a thick layer of frosting or a decorative swirl, this element adds a necessary richness to the bar. I think the balance between tangy notes and sweet cream cheese creates a complex texture that keeps people coming back for more.
| Feature | Traditional Red Velvet Cake | Fudgy Velvet Brownies |
|---|---|---|
| Crumb Texture | Light, airy, and fluffy | Dense, moist, and chewy |
| Chocolate Profile | Very mild cocoa notes | Subtle but rich cocoa depth |
| Tanginess Source | Buttermilk and vinegar | Buttermilk and vinegar |
| Serving Style | Slices with frosting layers | Handheld bars or squares |
Why You'll Love This Red Velvet Brownie Recipe
I truly believe this red velvet brownie recipe stands out as a must-have for anyone who appreciates a decadent dessert. It combines the rich flavor of cocoa with the irresistible fudginess of traditional red velvet treats.
Perfect Blend of Cake and Brownie Textures
I designed this recipe to offer a unique texture that satisfies every craving. It features a dense, moist interior that mimics fudge while retaining the light crumb of a classic cake.
Stunning Visual Appeal for Any Occasion
The striking contrast of the deep red velvet color against creamy frosting makes these brownies look professional. Whether for a holiday or a party, this velvet treat always catches the eye. I love serving brownies that look as good as they taste.

- Striking crimson hue that looks beautiful on any dessert platter.
- Perfect balance of moist centers and slightly crisp edges.
- Versatile enough for both casual snacks and formal celebrations.
Simple Ingredients You Probably Already Have
You do not need a special trip to the store for these ingredients. This velvet brownie recipe uses pantry staples like butter and eggs for a reliable red velvet base. I am confident these brownies will become your new favorite velvet and brownie indulgence.
Essential Tools and Preparation
Before we dive into the mixing, I always emphasize gathering the right equipment to ensure a stress-free experience. I find that starting a baking project with a clean and organized workspace helps me focus on the quality of the dessert. Having everything ready from start to finish ensures your process remains smooth and enjoyable.
Baking Tools You'll Need

Selecting the best baking pans for brownies is the most important step for achieving even heat distribution. I typically recommend a standard 9×9-inch square pan, but you can also use an 11×7-inch rectangular option if needed. High-quality metal pans provide the best results for that signature fudgy center and crisp edges.
Importance of Each Tool and Usage
| Tool | Importance | Specific Usage |
|---|---|---|
| 9×9-inch Pan | Provides the perfect height and thickness for brownies. | Grease and line the pan with parchment paper for easy lifting. |
| Large Bowl | Allows enough space to combine wet and dry ingredients. | Use this to whisk the sugar, eggs, and melted fats together. |
| Whisk and Spatula | The whisk adds air, while the spatula folds gently. | Whisk wet ingredients and use the spatula to fold in flour. |
| Hand Mixer | Essential for creating a smooth cream cheese frosting. | Beat the cream cheese until it is light, fluffy, and lump-free. |
| Wire Rack | Prevents the bottom from becoming soggy while cooling. | Transfer the pan to the rack immediately after taking it out. |
Preparing Your Ingredients for Best Results
I insist on proper preparation of your ingredients to ensure a smooth batter. I always set my eggs out 30 minutes before the baking time to reach room temperature. This simple step helps the eggs emulsify better with the fats, creating a much more uniform texture.
I also melt the butter and let it cool slightly in the room. This cooling period is vital because it prevents the heat from cooking the eggs prematurely when they meet in the bowl. I prepare my pan by lining it with parchment paper to ensure clean, professional-looking cuts every time.
I preheat my oven to 350°F about 10 minutes before I am ready to begin. This ensures that the oven maintains a consistent temperature throughout the entire process. Finally, I soften the cream cheese for an hour so it is ready for the topping.
Red Velvet Brownies: Fudgy Dessert Bars with Classic Cake Flavor Ingredients
Creating the perfect batch of Red Velvet Brownies: Fudgy Dessert Bars with Classic Cake Flavor starts with organizing your pantry and fridge. I find that having everything measured out before I start helps me stay focused on the bake. These specific ingredients ensure you get that iconic red velvet look and a rich, chocolate taste in every bite.
I have organized the main components for the from-scratch version and the topping below. This list covers everything from the dense brownie base to the tangy cream cheese layer. Using fresh items at the right temperature will help your batter mix smoothly without any lumps.
Exact Ingredients and Measurements
I recommend following these measurements strictly to maintain the balance between a dense brownie and a light cake. Whether you want a deep cocoa flavor or a sweet finish, these proportions work every time. Note that both the butter and cream cheese should be soft enough to blend easily.
| Component Type | Brownie Base (From Scratch) | Cream Cheese Frosting |
|---|---|---|
| Fats & Dairy | 1/2 cup unsalted butter | 8 oz cream cheese |
| Sweeteners | 3/4 cup plus 2 tbsp sugar | 2.5 cups confectioners’ sugar |
| Dry Ingredients | 2/3 cup flour and 3 tbsp cocoa | 1/8 tsp salt |
| Liquids & Flavor | 2 large eggs and vanilla extract | 1/3 cup softened butter |
| Color & Acid | 2 tsp red food coloring | 1 tbsp vanilla extract |
Understanding Key Ingredients
Every item on this list serves a vital purpose in the final texture of your dessert. I pay close attention to how the dairy and acids interact to create that signature velvet crumb. Knowing why we use these specific ingredients will make you a much more confident baker.
Why Buttermilk Matters
I include buttermilk or a touch of vinegar because the acidity is essential for authentic flavor. This acid reacts with the cocoa powder to keep the brownies moist and tender. While regular milk works for some recipes, it won’t give you that specific tangy finish that defines a red velvet treat.
Choosing the Right Food Coloring
I suggest using gel food coloring instead of the liquid kind you find in most grocery stores. Gel is much more concentrated, so you only need a small amount to reach a vibrant crimson shade. It won’t add extra moisture to your batter, which helps keep the brownies dense and chocolatey rather than runny.
I always make sure my eggs and cream cheese are at room temperature before I begin. If the temperature is too cold, the fats will clump up and ruin the smooth finish of your frosting. Taking these small steps with your ingredients makes a massive difference in the quality of your velvet cake bars.
How to Make Red Velvet Brownies: Step-By-Step Instructions
To get that perfect texture, I follow a specific process that ensures every bite is rich and flavorful. Following this brownie recipe will help you achieve that signature fudgy red look that everyone loves. I will show you how to make brownies that stay moist for several days.
Step 1: Whisk Together the Wet Ingredients
I start by taking a large bowl to prepare my batter base. First, I whisk together the melted butter, room temperature eggs, and buttermilk. I make sure to whisk the eggs well to create a smooth emulsion.
I use a large egg for moisture, and each egg must be fresh for the best rise. I also stir in the vanilla extract to provide a deep, aromatic flavor. Once these are smooth, I whisk together the melted chocolate until the mixture is creamy and dark.
Step 2: Incorporate the Dry Ingredients
Next, I add red velvet cake mix or flour to the wet ingredients. I use a silicone spatula to stir the batter gently until it is just combined. I avoid overmixing to make sure the velvet brownie stays tender and soft.
It is important to treat this batter carefully so you do not develop too much gluten. I add the flour slowly to avoid any dry lumps in the final bars. This step ensures a tight, fudgy crumb rather than a cakey one.
Step 3: Rest the Batter (The Secret to Fudgy Texture)
I spread the thick batter into my parchment-lined 9×9-inch pan using an offset spatula. My secret to make brownies extra rich is to let the batter rest in the fridge before baking. I cover the batter and refrigerate it for at least one hour.

This resting period allows the flavors to develop and results in a more decadent velvet texture. If I have time, I let it sit for up to 72 hours. This process helps the starches hydrate fully for a better mouthfeel.
Step 4: Bake the Brownies to Perfection
I preheat my oven to 350°F about ten minutes before I am ready to bake. I slide the pan inside and close the oven door quickly to keep the heat consistent. I bake the red velvet brownies for 20-25 minutes until the edges are set.
The batter in the center should have a slight jiggle for a perfect, moist brownie. I let the brownies cool in the pan for several minutes before moving them to a wire rack. Cooling is vital so they don’t fall apart when you frost them.
| Stage | Duration | Key Action |
|---|---|---|
| Mixing Base | 5 Minutes | Whisk wet ingredients until smooth |
| Resting | 1-72 Hours | Chill for a denser, fudgy texture |
| Baking | 20-25 Minutes | Bake until the edges are firm |
| Final Cooling | 60 Minutes | Cool completely before adding frosting |
Step 5: Prepare the Cream Cheese Frosting
While the velvet base cools, I prepare the tangy cream cheese layer. I beat the cream cheese in a bowl for a few minutes until it is smooth and lump-free. Then, I add butter and sugar and beat for another minute.
I gradually add more sugar along with the vanilla and the extract until the frosting is light. I make sure the cream cheese is at room temperature to avoid a grainy texture. This frosting balances the richness of the chocolate base perfectly.
Step 6: Frost, Cut, and Serve
Finally, I lift the cooled brownies from the pan and spread the cream on top. I use a sharp knife to cut the brownie into neat squares. These treats are much easier to prepare than a peanut butter cup dump cake.
If you have leftover batter, you can bake it in a separate small dish for a quick snack. Using high-quality sugar and cream ensures a bakery-style finish for every velvet square. I love the way the vanilla and the extract smell as I finish the brownies for my family.
Storage and Reheating Instructions
After baking a batch of these vibrant treats, I always focus on maintaining their moisture through correct storage techniques. Proper storage preserves the quality and fudgy texture of your red velvet brownies for several days. This ensures every bite remains as delicious as the first.
How to Store Unfrosted Red Velvet Brownies
I store unfrosted brownies at room temperature for up to four days. To keep the velvet texture from drying out, I place them in an airtight container. You can also cover the baking pan tightly with plastic wrap to maintain freshness.
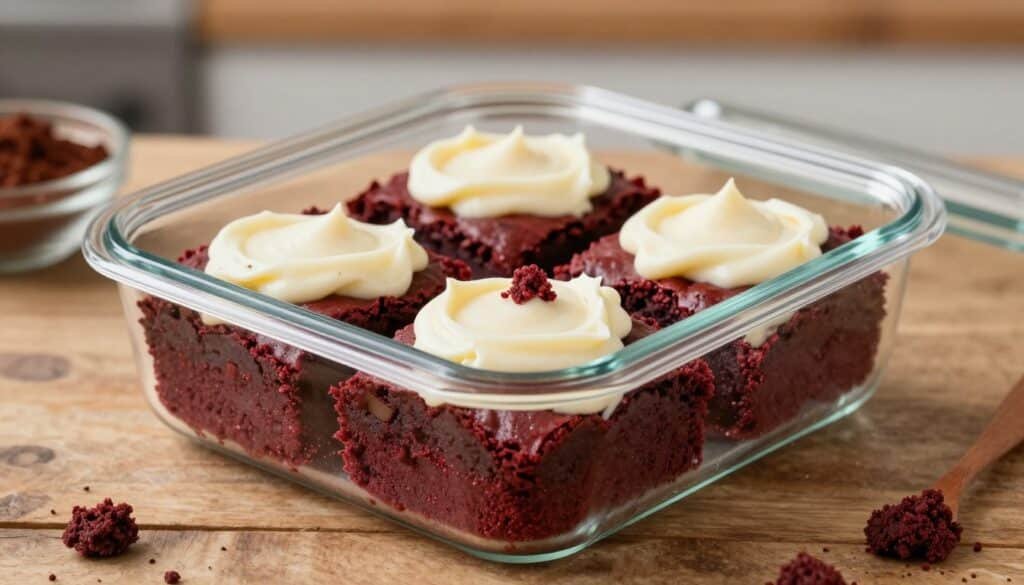
Storing Frosted Brownies Properly
Because the cream cheese frosting contains dairy, I always refrigerate frosted velvet brownies. They stay fresh for four to five days when kept covered. I recommend a single layer or using parchment paper between layers to avoid any mess.
Freezing Red Velvet Brownies for Later
You can freeze these brownies for a longer time. I wrap each square in plastic wrap and then in aluminum foil to prevent freezer burn. These brownies stay delicious for one to two months when stored properly in the freezer.
Best Practices for Thawing and Serving
I thaw frosted velvet brownies in the refrigerator overnight to protect the cream cheese. Unfrosted ones take about an hour on the counter. I find the red velvet brownies taste best at room temperature, so I let them sit out for a short time before serving.
The soft velvet crumb and chewy brownies edges stay perfect when handled with care. This method helps you prepare your desserts well in advance for any special event.
| Storage Method | Recommended Location | Max Duration |
|---|---|---|
| Unfrosted Brownies | Airtight Container / Room Temp | 4 Days |
| Frosted Brownies | Refrigerator (Covered) | 5 Days |
| Frozen Brownies | Freezer (Double Wrapped) | 2 Months |
Recipe Variations and Expert Baking Tips
Whether you prefer your dessert to be ultra-fudgy or light and airy, these professional tips will help you master the perfect red velvet brownie. I enjoy tweaking the basics to create something new every time I step into my kitchen. Exploring variations of this versatile brownie recipe allows me to customize the treat for any event.

Creative Frosting and Topping Ideas
Beyond the classic tangy cream cheese, I often use a rich white chocolate ganache or a simple vanilla buttercream. To make a beautiful pattern, I dollop cream mixture over the brownie batter and swirl it with a knife. Sometimes, I just add a light dusting of confectioners’ sugar on top for a signature red velvet look. You can also drizzle melted white chocolate over the finished bars.
Achieving Your Preferred Texture: Fudgy or Cakey
To get those ultra fudgy brownies, I let the batter rest in the fridge for at least one hour. This step helps the flour and sugar fully hydrate, ensuring the desired texture is dense and decadent. If you want a more cake-like presentation, simply skip the rest or add one extra egg. Adjusting the amount of butter and cocoa can also shift the velvet texture of your squares of fudgy red velvet.
Adapting the Recipe to Different Pan Sizes
I have successfully used an 11×7-inch pan or a 10-inch round cake pan for this velvet brownie recipe. When making velvet brownies in a larger pan, you might need to adjust the time by a few minutes.
- 11×7-inch pan: Creates thinner, chewy bars ideal for large gatherings.
- 10-inch round pan: Perfect for a unique cake-style presentation.
- Standard 8×8-inch pan: Use this for thick, bakery-style squares.
Always use a pinch of salt on the buttered pan to prevent sticking and improve the chocolate flavor.
Delicious Mix-Ins and Flavor Additions
I love adding white chocolate chips or toasted pecans into my red velvet creations for extra crunch. Always use gel food coloring to add red hues because it provides a vibrant color without thinning the batter. A half teaspoon of vinegar can also enhance the authentic red velvet flavor when it reacts with the natural cocoa. Be careful with adjusting salt and vanilla extract levels, as they greatly impact the final flavor balance in my brownies.
Final Thoughts and Similar Recipes to Try from Cuisines-Corse.com
The unique blend of chocolate flavor and fudgy texture makes this red velvet recipe a standout choice. I believe these red velvet brownies offer the perfect marriage of visual appeal and deep cocoa richness. This recipe combines the iconic look of a red velvet cake with a fudgy texture everyone loves.
By using quality cocoa, a dash of vanilla extract, and a pinch of salt, you create a treat that shines. These brownies take very few minutes to prepare but leave a lasting impression every single time. If you want to make brownies often, explore more delicious options on Cuisines-Corse.com.
My velvet brownie guide is just the beginning of your baking journey. Try our classic chocolate brownies or cream cheese swirl brownies for more variety. For a different velvet style, our pink velvet blondies look great on top of any dessert platter.
Try the red velvet cake or another brownie recipe from our extensive collection. I value your feedback on these red velvet brownies and love seeing your creative kitchen results. Please share your success with friends and family!
| Similar Recipe | Key Highlight | Website Link |
|---|---|---|
| Chocolate Brownies | Classic Fudgy Texture | View Recipe |
| Cream Cheese Brownies | Elegant Tangy Swirl | View Recipe |
| White Chocolate Blondies | Sweet and Buttery | View Recipe |
| Pink Velvet Blondies | Colorful White Chocolate | View Recipe |