Table of Contents
ToggleThere’s something magical about biting into a warm, chewy bagel—especially when it’s homemade. I still remember the first time I tried making them myself. The smell filled my kitchen, and the satisfaction of creating something delicious from scratch was unbeatable.
Now, I’ve found a way to make them even better. These wholesome bagels are loaded with 10g of protein each, yet they only take a few basic ingredients. Cottage cheese, flour, and baking powder come together for a nutritious twist on a classic favorite.
What makes this recipe special? It’s quick, healthy, and perfect for busy mornings. The air fryer gives them a golden crust in just 15 minutes. Plus, you can customize them with your favorite toppings or gluten-free flour.
Whether you need a post-workout snack or a grab-and-go breakfast, these bagels deliver flavor and fuel. Let me show you how easy it is to make them!
Why You'll Love These Protein Bagels
These bagels are a game-changer for busy mornings and fitness goals. They pack 10g of protein each, thanks to cottage cheese—a swap that keeps them fluffy without yeast or kneading. I’ve tested them for weeks, and even my picky kids devour them.

High-Protein Breakfast Option
Traditional bagels often leave you hungry by mid-morning. These? They’re satisfying and nutrient-dense. Here’s why they stand out:
- 10g protein per serving—double most store-bought options.
- Cottage cheese adds creaminess without overpowering flavor.
- Gluten-free? Swap flour for Cup4Cup blend seamlessly.
Incredibly Easy to Make
No fancy tools or hours of waiting. Mix, shape, and air fry—done in 25 minutes flat. The dough comes together with just a bowl and spoon. I love how forgiving it is; even uneven shapes bake up golden.
Perfect for Meal Prep
Make a batch Sunday, and enjoy all week:
- Fridge: Stays fresh for 5 days in airtight containers.
- Freezer: Freeze individually for up to 3 months.
- Reheat in the toaster or air fryer for that just-baked crunch.
Whether you’re rushing to work or fueling post-workout, these bagels deliver. Try them once, and they’ll become your go-to breakfast recipe.
Simple 3 Ingredient Protein Bagels - The Magic Formula
Cottage cheese isn’t just for dips—it’s the MVP of these golden bagels. During recipe testing, I stumbled on a game-changing combo: its acidity activates baking powder, creating lift without yeast. The result? Fluffy interiors with a protein boost.
Flour binds everything together, while the air fryer’s rapid heat mimics a bakery oven. Unlike traditional methods, the circulating air crisps the crust evenly in half the time. No more soggy bottoms!
Texture-wise, these are lighter than yeast-risen versions but just as satisfying. The cottage cheese keeps them moist, while baking powder ensures a tender bite. For the best rise, use full-fat dairy—it reacts best with the leavener.
Pro Tip: If your dough feels sticky, add flour 1 tbsp at a time. Too dry? A splash of water saves the day. My first batch was a happy accident—now, it’s a weekly staple.
Exact Ingredients You'll Need
Gathering the right ingredients makes all the difference in crafting perfect homemade bagels. Quality and measurements matter—here’s your foolproof checklist.
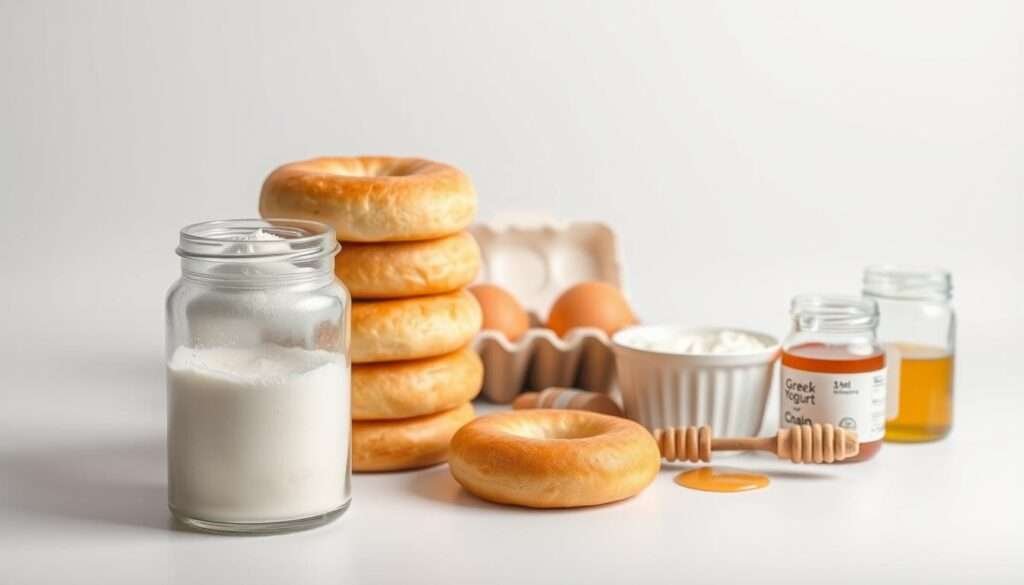
| Category | Ingredient | Measurement | Notes |
|---|---|---|---|
| Dry | All-purpose flour | 1 cup | Leveled with a knife |
| Baking powder | 2 tsp | Aluminum-free for best rise | |
| Salt | Pinch | Enhances flavor | |
| Wet | Cottage cheese | 1 cup + 2 tbsp | Good Culture 4% recommended |
| Egg (for wash) | 1 | Whisked with 1 tbsp water | |
| Toppings | Everything seasoning, sesame seeds, asiago | To taste | Press gently into dough |
Dry Ingredients
Flour forms the base—use spoon-and-level method for accuracy. Baking powder ensures a light texture. A pinch of salt balances sweetness.
Wet Ingredients
Full-fat cottage cheese adds moisture and protein. For dairy-free versions, try Kite Hill almond milk ricotta. The egg wash gives a glossy finish.
Optional Toppings
Everything seasoning is my go-to, but sesame seeds or grated cheese work too. Apply toppings right after brushing with egg wash for maximum stickiness.
Step-By-Step Cooking Instructions
Mastering homemade bagels is easier than you think—here’s how to nail every step. I’ve refined this process through dozens of batches, and these tips guarantee golden, chewy results.
Preparing the Dough
Start by combining flour, baking powder, and salt in a bowl. Add cottage cheese and mix with a fork until crumbly. For faster results, a stand mixer works too—just pulse for 30 seconds.
Turn the dough onto a floured surface. Knead for 2 minutes until semi-smooth. If sticky, add flour 1 tbsp at a time. The texture should resemble playdough.

Shaping the Bagels
Divide the dough into 4 equal parts. Roll each into a 6-7″ log, then connect the ends. Pro tip: Use your pinky finger to widen the hole—it prevents shrinking during cooking.
- Brush each with egg wash (1 egg + 1 tbsp water).
- Press toppings gently so they stick.
- Let rest 5 minutes before air frying.
Air Frying to Perfection
Line the air fryer basket with parchment or lightly spray it. Arrange bagels in a single layer, leaving space between them. Cook at 300°F for 15-17 minutes.
Check at 12 minutes—they’re done when deep golden brown. Resist cutting immediately! Cooling for 15 minutes firms up the texture.
Essential Tools and Utensils
Having the right tools transforms bagel-making from messy to effortless. I’ve tested various equipment combinations to identify what delivers consistent results. Whether you’re a beginner or seasoned baker, these recommendations will streamline your process.

Mixing Tools
A sturdy medium-sized bowl is non-negotiable—I prefer the OXO Good Grips 3-quart model. For blending, a rubber spatula prevents sticking better than wooden spoons. If using a stand mixer, the dough hook attachment kneads perfectly in 90 seconds.
Shaping Tools
Bench scrapers create clean dough divisions—the Norpro stainless steel version lasts years. Keep a pastry brush handy for egg washes; silicone bristles clean easier than natural hair. Always flour your surface lightly to prevent sticking without altering dough texture.
Air Fryer Accessories
For Cosori or Ninja models, parchment paper rounds prevent sticking without oil. Silicone tongs flip bagels safely mid-cook. A spray bottle helps adjust dough moisture if needed during shaping.
| Tool Type | Must-Haves | Budget Alternatives | Cleaning Tip |
|---|---|---|---|
| Mixing | Digital scale (Escali Primo) | Measuring cups | Soak bowls immediately to prevent cottage cheese residue |
| Shaping | Dough scraper | Mason jar lid for shaping rings | Use cold water for egg wash cleanup |
| Air Frying | Air fryer basket liners | Aluminum foil (pierced) | Wipe basket while warm for easy cleaning |
No specialty tools? A fork mimics a dough hook’s action surprisingly well. The key is patience—let the dough rest between mixing stages for easier handling. With these essentials, you’ll achieve bakery-quality results every time.
Delicious Variations to Try
Transform your morning routine with these irresistible bagel twists. Each version adds a burst of flavor while keeping prep effortless. Whether you crave savory or sweet, these adaptations turn basics into gourmet.

Everything Bagel Seasoning
This iconic blend elevates plain dough with garlic, onion, and poppy seeds. My homemade mix uses 2 tbsp sesame seeds, 1 tbsp each dried garlic and onion, plus 1 tsp salt. Press it into egg-washed dough before air frying.
Sesame Seed Version
Toasting sesame seeds unlocks nutty depth. Heat them in a dry skillet for 2 minutes until golden. Sprinkle generously atop bagels—they adhere best when applied right after egg washing.
Cheese-Topped Option
Asiago melts into a crispy crust, but shredded cheddar works too. For even coverage, grate cheese finely and pat it gently into the dough. Bake at 300°F for 15 minutes until bubbly.
- Sweet twist: Swap toppings for 1 tbsp cinnamon + 2 tbsp raisins.
- Gluten-free: Use almond flour and add 1 tsp xanthan gum.
- Vegan: Brush with almond milk and top with nutritional yeast.
Mix and match these ideas to match your mood. From smoky paprika to zesty lemon zest, the possibilities are endless.
Pro Tips for Perfect Bagels Every Time
Perfecting homemade bagels requires mastering a few key techniques—here’s how to avoid common pitfalls. Whether your dough sticks or your crust burns, these solutions guarantee bakery-quality results.
Dough Consistency Secrets
Dough hydration affects everything. If it’s too sticky, add flour 1 tbsp at a time. Too dry? Sprinkle water and knead gently. The ideal texture resembles Play-Doh—smooth but not tacky.
At high altitudes, reduce baking powder by ¼ tsp to prevent over-rising. For gluten-free versions, almond flour works best with 1 tsp xanthan gum for elasticity.
Air Fryer Temperature Guide
300°F is the ideal heat setting for even cooking. Lower temps yield pale bagels; higher risks burnt tops. For multi-batch cooking, preheat the air fryer 5 minutes between rounds to maintain crispness.
| Issue | Cause | Fix |
|---|---|---|
| Gummy Center | Undercooked or sliced too soon | Cook 2 extra minutes; let cool 15 minutes |
| Burnt Bottom | Direct heat exposure | Use parchment liner; lower rack position |
| Uneven Rise | Inconsistent dough thickness | Roll logs to equal length; seal ends firmly |
Cooling is Crucial
Let them rest for 15 minutes after cooking. This prevents gummy interiors by allowing steam to escape. For reheating, 330°F for 3 minutes restores the fresh-baked crunch.
Store extras layered with parchment paper to avoid sticking. Freeze for up to 3 months—toast straight from frozen for a quick breakfast.
Creative Ways to Serve Your Bagels
Turn your freshly baked bagels into gourmet meals with these creative serving ideas. Whether you’re craving savory or sweet, these twists will make every bite memorable.
Breakfast Sandwich Ideas
Stack eggs, avocado, and sriracha mayo for a hearty breakfast sandwich. The chewy texture holds up perfectly against runny yolks and crisp bacon.
Prefer sweet? Try almond butter with banana slices and chia seeds. A drizzle of honey adds a touch of indulgence.
Snack-Time Suggestions
Smoked salmon and dill cream cheese make a savory snack that feels luxurious. For crunch, air-fry leftover chunks into golden croutons for salads.
Pair with cucumber ribbons or pickled onions for extra freshness. It’s a protein-packed pick-me-up any time of day.
Bagel Pizza Creation
Transform halves into crispy bagel pizza in just 5 minutes at 350°F. Spread marinara, sprinkle mozzarella, and add pepperoni or roasted veggies.
Kids love personal-sized versions—let them customize toppings for fun family dinners. The air fryer delivers a bubbly, golden crust every time.
Storage and Reheating Instructions
Keeping your homemade creations fresh requires smart storage solutions—here’s how to maintain that just-baked quality. Through months of testing, I’ve perfected methods to preserve texture and flavor whether you’re saving them for tomorrow or months ahead.
Refrigerator Storage for Short-Term Freshness
For bagels you’ll eat within 5 days, place them in an airtight container with a folded paper towel. This absorbs excess moisture that causes sogginess. I’ve found this trick keeps the crust crisp while preventing the interior from drying out.
Freezing for Long-Term Enjoyment
To freeze for up to 3 months, first wrap each cooled bagel individually in plastic wrap. Then place them in a freezer bag, squeezing out all air. This double-layer protection prevents freezer burn. Label with the date so you can track freshness.
Reviving Your Bagels Perfectly
For best results, thaw frozen bagels overnight in the refrigerator. Need them faster? The quick-defrost method works too—microwave for 15 seconds, then toast as usual. Either way, always reheat before eating for that fresh-from-the-air-fryer experience.
| Method | Temperature | Time | Best For |
|---|---|---|---|
| Air Fryer | 330°F | 3-5 minutes | Crispy crust restoration |
| Toaster | Medium | 2 cycles | Quick weekday breakfasts |
| Oven | 350°F | 8 minutes | Multiple bagels at once |
For stale bagels, brush lightly with water before reheating. The steam revitalizes the texture remarkably well. Store any extras between parchment paper layers to prevent sticking—this trick saved countless breakfasts in my kitchen!
Nutritional Benefits Breakdown
Nutrition isn’t just numbers—it’s about feeling stronger with every bite. These homemade delights pack 10g of protein and only 170 calories each, making them a smart choice for active lifestyles. Let’s explore what makes them stand out.
Protein Powerhouse
Cottage cheese delivers a protein boost that keeps you full longer. Compared to store-bought options, these have double the protein with half the fat. Here’s how they stack up:
| Metric | Homemade | Store-Bought (Average) |
|---|---|---|
| Protein | 10g | 5g |
| Calories | 170 | 250 |
| Sugar | 1g | 8g |
Calorie-Smart Choice
At 170 calories per serving, they fit seamlessly into balanced diets. The carbs-to-protein ratio (28g carbs, 10g protein) supports energy without spikes. Swap toppings like cream cheese for avocado to cut calories further.
Dietary Adaptations Made Easy
Gluten-free? Use almond flour and xanthan gum for the same chew. Vegan versions thrive with chia eggs and nutritional yeast. For low-carb, reduce flour by half and add psyllium husk.
- Cost savings: Homemade batches cost 60% less than boutique protein-packed bagels.
- Sugar control: Commercial brands often hide 5x more sugar.
- Customization: Tailor ingredients to allergies or preferences effortlessly.
Whether you’re fueling workouts or simplifying meal prep, these adapt to your needs. The numbers tell a story—but the energy you gain writes the next chapter.
Conclusion
What started as a kitchen experiment turned into my go-to breakfast solution. These golden rounds prove that minimal effort yields delicious results—no fancy skills required.
Tag me on Instagram with your creations using #ProteinBagelChallenge! I’d love to see your twists, from cinnamon swirls to spicy jalapeño versions.
Pro tip: Make extras and freeze them. A quick toast in the air fryer revives that fresh-baked crunch anytime.
Hungry for more? Stay tuned for sweet and savory upgrades to this base recipe. Got questions? Drop them below—I’m here to help!