Table of Contents
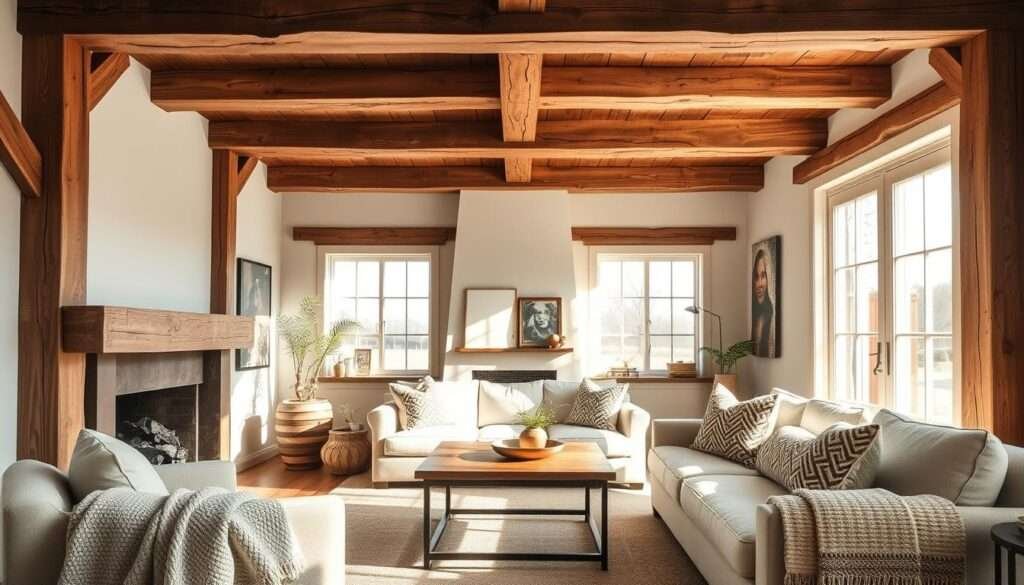
ToggleI still remember the first time a mirror over our fireplace changed the whole mood of my living room. That single act made the space feel brighter, calmer, and somehow more honest. It taught me that small choices on a wall can shift how a home holds memory.
I promise this list will give you fresh, modern-meets-rustic ideas you can copy today. Each idea pairs a clear image prompt with practical tips and a few shoppable picks to speed styling.
The guide moves from mood-setting to hands-on projects: reclaimed wood, textile hangings, grouped ceramics, mirrors, and smart lighting. I also show safe mounting tips and how to honor beams, stone, or shiplap so your choices lift the architecture, not hide it.
Key Takeaways
- Small wall changes can redefine the feel of a room.
- Pair cozy neutrals with character-rich accents for an elevated look.
- Use mirrors and lighting to boost daylight and evening warmth.
- Choose sustainable, reclaimed pieces for lasting style.
- Follow safe mounting and spacing rules for a polished finish.
Setting the mood: my modern rustic farmhouse wall philosophy
When I plan a fresh living space, I begin by quieting the palette so the architecture can speak. That calm base makes the rest feel intentional and restful.
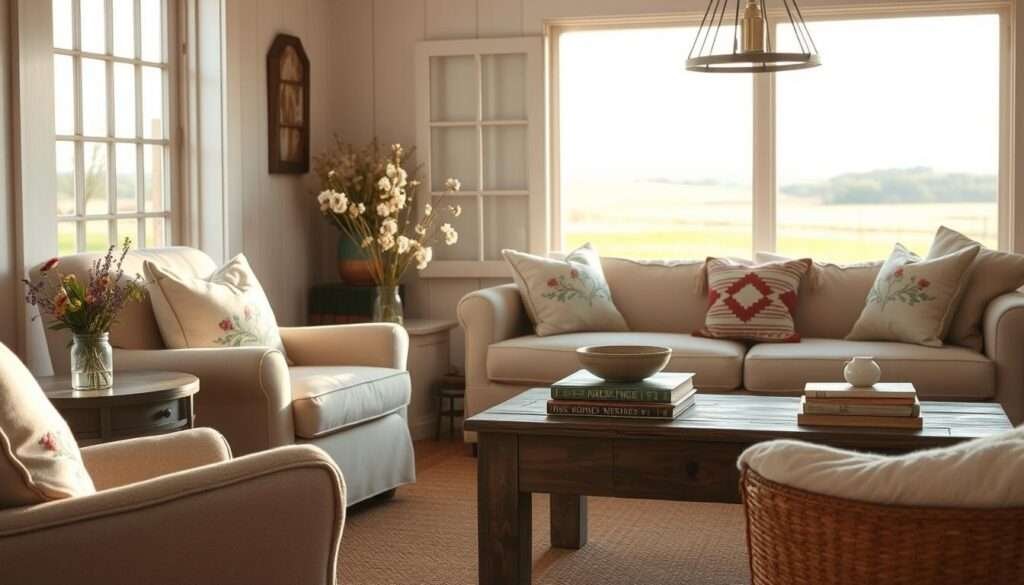
How I balance cozy neutrals with character-rich accents
I start with warm whites or soft putty on the walls to let stone and beams stand out. Then I add one or two standout moments—an oversized wood-framed mirror or a handwoven tapestry—that create a clear focal point.
Texture is key: raw wood, matte metal, nubby textiles, and soft plaster keep the room cozy without clutter. I echo nature with organic shapes and add a small dose of contrast like a charcoal frame or black iron sconce to sharpen the look.
- Neutral paint (warm white) for a grounded base
- Oversized round wood mirror to multiply light and reflect beams
- Linen tapestry or botanical prints for personality
- Woven baskets and matte black frames to anchor art to furniture
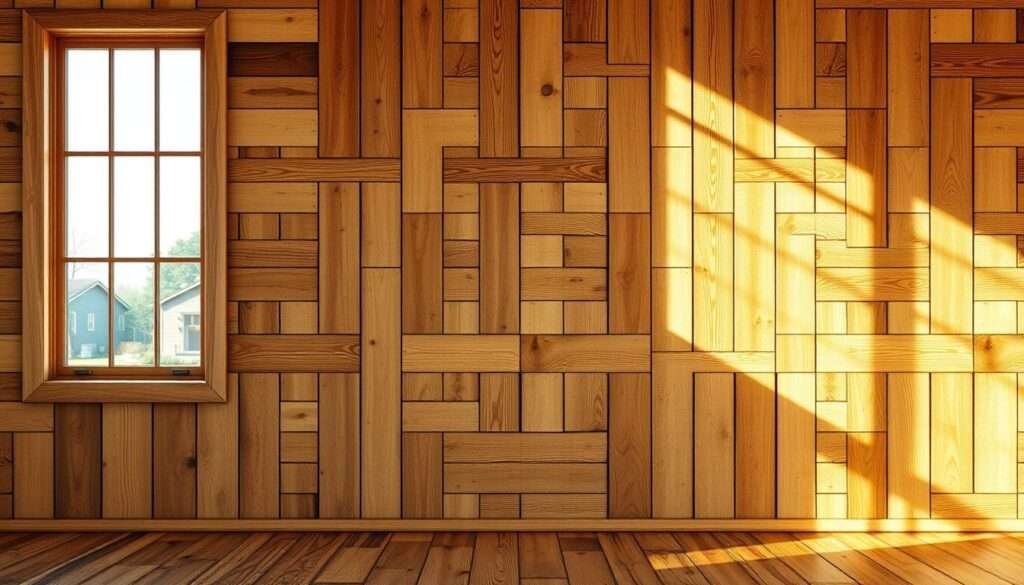
Reclaimed wood accent wall that warms the whole room
Nothing grounds a room faster than a panel of weathered boards that carry time and texture.
I choose reclaimed wood when I want instant warmth and a story-driven backdrop. Each plank brings unique patina, nail holes, and grain that soften modern lines and lift a living area.
Best wood tones and paneling directions for different spaces
- Horizontal paneling widens a narrow room.
- Vertical boards make low ceilings feel taller.
- Chevron or herringbone adds movement in larger open spaces.
| Type | Color | Texture | Maintenance |
|---|---|---|---|
| Barnwood | Multi-tonal browns/greys | Heavy, rustic | Dust and seal yearly |
| Reclaimed oak | Warm medium brown | Moderate grain | Wipe and re-oil annually |
| Pine planks | Honey tones | Softer grain | Gentle cleaning; watch for dents |
| Weathered gray mix | Cool greys | Sun-bleached | Clear matte seal recommended |
Tip: I install one feature wall behind the sofa using kiln-dried boards and a light matte seal. This creates a durable, eco-friendly focal point that pairs well with iron sconces or a centered mirror.
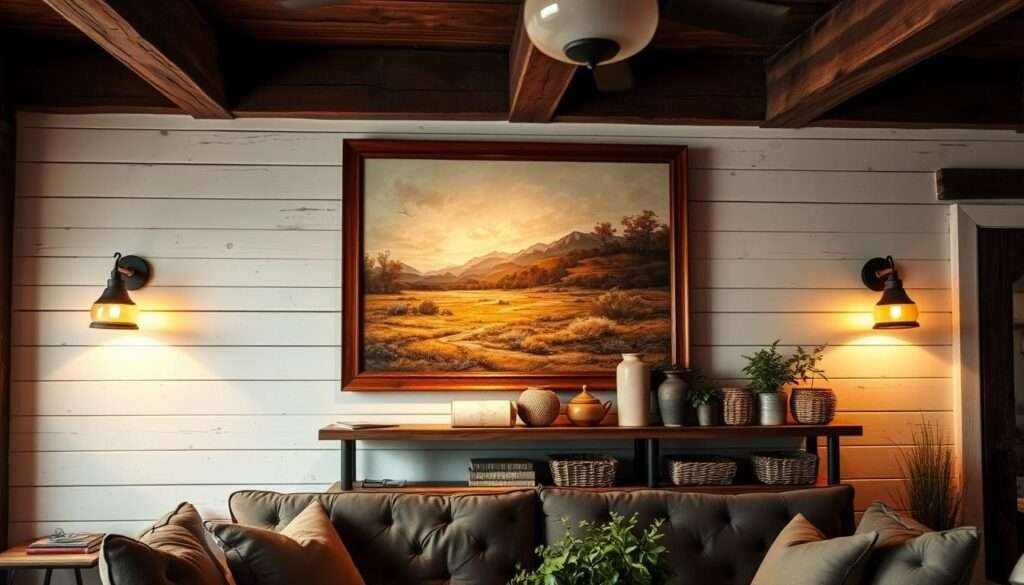
Mirror over the fireplace to double light and views
A well-placed mirror above a hearth can instantly brighten a space and catch a view you didn’t know you had. I use a mirror to reflect daylight and to amplify architectural details like exposed beams. The result is more depth and a lighter, warmer atmosphere.
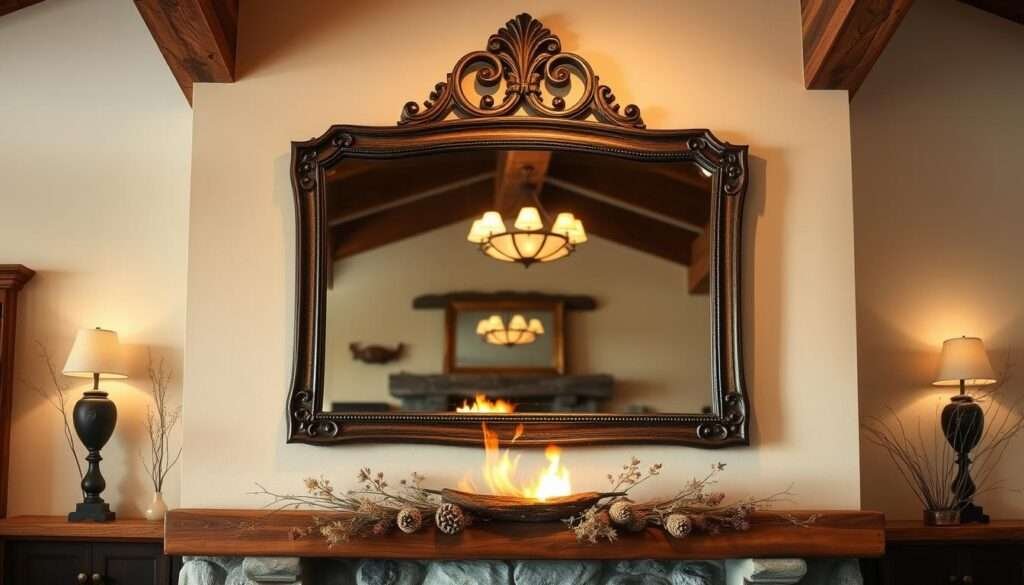
Choosing a frame: I balance warm wood frames against slim metal ones depending on my mood. Wooden frames feel textured and cozy. Antiqued brass or black metal adds a clean, modern farmhouse edge.
Placement and sizing tips
I aim for a mirror that is about 2/3 to 3/4 the mantel width so it reads in proportion. Hang it low enough to visually connect with the fireplace but high enough to avoid glare. If beams are a feature, I tilt the mirror slightly forward to catch their rhythm.
- Use a picture light or slim sconces for evening glow.
- For stone surrounds, mount with a french cleat for steady support.
- Position to avoid reflecting nearby screens.
| Frame | Material | Best use |
|---|---|---|
| Round | Mango wood | Soft, textural look |
| Arched | Antiqued brass | Modern farmhouse contrast |
| Thin rectangle | Black metal | Clean, architectural element |
Product notes: I recommend a cordless picture light, a low-profile french cleat, and fire-resistant mantel accents to keep the styling safe and calm.
Neutral gallery wall that feels curated, not cluttered
I like to treat a group of prints like a single large artwork rather than many small pieces.
Decide the vibe first: choose a relaxed, non-rectangular cluster for casual rooms or a tight grid when you want formal balance.
Layout styles: relaxed vs. tight grid
For a relaxed look, stagger frames and keep edges soft. Pieces may overlap visually but still read as one composition.
For a tight grid, align centers and keep spacing consistent. This creates symmetry and a clean, calm finish.
Image ideas and practical tips
I favor black-and-white botanicals, simple line drawings, or sepia landscapes to preserve calm and add depth.
Keep spacing tight (1.5–2 inches) so the group reads as a single composition. If you lean art on a console, size up to 24×36 or larger and place it opposite the main entry for impact.
- Center the arrangement above a sofa or console to anchor the composition.
- Use matching frame kits, gallery hanging templates, museum putty, and cordless picture lights for a polished finish.

| Element | Best use | Why it works |
|---|---|---|
| Black-and-white botanicals | Groups of 4–7 | Timeless, ties into neutrals |
| Line drawings | Leaned on console | Modern, casual scale |
| Matching frame sets | Whole-gallery cohesion | Makes varied pieces read as one |
For a cohesive look across rooms, consider coordinating print sets and frames; a small investment in frame kits pays off. See a similar calm palette for kitchen transitions here.
Textiles and tapestries for depth, story, and softness
A single handwoven piece can change how a space feels, adding quiet motion and memory.
I use textiles when I want to add warmth without clutter. They introduce scale and a human story. Commissioned tapestry or a vintage quilt becomes a focal point that reads as artwork and heirloom.
Commissioned fiber art, vintage quilts, and handwoven pieces
Commissioning a fiber artist lets you honor landscape or family history. I ask makers for palettes that echo the room and for simple loops or tabs for hanging.
- I mount quilts on hidden rods or archival Velcro to protect fibers and allow a gentle drape.
- Tapestries hang best from wood dowels or iron rods for clean lines and secure support.
- Palettes I favor: undyed wool, indigo, terracotta, and muted botanical dyes.

| Textile | Best mounting | Care |
|---|---|---|
| Handwoven tapestry | Wood dowel + leather loop | Spot clean; avoid direct sun |
| Vintage quilt | Hidden rod or archival Velcro | Professional conservation; gentle vacuum |
| Macramé panel | Iron rod with anchors | Light dusting; keep dry |
Quick tips: pair textiles with matte pottery and metal accents to balance soft and hard materials. Add anti-UV film on windows to protect fragile dyes and consider local fiber artists like Abby at Walker Loom or Mateo Textiles for commissioned pieces.
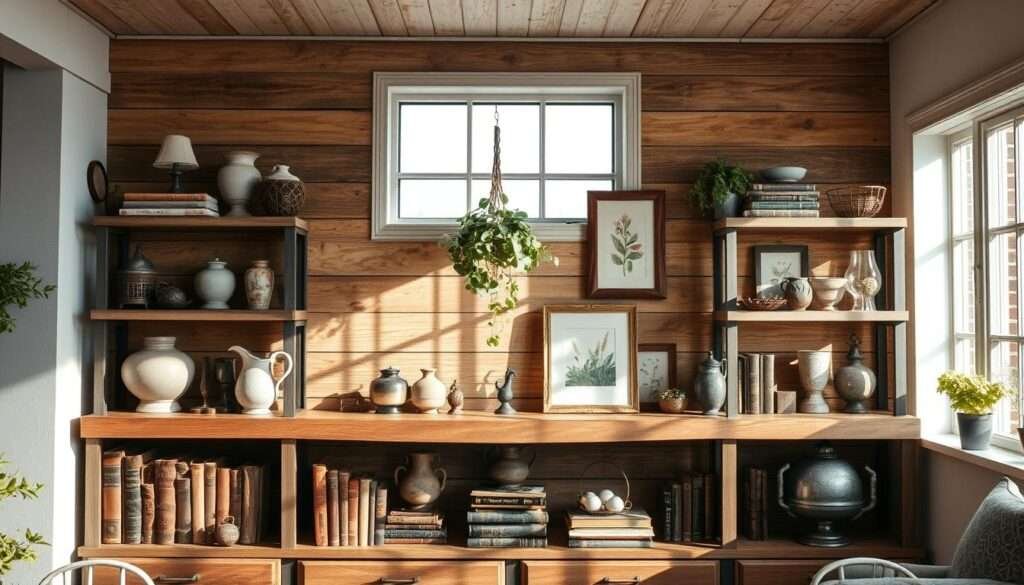
Open shelving vignettes that showcase personality
Open shelves are where small finds and daily objects become a personal tableau.
I style each shelf like a tiny landscape: a tall item at the back, mid pieces to the side, and a small object front-center for depth. I rely on a simple pyramid of height, texture, and odd-number groupings to guide the eye.
Styling pyramid: height, texture, and odd-number groupings
Height: vary tall vases with low bowls and stacked books so sightlines move naturally.
Texture: mix matte ceramics, timeworn metal, and wood for contrast.
Odd-number groups: use 3s and 5s to keep arrangements casual but purposeful. I tuck in a trailing plant like pothos to soften edges and add life.
Shelf styling formula
| Row | Key elements | Why it works |
|---|---|---|
| Row 1 | Tall ceramic vase + stack of 3 books + small brass object | Creates a strong vertical anchor and layered depth |
| Row 2 | Medium bowl + trailing plant + framed 5×7 print | Balances organic shapes with personal imagery |
| Row 3 | Lidded jar + candle snuffer + stoneware mug trio | Adds tactility and useful, everyday charm |
I color-block subtly with warm whites, clay, charcoal, and natural wood tones to echo the larger room palette. For product picks, I reach for hand-thrown vases, neutral hardbacks, faux trailing vines, and vintage brass candlesticks. A small picture light can finish the vignette and keep the materials visible in evening light.
Anchor art to furniture so it never “floats”
The trick I use is to make the furniture and art read as one composed moment. When pieces sit too high they disconnect from the seating and the whole room feels off.
Above a sofa, credenza, or console: spacing and scale
Keep the distance small: I hang frames so the bottom edge sits 6–8 inches above the sofa back or console. This visually links the piece to the furniture and creates a stronger focal point.
- Make one large artwork roughly two-thirds the width of the sofa for balanced scale.
- For pairs or trios, keep the full grouping within that same width so the arrangement reads as one look.
- With tall ceilings, drop the bottom edge lower rather than raising everything to keep the vignette human-scaled.
- Always check head clearance above seating so tall sitters won’t bump the art.
Safe mounting and product picks
I favor secure hardware and clear alignment. Use extra-strong hooks, gallery wire kits, a laser level, and anti-tip straps for consoles to avoid accidents.
| Product | Why I use it | Tip |
|---|---|---|
| Extra-strong picture hooks | Holds heavy frames reliably | Choose weight rating 25% above frame weight |
| Gallery wire kit | Even weight distribution | Use brass hangers for longevity |
| Laser level & anti-tip straps | Precise alignment and safety | Anchor straps to studs for consoles |
Let your architecture lead: beams, brick, stone, and shiplap
A beam, chimney, or paneled wall often tells me exactly what to highlight. I begin by identifying the strongest element and then simplify everything around it so that feature can sing.
What to highlight vs. what to simplify
- I let one architectural star lead — exposed beams, a rugged stone chimney, or crisp shiplap — and keep nearby walls restrained.
- On stone, choose simple shapes: a round mirror or a single matted artwork so the masonry reads as the focal point.
- For shiplap, use low-profile iron sconces and small framed pieces to avoid visual noise between the boards.
- If brick dominates, simplify shelves and accessories so they don’t compete for attention.
Image prompts and product picks
Image ideas I favor: a circular oak mirror centered on a rugged stone chimney, or crisp white shiplap paired with a single black iron sconce and a petite landscape.
Matching finishes: pick black iron for a raw edge, antiqued brass for warmth, or pewter for a softer look. For installs, use masonry anchors for stone and low-profile hardware for shiplap.

| Feature | Best accent | Install tip |
|---|---|---|
| Exposed beams | Single oversized mirror | Anchor to studs; keep surrounding walls simple |
| Stone chimney | Round oak mirror or matted art | Use masonry anchors and a french cleat |
| Shiplap | Forged iron sconces | Choose low-profile backplates to avoid board shadowing |
Botanical prints and nature studies that ground the room
Grouping nature studies beside a window makes the view outside feel like part of my decorating plan. I use even-numbered sets to create calm order so the eye flows from art to landscape.
Arranging sets to frame windows and connect indoors with out
I like two matching rows flanking a window so the composition bridges inside and out. Choose sizes like 12×16 or 16×20 with generous mats for a gallery-like feel that does not overwhelm the space.
- I arrange matched pieces in sets of three or six to keep mood and scale consistent.
- Mats in sage, wheat, or soft charcoal echo an accent color and tie the prints into the room.
- Slim black or oak frames with non-glare acrylic glazing keep the look crisp under natural light.
| Size | Mat color | Frame type |
|---|---|---|
| 12×16 | Sage green | Slim black |
| 16×20 | Wheat | Oak |
| 16×20 | Soft charcoal | Thin metal |

Soft summer color swaps that still honor neutrals
A subtle swap of art and accents can make summer feel fresh without repainting a single surface. I prefer to keep large surfaces neutral and layer seasonal color where it is easy to change.
Sunshine yellows, calming blues, and terracotta
My approach is simple: rotate lightweight art, a tapestry, or small wall plates to introduce citrusy yellows, soft Mediterranean blues, and warm terracotta. These tones pair naturally with linen, plaster, and wood.
- I refresh walls seasonally with easy swaps: a set of blue seascapes, a terracotta-toned tapestry, or a trio of sunny abstracts.
- I repeat the accent hue elsewhere—throws, pillows, and a ceramic vase—so the theme reads as intentional across the room.
- Store larger pieces in slim portfolios and use magnetic frame rails or simple hooks for quick changeovers.
| Swap | Why it works | Storage tip |
|---|---|---|
| Interchangeable prints | Add color without commitment | Keep in a slim portfolio |
| Terracotta plates | Warm, tactile accents | Stack in padded boxes |
| Magnetic rails | Fast seasonal rotation | Label frames by season |
For Mediterranean-inspired guidance, I also reference Spanish Mediterranean kitchen styles in a related post: Spanish Mediterranean kitchen styles.
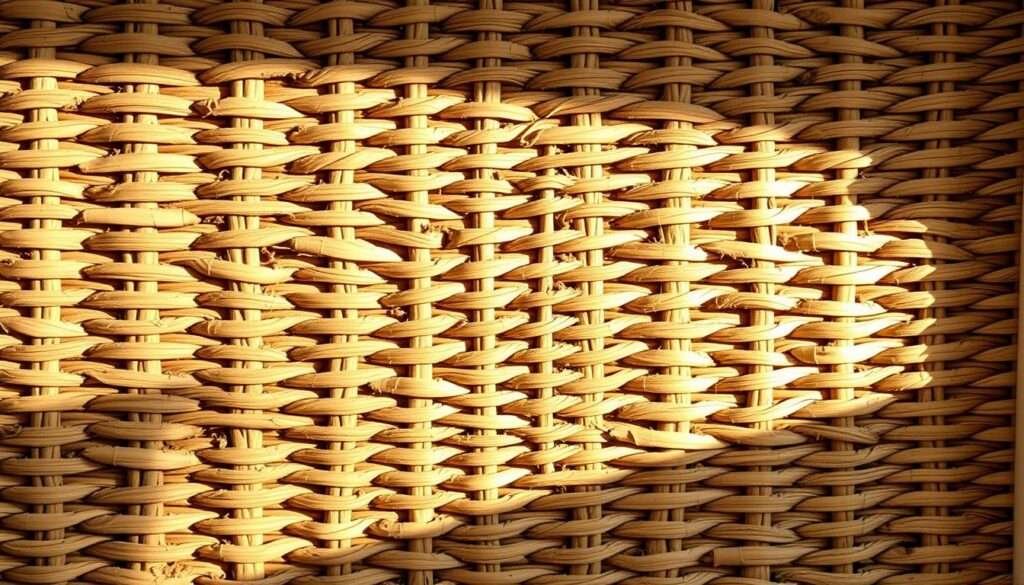
Woven basket walls for texture, movement, and warmth
A carefully arranged group of baskets adds instant warmth and subtle shadow play to a room. I like how tactile weaves change a plain surface into something personal and lived-in.
Balanced layouts: I begin on the floor with the largest basket at center, then radiate out with medium and small pieces. I balance diagonals so corners don’t feel heavy and mix shallow and deep weaves to create natural dimension.
Before I hang anything, I snap a photo of the layout. That image guides final placement and saves time when I transfer the design to the wall. For layering, thin floral wire secures overlapping baskets while removable hooks or small nails hold weight safely.
- Place the biggest item first and work outward for a balanced composition.
- Vary tones from honey to espresso for depth.
- Dust weekly; deep clean with mild soap and dry completely to avoid mold.
Image idea: an asymmetrical cluster over a console with a few layered pieces to cast soft shadows. For sourcing, I reach for fair-trade rattan and seagrass sets, removable hooks, floral wire, and a natural sealant spray to protect fibers.
| Item | Best use | Mounting | Care |
|---|---|---|---|
| Large woven tray | Center anchor for clusters | Two nails or french cleat | Spot clean; air dry |
| Shallow plate basket | Layering front piece | Floral wire loop + hook | Dust weekly; gentle wash |
| Deep market basket | Adds shadow and depth | Removable hook to stud | Avoid prolonged sun; seal lightly |
| Rattan accent set | Mix shapes and tones | Small nails or adhesive hooks | Occasional mild soap clean |
Antique window frames and rustic mirrors with history
I love finding a weathered frame that still hums with the house it once belonged to. Old sashes make a low-effort statement and give a warm backdrop to a seating area.
Makeovers: from salvage to statement with simple preservation
I source soulful windows at yard sales, thrift stores, salvage yards, and from local window replacement shops. I start by cleaning with a soft brush and removing loose paint chips.
I repair gaps with wood putty, sand smooth, and choose either a clear wax to keep patina or a limewash for a fresh finish. For mirror conversions I have glass cut to size and back the panes with mirror or pressed botanicals for layered decor.
Quick checklist:
- Stabilize frames, fill cracks, and sand edges.
- Decide finish: wax, stain, or limewash paint.
- Convert panes to mirror glass or botanical prints.
- Mount with a french cleat and use iron hooks for a subtle utility feel.

| Item | Use | Why I pick it |
|---|---|---|
| Wood putty | Fill cracks | Stabilizes old joinery |
| Sanding sponges | Smooth surfaces | Preps for finish |
| French cleat kit | Secure hanging | Safe, flush mount to a wall |
I place an aged six-pane mirror above a console or a grid of botanical panes over a bench for quiet impact. Mount heavy pieces to studs so the piece reads like collected history and the room stays safe.
Distressed wooden signs and heirloom typography
A simple wooden sign can anchor a corner with quiet confidence. I use hand-lettered boards when I want a personal line of text to read like family history instead of craft. These pieces add warmth and a subtle narrative without overwhelming the room.
Personalization paths and quick makers
Fast personalization: order a surname plank or a short phrase from trusted custom shops. For small-batch makers and one-off commissions I often browse custom sign shops and marketplaces, or check curated lists for distressed sign ideas.
DIY distressing mini-guide
Start with a smooth pine board. Sand, apply a base coat, and stencil your text. Let the paint dry, then sand edges and high spots to reveal layers.
Finish with a matte poly for protection. For authentic wear, use steel wool in small areas rather than aggressive stripping.
Grouping and hanging tips
Limit typography to one large family sign or a trio of quotes in varied fonts. Add small date plaques or coordinates for subtle personalization. Hang near entryways or above a console so guests see the message up close.

| Item | Best for | Tip |
|---|---|---|
| Stencil kit | Precise lettering | Use removable adhesive for crisp edges |
| Reclaimed lumber blank | Authentic grain | Pre-sand to avoid splinters |
| Alphabet stamp set | Small coordinates or dates | Ink lightly for imperfect charm |
| Matte polyurethane | Durable finish | Apply two thin coats, dry fully between |
Vintage farm tools as sculptural wall art
Picked-up tools from a barn sale can become sculptural accents that tell a house’s working past. I treat each piece as a small artifact and pair it with a warm backboard so the story reads clearly.
Choose characterful pieces: hay hooks, a worn hoe, or a large pitchfork make strong focal elements. A single pitchfork anchors a seating area. A trio of mixed tools creates rhythm and scale.

Safe mounting on reclaimed backboards with twine or conduit straps
I mount tools to reclaimed wood boards to protect plaster and to lend a composed, gallery-ready look. For lighter implements I use double jute twine loops; for heavier pieces I secure conduit straps and stainless hardware.
- Always anchor the board to studs; use a stud finder and heavy-duty screws.
- Use conduit straps for metal heads and loop twine around handles for lighter items.
- For masonry, predrill with masonry bits and use anchors rated for the load.
| Task | Material | Tip |
|---|---|---|
| Light pieces | Natural jute twine + reclaimed wood | Double loop and knot; hang to stud |
| Heavy tools | Conduit straps + stainless screws | Use two straps per tool; distribute weight |
| Preservation | Mineral oil / linseed oil | Oil metal lightly; condition wooden handles |
Care and preservation: dust weekly, clean with mild soap and dry thoroughly, oil metal sparingly to pause rust, and rub linseed oil into wooden handles to revive grain. I avoid aggressive cleaning to keep the patina that gives pieces charm.
Image ideas: a dark-stained board with aligned tools over a bench, or a single antique hay hook centered on plaster. For supplies, I keep conduit straps, jute twine, reclaimed board blanks, mineral oil, linseed oil, a stud finder, and masonry bits on hand.
Rustic floating shelves and sconces that layer light and storage
A narrow shelf and a well-placed sconce can change how a corner behaves at dusk. I begin with a simple plan: secure load-bearing brackets, choose a warm plank, and add a light source that flatters objects after dark.
Load-bearing basics: studs, brackets, and spacing
Mark studs and level lines before you drill. I pre-drill and secure concealed steel brackets into studs; for a 6-foot run I use three brackets for extra stability.
I pick solid wood planks—2-inch-thick oak for warmth—and leave slight side gaps so the board fits without binding. Custom metal brackets typically support 40–80 lbs each.
Lighting art: picture lights and sconces for evening glow
I use a cordless picture light to wash a shelf vignette, and hardwired sconces for steady ambient glow. Mount sconces about 60–66 inches high for accent lighting; lower them near a chair for reading.
Over a fireplace, a low-profile picture light adds drama without visual clutter.
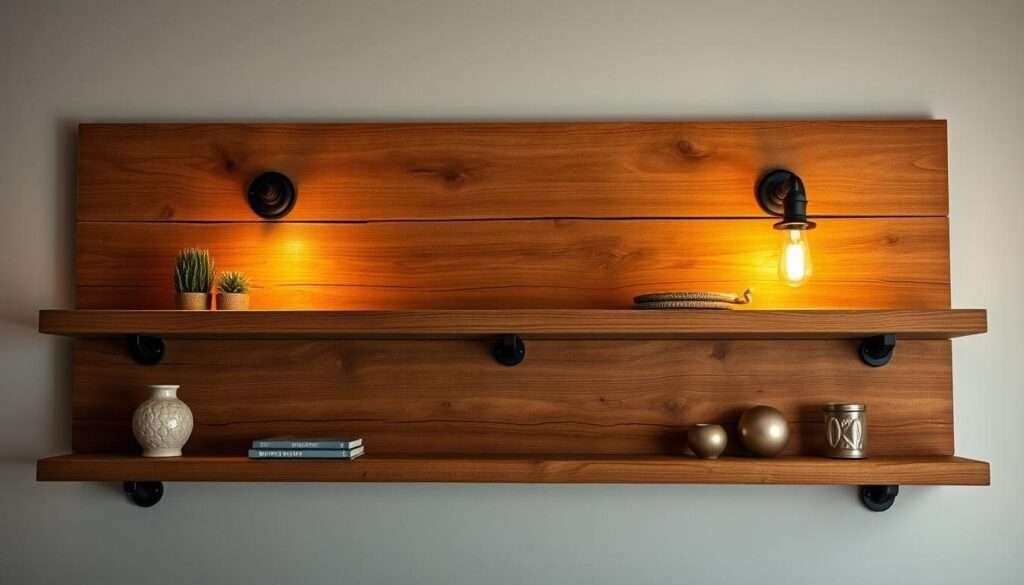
Mini checklist and display suggestions
- Materials: concealed steel brackets, 2″ oak plank, digital level.
- Install: mark studs, pre-drill, secure brackets to studs.
- Style: stoneware, framed mini-prints, and a trailing plant under a picture light.
- Lighting: hardwired iron sconces + 3000K bulbs for cozy warmth.
| Item | Why | Tip |
|---|---|---|
| Concealed brackets | Strong, clean look | Use at least three for long shelves |
| 2″ oak plank | Warm, durable surface | Seal matte for cleanability |
| Cordless picture light | Highlights objects at night | Place to graze frames and pottery |
When I combine practical install steps with layered lighting, the shelf becomes both storage and a curated vignette that lifts the whole room’s decor.
15 Rustic Farmhouse Living Room Wall Decor Ideas You’ll Love: my final styling notes
Before I close the door on a project, I step back and see whether the focal point greets me from the entry.
I use a short checklist to finish: confirm scale (art about two-thirds the sofa), let architecture lead—beams or stone first—and remove anything that competes. Layer three light sources: ambient lamps, accent sconces or picture lights, and the fireplace for evening depth.
Mix patina-rich antiques with new ceramics that read timeworn, keep a neutral backdrop, and add mirrors to reflect beams and expand daylight. For quick buys, I rely on cordless picture lights, cohesive frame sets, archival hanging kits, reclaimed wood panels, and smart dimmers to set mood.
Image idea: a pulled-back shot showing a stone fireplace with a round mirror, a reclaimed wood backdrop to the side, and a basket cluster by the door. For more curated inspiration, see curated farmhouse living room ideas here.