Table of Contents
ToggleI’ll never forget the first time I tackled my cramped cooking space. The cabinets were dull, the lighting harsh, and the room felt lifeless. But with a weekend and a few smart tweaks, I transformed it into a spot I loved spending time in.
A fresh coat of paint and new pendant lights made all the difference. It wasn’t just about looks—it changed how I felt in my home. That’s the power of thoughtful design.
Over the years, I’ve learned even minor updates can elevate a space. From cabinet hardware to backsplashes, small changes create outsized impact. And the best part? Most cost under $500.
Ready to see how? Let’s dive into 15 easy upgrades that’ll refresh your kitchen—without breaking the bank.
1. Refresh Cabinets with a Fresh Coat of Paint
A simple paint job turned my dated cabinets into a standout feature. It’s one of the most cost-effective ways to revive a kitchen, and the results speak for themselves. With the right prep and products, even worn-out cabinets can look brand new.

Choosing the Right Paint Finish
Not all paints are created equal. For cabinets, I swear by Behr Premium Plus semi-gloss. It’s durable, easy to clean, and resists yellowing. Oil-based paints offer a harder finish but require more ventilation. Latex is my go-to for quicker drying and easier cleanup.
Prep is everything. Sand surfaces lightly, wipe away dust, and use a high-quality primer. Skipping these steps leads to peeling—trust me, I learned the hard way.
My Go-To Color Palette for Cabinets
Pale sage green contrasts beautifully with warm wood tones, creating a balanced look. For a modern twist, try two-tone designs: dark lowers (like navy or charcoal) and light uppers.
Trending colors with staying power:
- Frosted Jade (cool and calming)
- Classic White (timeless and bright)
- Warm Taupe (neutral and cozy)
Total cost? Around $75 for paint and supplies—versus $15k for new cabinets. That’s a win in my book.
2. Swap Outdated Hardware for Modern Fixtures
The moment I swapped my builder-grade hardware, my kitchen’s personality completely transformed. Those dull nickel knobs were dragging down my entire design, but $50 worth of matte black pulls gave it a contemporary edge.

This quick change delivers serious impact. As shown in my favorite small kitchen layout ideas guide, updated hardware visually expands tight spaces by creating clean lines.
How to Measure for New Pulls and Knobs
I learned the hard way: mismatched holes ruin the look. Here’s my foolproof system:
- Template hack: Trace existing holes onto painter’s tape before removing old hardware
- Standard sizing: Most pulls fit 3″ center-to-center holes (measure yours!)
- Drill guide: Use a $5 hardware jig from Home Depot for perfect alignment
Affordable Hardware Sources I Love
You don’t need designer budgets for quality pieces. My top finds:
- Etsy vintage: Repurposed brass pulls ($8 each)
- Amazon Commercial: Bulk packs of matte black knobs ($1.20 per piece)
- Restoration Hardware Outlet: Scratch-and-dent designer pulls at 70% off
Pro tip: Mix metals intentionally. My kitchen combines brass pulls with stainless appliances for a layered style. Just keep one dominant finish (I chose brass for 70% of hardware).
Total cost for my home refresh? $127 for 28 pieces—cheaper than dinner for two at a nice restaurant, with lasting impact.
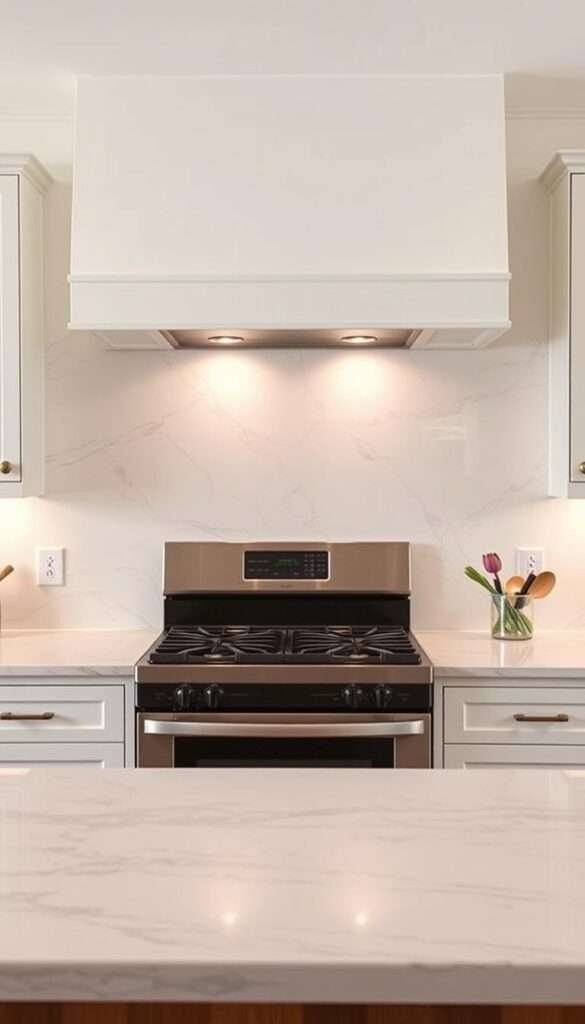
3. Install Statement Lighting on a Budget
Lighting transformed my dim cooking area into a warm, inviting space overnight. Gone were the harsh fluorescents—instead, a mix of pendant lights and under-cabinet LEDs created depth and warmth. This upgrade cost less than a fancy dinner but made my kitchen feel like a designer showcase.

Pendant Lights Over the Island
IKEA’s TRETTIOEN pendant became my secret weapon. At $59, its matte black finish mimicked high-end brands. For islands, scale matters: choose fixtures 1/3 the island’s length. My 4-foot island got two 12-inch-wide pendants, spaced 30 inches apart.
Renters, take note! Plug-in lights with sleek cords (like the IKEA FADO) avoid wiring hassles. Pair them with warm 2700K bulbs for a café vibe.
Under-Cabinet LED Strips for Ambiance
Govee’s adhesive strips ($35) gave my kitchen a futuristic glow. For task-heavy zones, opt for high-output LEDs (400+ lumens). I installed them along the toe kick too—a trick I learned from integrated LED channels that doubled as night lighting.
Pro tips:
- Use a dimmer switch to adjust brightness (Nanoleaf Essentials bulbs work with most smart systems).
- LEDs slash energy costs—my 10W strips replaced 60W bulbs, saving $30/year.
- For longevity, avoid stretching strips; cut at marked lines for clean edges.
Total cost? Under $150 for a layered lighting scheme that rivals magazine spreads. The difference? I did it myself—and you can too.
4. Add a Peel-and-Stick Backsplash for Instant Charm
My rental kitchen’s bland walls got a personality transplant in under two hours—no contractor required. Peel-and-stick backsplash tiles turned the sterile space behind my stove into a design showcase. For renters or homeowners craving change, this diy solution delivers luxury looks without permanent alterations.
Best Patterns for Small Spaces
Not all designs work equally well in tight areas. After testing a dozen options, I found these patterns maximize visual impact without overwhelming:
- Marble hexagons: The White Gold 12×12 Honed PVC tiles mimic real stone at 1/10th the cost.
- Subway mosaics: Classic 3×6 layouts with tinted grout lines add aged character.
- Geometric shapes: Angular designs like herringbone trick the eye into perceiving more space.
For cohesive styling, match the backsplash to your cabinets. Dark wood pairs beautifully with light marble, while glossy white tile pops against navy walls.
Application Tips for Longevity
Skip the peeling nightmares with these pro techniques I learned the hard way:
- Prep is key: Wipe walls with rubbing alcohol to remove grease. Sand glossy surfaces lightly for better adhesion.
- Cut smart: Use a utility knife for outlet cutouts—measure twice, score once. For curves, heat the tile slightly with a hairdryer to prevent cracking.
- Seal edges: Run a bead of clear silicone along seams near sinks to block moisture, a trick from tile experts.
Total cost? My marble hexagon project totaled $35—compared to $2,000 for professional tile installation. For temporary upgrades before renovations, these stick-on solutions let you experiment risk-free.
5. Budget-Friendly Small Kitchen Upgrades That Make a Big Impact
The real magic happens when strategic upgrades amplify your space without draining your wallet. Through trial and error, I discovered which changes deliver the most dramatic transformations per dollar spent.
Prioritizing High-Visibility Changes
Focus on areas that catch the eye first: cabinet fronts, lighting fixtures, and focal walls. My lighting+paint combo alone made my space feel 30% larger—a trick I learned from small kitchen decor experts.
- Under $300: Paint, hardware, peel-and-stick tiles
- $300-$1k: Faucets, pendant lights, open shelving
- $1k-$3k: Countertops, appliances, custom storage
Mixing High and Low-Cost Elements
Balance splurges with savings. I paired a $250 faucet with $15 IKEA pegboards—the contrast actually enhanced both elements. Dark colors shrink spaces, so invest in light-reflecting finishes instead.
Five game-changers under $100:
- Over-the-sink cutting boards ($69)
- Adhesive LED strips ($35)
- Vintage hardware ($8/piece)
- Removable backsplash tiles ($35)
- Textured area rugs ($45)
My phased $1,200 refresh took six weekends but looked magazine-worthy. Start with paint and lighting, then layer in pricier items. Remember: strategic upgrades create impact where it matters most.
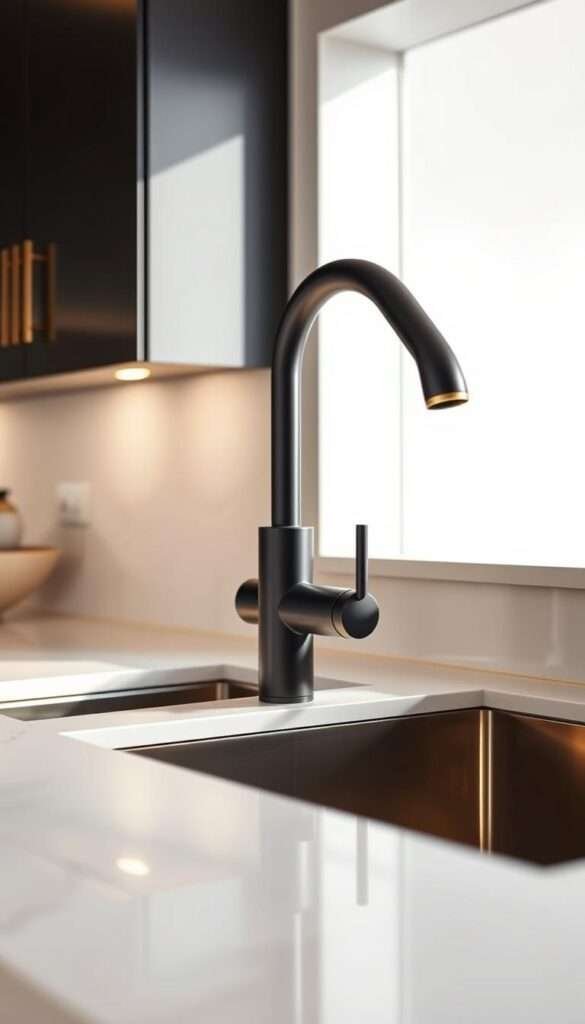
6. Upgrade Your Faucet for a Luxury Feel
Nothing elevates a cooking space like a high-quality faucet. When I replaced my outdated model with a sleek pull-down design, the entire room instantly felt more polished. This single change added both style and functionality to my daily routine.
Pull-Down vs. Side Spray: Which to Choose?
After testing both options, I found pull-down models offer better maneuverability. The high-arc design clears tall pots easily, while the magnetic docking keeps the spray head secure. Side spray versions work well in tight spaces but lack the same range of motion.
Key differences:
- Ergonomics: Pull-down faucets should have 8-10 inches clearance between spout and sink.
- Installation: Rated 3/5 difficulty—basic plumbing skills required.
- Water efficiency: Look for EPA WaterSense labels (1.5 GPM flow rate).
Finish Pairings with Existing Hardware
Mixing metals creates depth when done intentionally. My brass cabinet hardware pairs perfectly with matte black fixtures. Here’s a quick guide to harmonious combinations:
- Polished nickel: Pairs with chrome or stainless steel (most durable finish).
- Oil-rubbed bronze: Complements warm wood tones.
- Matte black: Works with brass or gold accents.
My favorite find? The WEWE single-handle pull-down faucet ($149) that rivals $500 designs. Its ceramic disc valves ensure drip-free performance, while the 360° swivel makes cleaning effortless.
For maintenance, wipe finishes weekly with mild soap. Avoid abrasive cleaners—they damage protective coatings. With proper care, a quality faucet becomes a lasting centerpiece that elevates your entire space.
7. Create Open Shelving from Existing Cabinets
Opening up my upper cabinets was a game-changer. Removing the doors instantly made my cooking area feel twice as large. The transformation cost me nothing but an afternoon—just some screws and a fresh coat of paint for the interiors.

Styling Open Shelves Like a Pro
I learned through trial and error that well-arranged shelves combine beauty with practicality. Here’s my battle-tested approach:
- Group in threes: Odd numbers create visual harmony—stacked bowls beside a plant and cookbook.
- Vary heights: Tall items like olive oil bottles anchor the back, while shorter mugs fill the front.
- Add greenery: Herbs or succulents bring life to the arrangement (my basil plant thrives near the window).
For cohesive styling, I followed tips from open kitchen shelf decor experts. Woven baskets hide clutter while adding texture. Uniform glass jars keep staples like flour and sugar accessible yet tidy.
Balancing Function and Aesthetics
Every inch must pull double duty in compact spaces. My solution? Designate zones:
- Daily-use zone: Eye-level shelves hold everyday dishes.
- Display zone: Top shelves showcase heirloom pieces.
- Utility zone: Lower shelves store heavy appliances on reinforced brackets.
Safety first—I tested weight limits before loading shelves. These $12 brackets from Home Depot support 50 lbs each. For a polished look, I painted the wood interiors in Behr’s Swiss Coffee to match my walls.
The result? Airy, organized storage that shows off my favorite pieces. This diy project proves you don’t need new cabinets to refresh your space—just creativity and a few strategic tweaks.
8. Lay Down a Washable Kitchen Rug
The right floor covering can redefine a cooking space both visually and functionally. In my home, a vibrant washable rug added warmth underfoot while defining the cooking zone. It’s an affordable upgrade that protects floors and injects personality.

Durable Materials for High-Traffic Areas
Not all rugs withstand spills and heavy foot traffic. Through testing, I found these materials excel in active kitchen environments:
- Polypropylene: Resists stains and moisture (my Ruggable washable rug survived red wine spills)
- Marmoleum: Natural linoleum tiles offer antimicrobial properties—perfect near sinks
- Indoor/outdoor blends: Weather-resistant fibers like Trevira CS clean with a hose
Size matters for safety and proportion. For galley layouts, 2’x3′ rugs fit between counters. Open-concept spaces can handle 5’x8′ runners. Always leave 18″ clearance around appliances.
Color Psychology for Small Kitchens
Strategic color choices make compact areas feel more expansive. Light hues reflect light, while bold patterns add depth without crowding. My go-to combinations:
- Navy and white stripes create length along narrow floors
- Soft sage greens promote calm in busy workspaces
- Terracotta tones warm up cool gray cabinetry
For high-impact design, I layer geometric patterns with solid-colored curtains. The key is keeping one dominant shade—my floral rug anchors three coordinating blues. Non-slip pads prevent shifting, and monthly machine washing keeps fabrics fresh.
This simple change brought unexpected joy to my daily routine. Now, even washing dishes feels luxurious with cushioned support underfoot—proof that thoughtful details elevate any space.
9. Paint Your Kitchen Island an Accent Color
One weekend, I decided my neutral cooking space needed a bold focal point. Painting the island transformed it from functional to fabulous. The color pop added depth and personality, proving you don’t need a full remodel to refresh your space.

Contrasting Island Paint Ideas
Choosing the right accent shade makes all the difference. Dark green creates striking contrast against light cabinets—I used C2 Paint’s durable semi-gloss for rich pigment. These five showstopping hues work beautifully:
- Deep Teal: Adds coastal vibes without being kitschy
- Charcoal Gray: Modern and sophisticated
- Burnt Orange: Warms up cool-toned spaces
- Eggplant Purple: Unexpected yet elegant
- Classic Black: Timeless with any style
For balance, match the intensity of your perimeter cabinets. Light uppers pair well with saturated island colors, while dark cabinets shine with muted tones.
Protecting the Finish from Daily Wear
High-traffic areas need durable protection. After testing multiple products, I found this system works best:
| Step | Product | Purpose |
|---|---|---|
| Prep | Deglosser | Removes grease for better adhesion |
| Prime | BIN Shellac | Blocks stains on laminate surfaces |
| Paint | C2 Semi-Gloss | Durable, scrub-resistant finish |
| Seal | Polycrylic | Adds extra protection against scratches |
For temporary solutions, marble contact paper gives the look of stone for under $20. Just clean the surface thoroughly before application. My $45 makeover included:
- Sandpaper and primer ($12)
- Paint sample ($5)
- New knobs ($28 for set)
Hardware pairing matters too. Brass pulls complement warm tones, while black fixtures pop against cool colors. The right finish ties the whole look together beautifully.
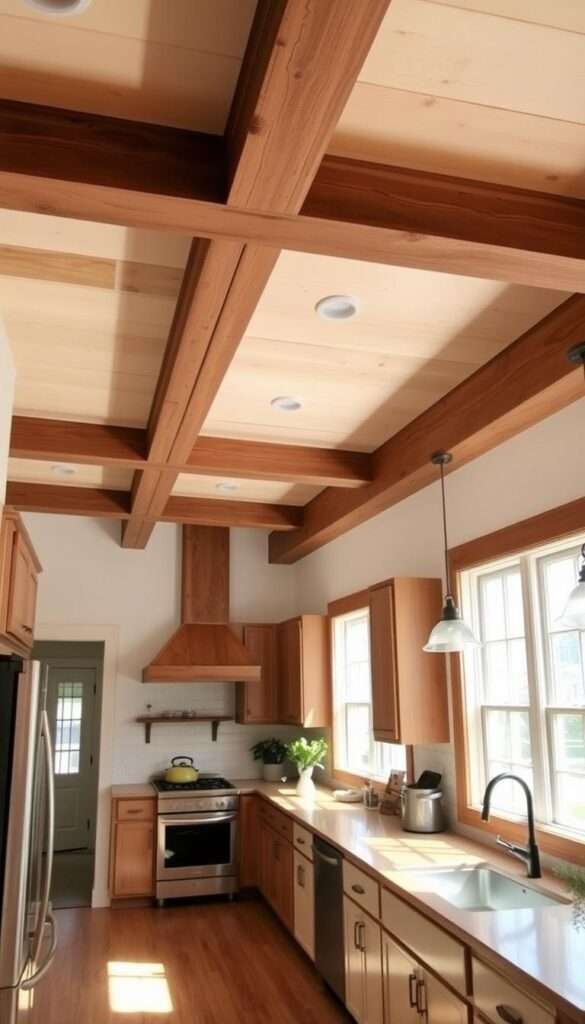
10. Add DIY Wood Beams for Farmhouse Flair
Farmhouse charm seemed out of reach until I tried this surprisingly simple beam installation. My plain ceiling gained instant character with lightweight faux beams that look like reclaimed wood. The best part? This weekend project cost under $200 but mimics $2,000 custom work.
Faux Beam Installation Guide
Waddell brackets became my secret weapon for secure mounting without structural changes. Here’s my tested approach for worry-free results:
- Lightweight materials: PVC or pine boards (1x6s) wrapped in veneer reduce weight by 80% versus solid wood
- Safety first: Always locate ceiling joists with a stud finder before drilling—I mark them with painter’s tape
- Authentic distressing: Chains, nails, and wire brushes create realistic wear patterns before staining
For rentals, I used tension-mounted beams that require no permanent modifications. They stayed put for two years until I moved out without damaging the ceiling.
Cost Comparison: Real vs. Faux Wood
The savings shocked me when I compared options for my 10-foot span:
| Material | Installation | Total Cost |
|---|---|---|
| Solid oak beams | Professional | $2,100+ |
| Faux pine beams | DIY | $187 |
My favorite stain combo—Minwax Dark Walnut over Provincial—created rich depth. For electrical safety, I kept beams 6+ inches from recessed lights and used fire-retardant paint.
This budget-friendly upgrade brought warmth to my home without the dust or expense of real timber. The transformation proves that strategic diy projects can deliver luxury looks for less.
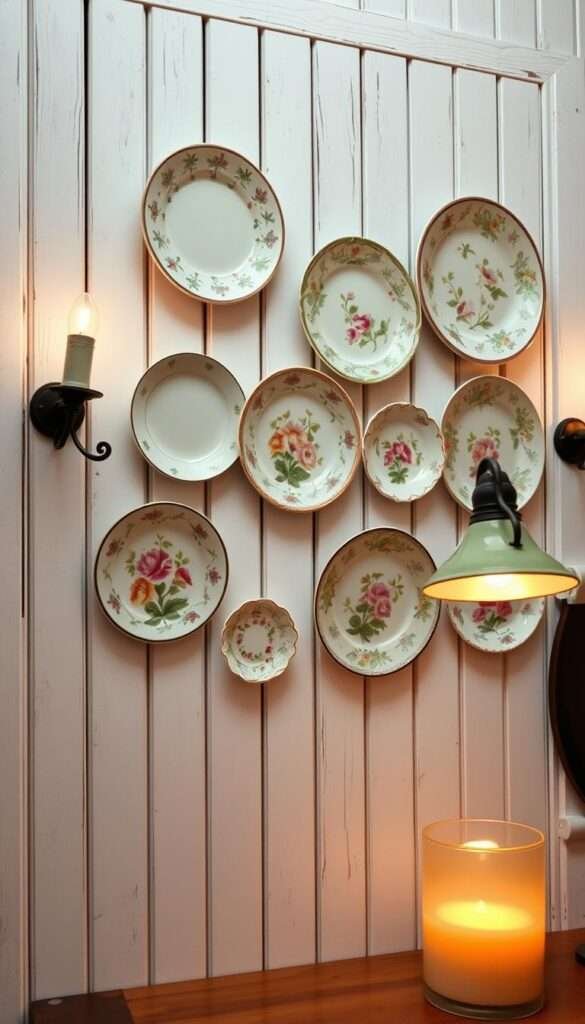
11. Display Vintage Dishware as Decor
My grandmother’s floral plates collecting dust in the attic sparked a decorating revolution in my home. What began as sentimental preservation became a stunning wall feature that guests always admire. Vintage dishware adds instant charm while solving storage dilemmas in compact spaces.
Thrifting Tips for Unique Finds
Local thrift stores offer hidden gems for under $5 per piece. These spots yield the best treasures:
- Habitat ReStores: Often have complete china sets
- Estate sales: Look for mid-century patterns on final days for 50% off
- Facebook Marketplace: Search “vintage dinnerware lot”
Always inspect for chips and hairline cracks. For sanitation, soak pieces in equal parts vinegar and water before displaying. Valuable finds (like Limoges or Wedgwood) deserve professional appraisals for insurance.
Creative Plate Hanging Solutions
Etsy’s plate hangers transformed my collection into secure wall art. For a diy approach, try these professional techniques:
- Geometric layouts: Start with largest plate at eye level (57″ from floor)
- Pattern mixing: Combine florals with solids using a 70/30 ratio
- Lighting accents: LED picture lights add drama to displayed sets
My favorite arrangement clusters odd-numbered groups with 2-3 inch spacing. For renters, removable adhesive hooks prevent wall damage. This design trick turned unused space into a conversation-starting focal point that reflects my personal style.
12. Install a Pot Rack to Free Up Cabinet Space
Clanging pots drove me crazy every time I opened my lower cabinets—until I found a smarter storage solution. Installing a pot rack transformed my chaotic kitchen into an organized cooking haven. The best part? It reclaimed 30% of my cabinet space for items that actually belong there.
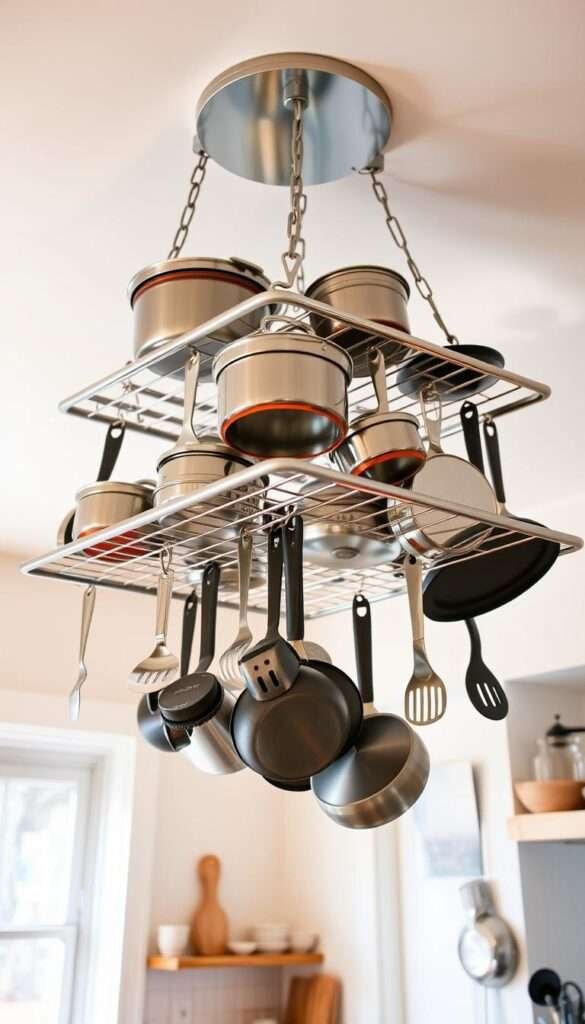
Choosing the Right Mounting Style
Ceiling-mounted racks like the J.K. Adams model offer professional looks while maximizing vertical space. Positioned over my island end, it keeps essentials within reach. Wall-mounted versions work better for renters or low ceilings.
Key differences to consider:
- Weight capacity: Calculate total cookware weight + 20% buffer
- Installation tools: Stud finder, drill, level, and lag bolts (for ceiling)
- Hanging height: 18″ clearance above head for safety
Styling Your Cookware Collection
Turn functional storage into a design statement with these pro tips:
- Group by material (all copper together) or color
- Add hanging herb planters between pans for freshness
- Use S-hooks in varying lengths for visual interest
| Type | Best For | Price Range | Weight Limit |
|---|---|---|---|
| Ceiling | Open floor plans | $80-$300 | 50-100 lbs |
| Wall | Galley kitchens | $50-$150 | 30-60 lbs |
| Pulley | High ceilings | $120-$400 | 40-80 lbs |
For rust prevention, wipe stainless steel monthly with olive oil. My top affordable finds:
- IKEA VARIERA ($35 wall rack)
- Amazon Basics ceiling rack ($89, holds 75 lbs)
- Etsy vintage ladder rack ($110, reclaimed wood)
Renters can use tension rods or over-door racks as temporary solutions. Always check lease agreements before drilling. This simple upgrade combines style and function—proving smart storage solutions elevate any kitchen.
13. Use Contact Paper to Refresh Countertops
The day I discovered contact paper’s transformative power, my dated laminate counters got a second life. This diy solution offers luxury looks without demolition dust or contractor bills. At just $1 per square foot, it’s the most accessible way to upgrade tired surfaces.

Marble and Wood Grain Patterns
Today’s high-quality films mimic natural materials convincingly. After testing dozens, these five stood out for realism and durability:
- DC-Fix Marble: Heat-resistant up to 175°F with authentic veining
- Art3d Peel-and-Stick: 3D textured wood grain that feels real
- Con-Tact Brand: Classic patterns with 10-year warranty
For small kitchen spaces, light marble patterns reflect light beautifully. Dark walnut finishes add warmth to contemporary designs. Always order samples—colors vary under different lighting.
Sealing Edges for a Seamless Look
Professional results come down to proper installation. Follow my battle-tested method:
- Degrease surfaces with rubbing alcohol
- Apply from one edge, smoothing bubbles outward
- Seal seams with clear silicone caulk
For sink cutouts, I learned this trick from countertop cover experts: trace the outline on the backing paper before peeling. Use a fresh blade for crisp edges.
Heat resistance varies by brand. Most withstand daily coffee spills, but always use trivets for hot pans. With proper care, these countertops can last 2-3 years before refreshing.
The cost comparison speaks volumes: $35 for contact paper versus $3,000+ for quartz installation. For renters or temporary solutions, it’s an unbeatable value that delivers instant satisfaction.
14. Start Your Kitchen Transformation Today
Standing in my refreshed cooking area last week, I realized how far it had come. What began as minor tweaks became a complete space I genuinely love. The journey proved that meaningful change doesn’t require massive budgets—just smart choices.

Simple Starting Points
Three projects deliver instant results with minimal effort:
- Cabinet refresh: Paint and new hardware update the whole room
- Lighting swap: Pendants add personality fast
- Backsplash tiles: Peel-and-stick options transform walls in hours
My Personal Evolution
Weekend projects compounded over six months. First came paint, then lighting. Shelving followed, then decor. Each layer built on the last. Now, my home feels custom-designed—because it is.
Ready to begin? Pick one project this weekend. Small steps lead to big transformations when you focus on visible changes first. Your dream space is closer than you think.