Table of Contents
ToggleI remember staring at my dull, outdated space, wishing for a warm, inviting atmosphere. A full overhaul wasn’t in the budget, but I discovered small, thoughtful updates could transform the entire feel. A fresh coat of paint, layered lighting, and textured decor made all the difference.
Affordable changes breathe new life into any room. Open shelving, thrifted accents, and strategic lighting create charm without breaking the bank. You don’t need a contractor—just creativity and a few budget-friendly tweaks.
This guide shares 16 simple tips to make your space feel like home. From peel-and-stick backsplashes to vintage finds, each idea is designed for real life. Start small, enjoy the process, and watch your kitchen evolve.
For more inspiration, explore these small cozy kitchen ideas that prove big style comes in small packages.
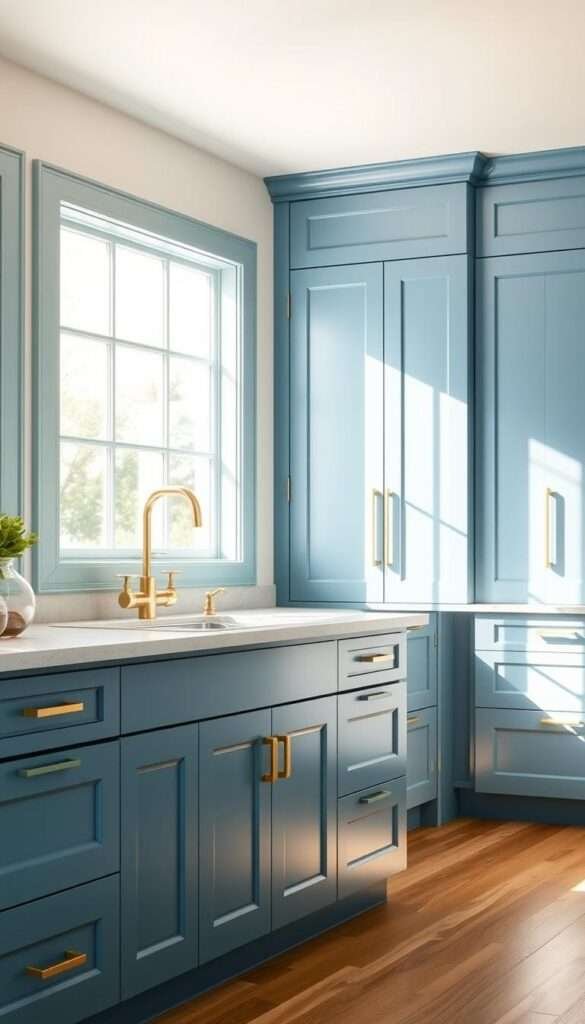
1. Refresh Cabinets with a Coat of Paint
Transforming tired cabinets with paint is one of the easiest ways to revive a kitchen. I used chalk paint for a no-sand, budget-friendly update—it clung perfectly to the old finish. The change was instant: my space felt brighter and intentional.
Choose a Paint Finish: Matte vs. Gloss
Matte finishes hide imperfections and add subtle warmth, while glossy options reflect light for a modern edge. I opted for matte—it’s forgiving on older cabinets and pairs well with textured decor. For high-traffic areas, semi-gloss resists fingerprints.
Color Pairings for Warmth and Contrast
Dark, cool-toned cabinets (like Farrow & Ball’s “Railings”) pop against warm oak floors. For coziness, try sage green or moody navy. Painting just the lower cabinets or island creates a focal point without overwhelm. Explore 10 ways to update kitchen for more ideas.
Lately, I love the color drenching trend—walls and cabinets in the same hue (Benjamin Moore’s “Simply White” is magic). It’s sleek yet inviting, proving small changes redefine a kitchen’s feel.
2. Swap Outdated Hardware for Modern Fixtures
Updating cabinet hardware is like adding jewelry to your kitchen—it elevates the whole look. When I replaced my chipped knobs with brushed brass pulls, the space felt instantly polished. Best of all, it’s a DIY project that takes under an hour.
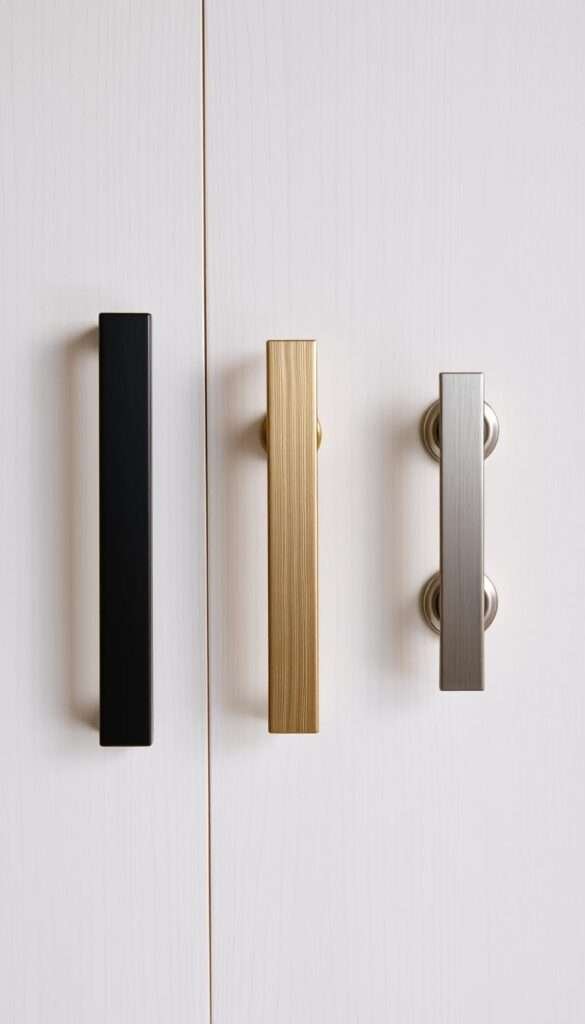
Brass, Black, or Nickel: Picking the Right Finish
Brass finishes add warmth and luxury, especially in farmhouse or traditional spaces. For a modern edge, matte black contrasts beautifully with light cabinets. My go-to? Polished nickel for a timeless, versatile style.
Match hardware to existing faucets or lighting for cohesion. Oil-rubbed bronze complements dark countertops, while satin brass pairs well with warm wood tones. IKEA’s hidden hinge systems offer affordable upgrades for smooth operation.
- Pulls vs. knobs: Use pulls for drawers (easier grip) and knobs for doors.
- Rub ’n Buff: A $7 trick to transform dated hardware into metallic statement pieces.
- Finish longevity: Lacquered brass resists tarnishing—ideal for busy kitchens.
3. Add Warmth with Open Shelving
Swapping upper cabinets for open shelving transformed my cramped kitchen into an airy, welcoming hub. The change instantly brightened the space, making it feel larger and more intentional. Shelves also let me display favorite dishes and greenery, adding layers of texture.
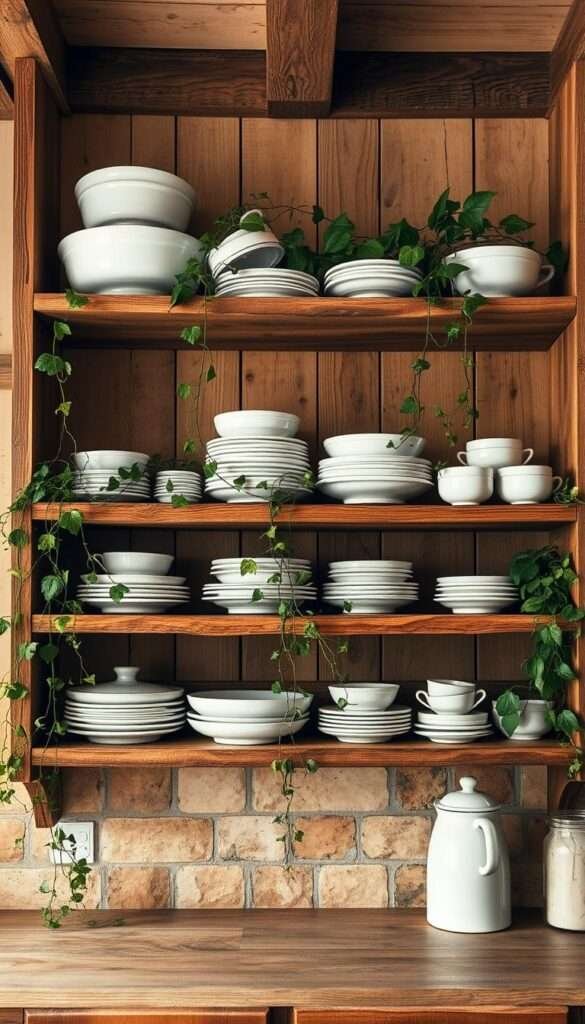
Styling Tips for Functional Displays
Depth matters: Opt for 10–12-inch shelves to hold dinner plates comfortably. I sourced reclaimed wood floating shelves from an Etsy artisan—they’re sturdy and full of character. Glass shelves with iron brackets offer a modern twist for traditional homes.
Mix everyday items with decor for balance. Olive oil bottles and stacked bowls pair well with vintage scales or a trailing pothos. Follow the rule of thirds: group items in odd numbers for visual harmony. Avoid overcrowding; leave 30% of shelf space empty.
| Material | Best For | Maintenance |
|---|---|---|
| Reclaimed Wood | Farmhouse, rustic styles | Dust weekly; occasional oiling |
| Tempered Glass | Modern, minimalist spaces | Wipe with vinegar spray |
Pro tip: Paint shelf brackets the same color as your walls for a seamless look. Open shelving isn’t just storage—it’s a way to infuse personality into your kitchen feel. Start with one wall to test the vibe before committing.
4. Install Affordable DIY Wood Beams
My builder-grade ceiling felt lifeless until I discovered the magic of faux wood beams. For under $200, I transformed my sterile space into a warm, farmhouse-inspired hub. The best part? No structural changes—just lightweight polyurethane beams secured with basic tools.
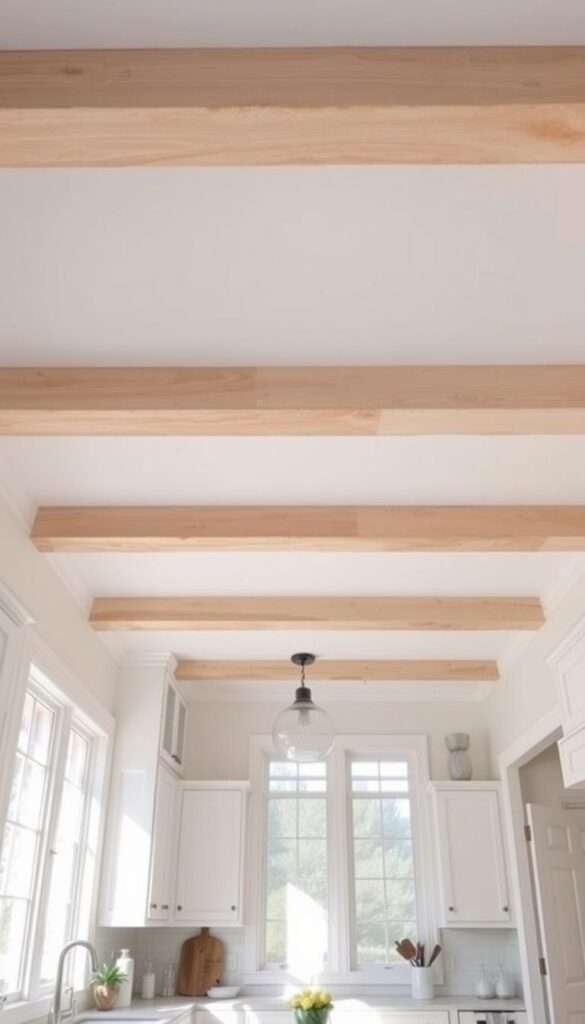
Real vs. faux wood: Solid oak beams cost $500+ each, while polyurethane replicas look identical for 80% less. I chose faux beams for their easy installation and featherlight weight (under 10 lbs each). Iron brackets added rustic authenticity without compromising safety.
Here’s how I nailed the look:
- Measure twice: Space beams evenly (30–36 inches apart) for balanced visual weight.
- Chalk paint hack: Dry-brush white paint onto faux beams for a weathered, reclaimed effect.
- Secure with confidence: Use heavy-duty anchors if your ceiling isn’t load-bearing.
| Beam Type | Cost per 8 ft | Installation Time |
|---|---|---|
| Real Wood | $120–$200 | Professional recommended |
| Polyurethane | $25–$50 | 2–3 hours (DIY-friendly) |
Pro tip: Test beam placement with painter’s tape before drilling. My kitchen’s new focal point proves that budget-friendly updates can deliver high-end style. Just avoid hanging heavy fixtures from faux beams—they’re for looks, not load-bearing.
5. Brighten the Space with Updated Lighting
Good lighting is the secret sauce that makes even simple meals feel like a restaurant experience. When I swapped my harsh overhead fixture for layered illumination, shadows disappeared and textures popped. Strategic lighting creates depth while making food prep safer.
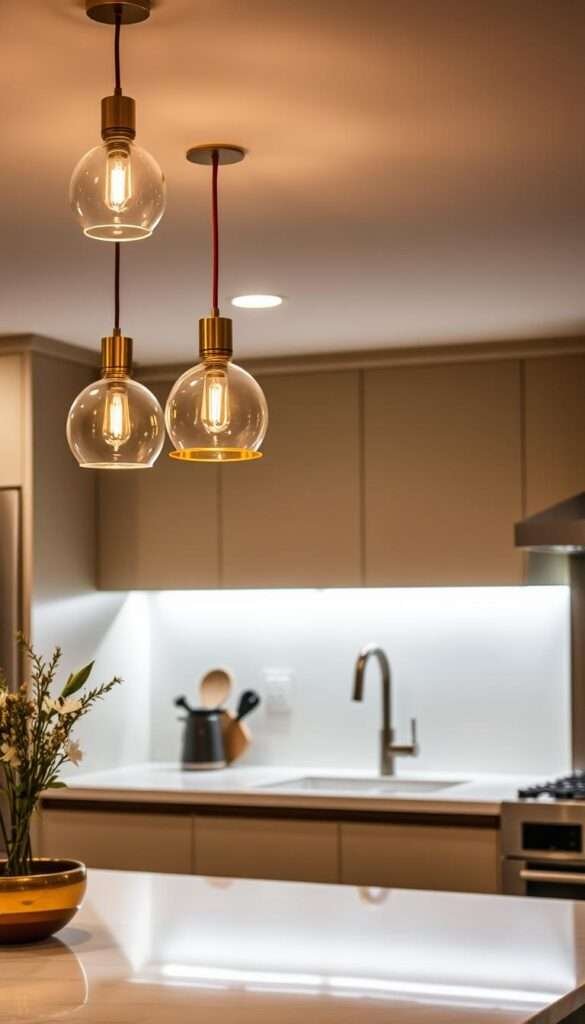
Pendant Lights Over an Island
Schoolhouse Electric pendants became my favorite upgrade—their vintage-inspired glass diffuses warm, even light. I chose 2700K bulbs (like afternoon sunlight) to enhance wood tones. For islands, hang lights 30-36 inches above countertops at even intervals.
Consider these smart options:
- Voice control: Adjust brightness hands-free while cooking
- Dimmable LEDs: Set mood from breakfast bright to dinner intimate
- Mixed metals: Brass pendants pair beautifully with nickel cabinet hardware
Under-Cabinet LED Strips
These transformed my dark countertops into a well-lit workspace. I used adhesive strips with 3000K temperature—bright enough for chopping but warm enough for ambiance. Renters can try battery-operated puck lights that stick on without wiring.
Installation tips:
- Measure cabinet length minus 2 inches
- Clean surfaces with rubbing alcohol before applying
- Use diffuser channels to prevent visible light dots
Lighting layers make any kitchen feel intentional. Start with task lighting, add ambient glow, then highlight decor with accent spots. The right combination turns functional areas into inviting spaces.
6. Layer Textures with a Washable Rug
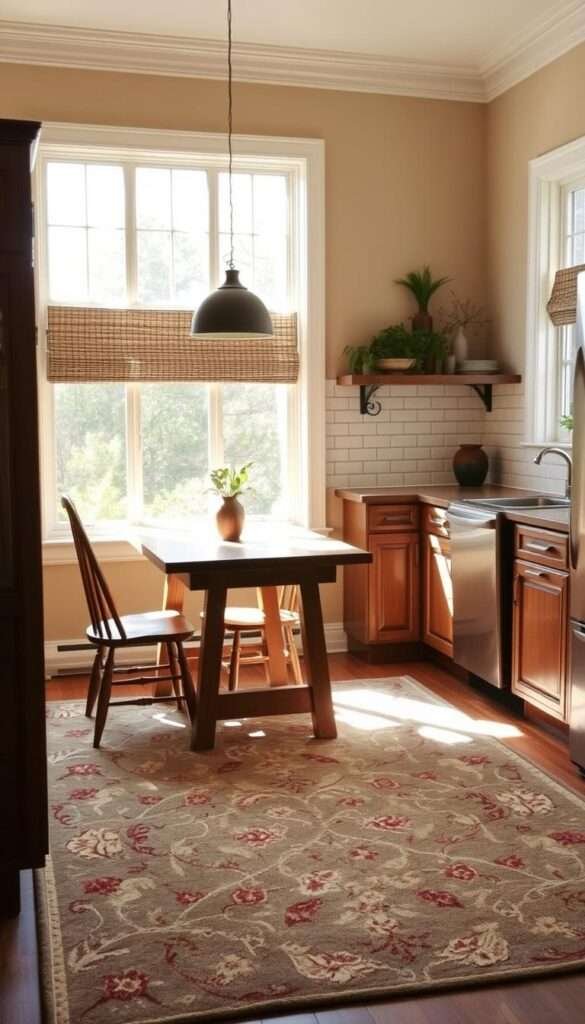
The moment I laid down a patterned rug in my kitchen, the room gained instant warmth and character. Unlike permanent changes like tile or paint, rugs offer flexible color and pattern play. My Ruggable washable rug survived three spaghetti incidents last month—proof that style and practicality can coexist.
For high-traffic areas, I swear by 2’x3′ runners in galley kitchens and 3’x5′ rectangles for island spaces. Natural fiber rugs like jute add organic texture but need spot cleaning. The secret? A grippy rug pad prevents slips and extends your rug’s lifespan.
Vintage Turkish kilims bring artisanal charm—layer them diagonally under dining nooks for visual interest. I styled mine with:
- Contrasting geometric patterns against hardwood floors
- Fringe details that peek out from under cabinets
- Earth tones that hide crumbs between cleanings
This simple addition transformed my sterile floors into part of the kitchen feel. Now every step feels intentional, not just functional.
7. Create a Focal Point with a Bold Backsplash
My kitchen lacked personality until I discovered the power of a statement backsplash. In one weekend, I transformed a blank wall into a conversation starter using budget-friendly materials. The change added depth and character without permanent alterations.
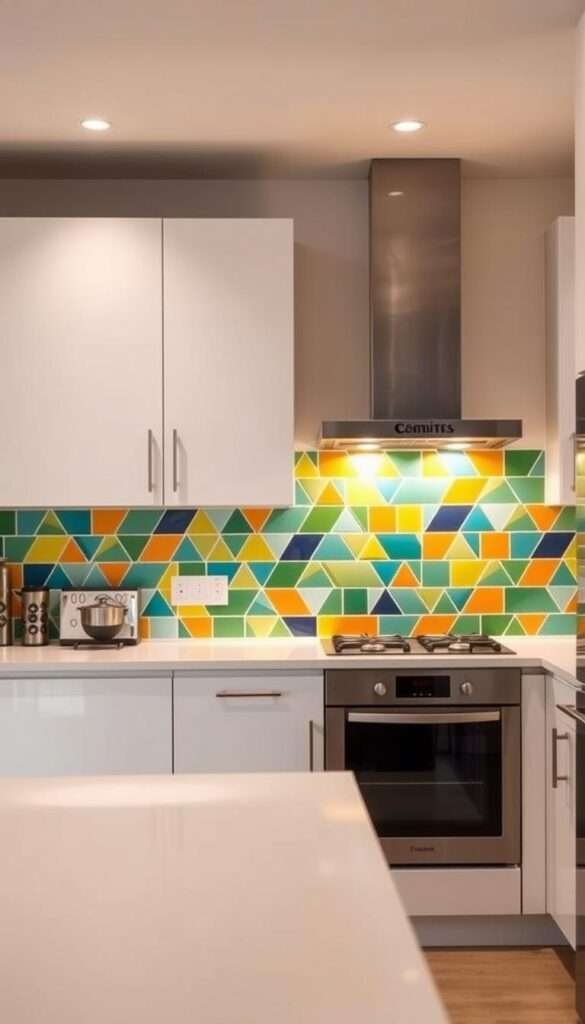
Peel-and-Stick Tile for Renters
Tempaper’s removable mosaics offer stunning patterns that install in minutes. I chose their hexagon design—it mimics real tile but peels off cleanly when moving. For renters or commitment-phobes, these decals provide high-impact style with zero damage.
Compare popular backsplash options:
| Material | Cost per sq ft | DIY Difficulty |
|---|---|---|
| Ceramic Tile | $5–$15 | Moderate (requires grout) |
| Glass Tile | $7–$20 | Easy (pre-mounted sheets) |
| Beadboard | $1–$3 | Simple (paintable panels) |
Metallic accents add glamour—try copper or brass-finished tiles behind the range. For a modern twist, arrange subway tiles in a herringbone pattern. Dark grout creates bold definition, while light grout keeps spaces airy.
Calculate tile needs with this formula:
- Measure wall height × width (in inches)
- Subtract window/door areas
- Divide by 144 to get square footage
- Add 10% extra for cuts
My favorite hack? Removable wallpaper with tile prints—it’s perfect for small accent walls. For more inspiration on functional decor, explore these small kitchen decor ideas that maximize style.
8. Repurpose Vintage Finds for Unique Charm
That chipped 1920s dresser I found on Craigslist became the heart of my cooking space. With a marble top added, it now serves as a vintage kitchen island full of charm. Antique stores and Facebook Marketplace are goldmines for pieces that add instant character.
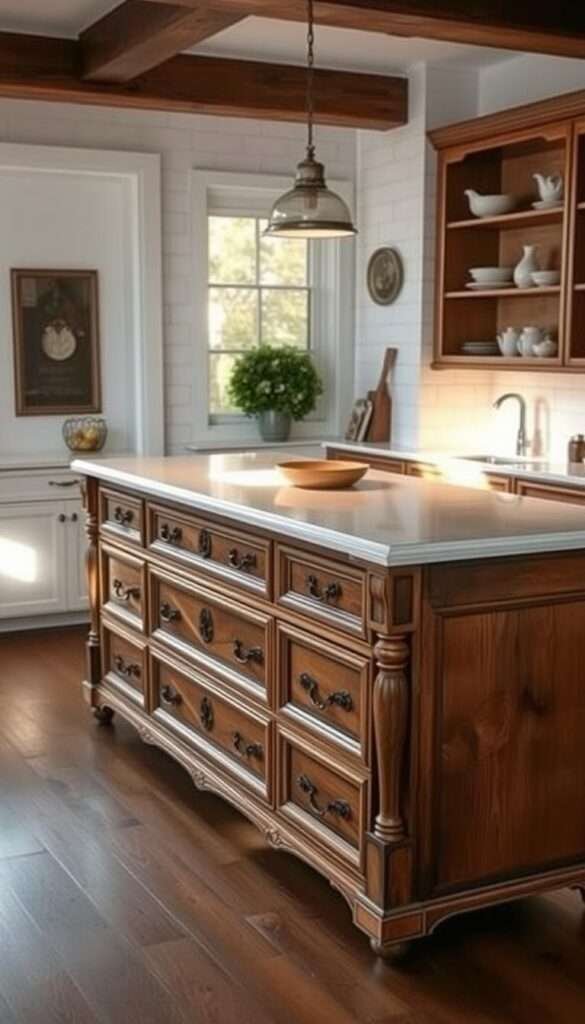
Chalk paint works miracles on flea market finds. My go-to technique: light sanding, two thin coats, and wax sealing for durability. Heritage Hardware’s reproduction knobs maintain the antique style while ensuring functionality.
Safety first with older pieces:
- Test leaded glass doors before installation
- Reinforce wobbly legs with corner brackets
- Check weight limits before converting furniture
Glass apothecary bottles hold spices beautifully, while framed vintage seed packets become affordable art. My favorite diy? Turning antique pantry doors into open shelving—they add architectural interest without renovation.
These treasures make my home feel layered with history. Each scratch tells a story, proving perfection isn’t required for warmth. Start small with a single vintage stool or bread box to test the waters.
9. Style Countertops with Minimal, Intentional Decor
Cluttered countertops used to overwhelm me until I discovered the art of intentional styling. Now, my workspace feels curated yet functional—every item serves a purpose or sparks joy. The secret? Balancing open space with carefully chosen accents.
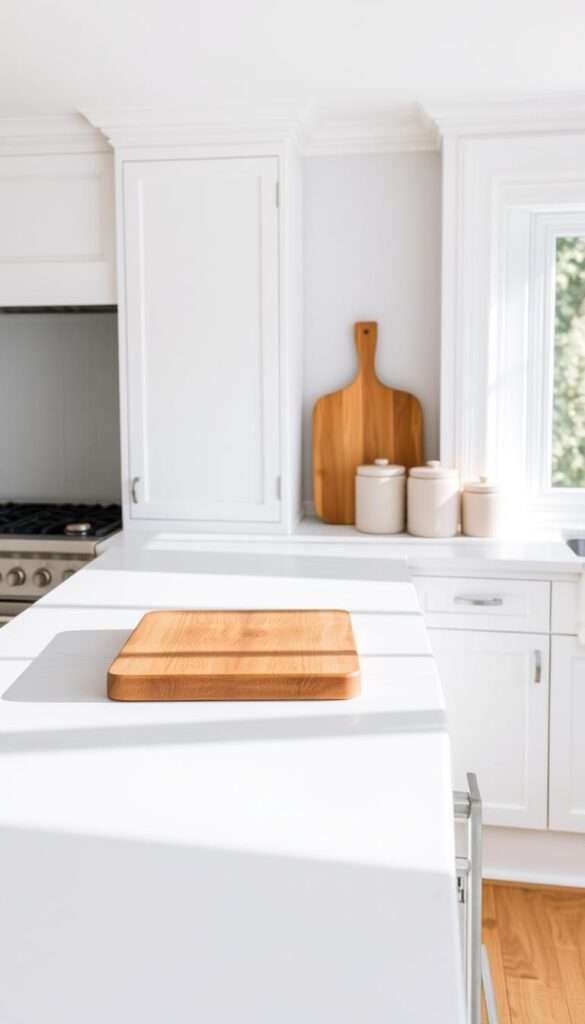
Decanting staples into matching containers instantly elevates daily essentials. I use amber glass jars for flour and sugar, with chalkboard labels for easy identification. Anthropologie’s ceramic canisters add artful texture while keeping things fresh.
Follow the trio rule for visual harmony. Group items in threes—like a wooden cutting board, olive oil bottle, and copper measuring cups. These functional pieces double as decor when arranged thoughtfully. Tiered stands maximize vertical storage for spices or fruit.
Watch out for grease splatter zones near the stove. I keep this space clear except for a leather-bound plant holder with easy-to-clean succulents. Crate & Barrel’s marble utensil crock adds polish while corralling daily tools.
Your kitchen deserves both beauty and practicality. Start with one cleared area, then slowly add purposeful items. Less clutter means more room for creativity—and better cooking vibes.
10. Introduce Cozy Seating with a Kitchen Nook
Adding a built-in nook transformed my kitchen from purely functional to invitingly social. The sunlit corner now draws family and friends like a magnet, proving even small spaces can become heartwarming hubs.
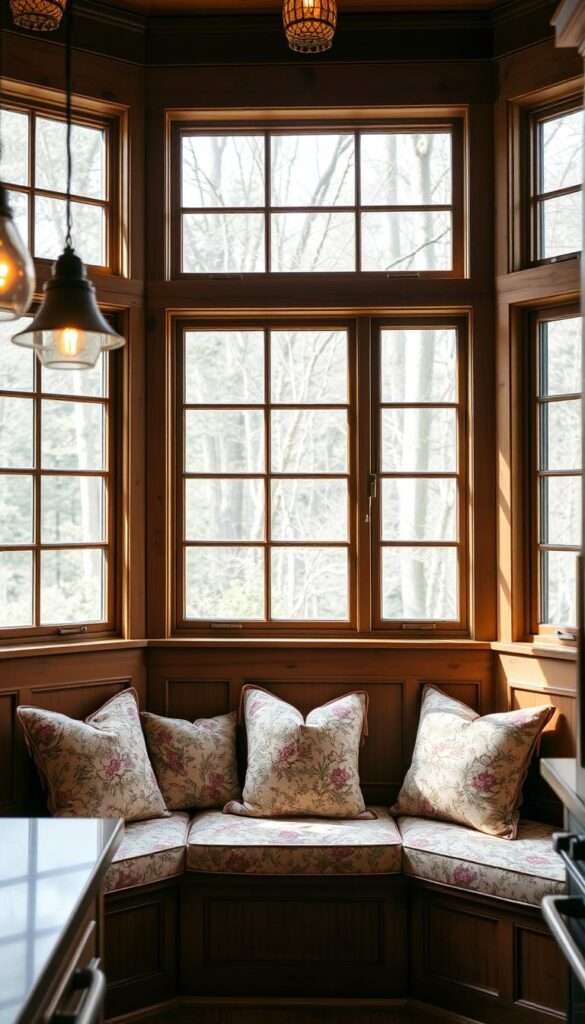
Bench depth matters for comfort—aim for 18-20 inches to accommodate cushions without sacrificing floor space. My IKEA hack used two BILLY bookcases as the base, topped with a custom cushion in Sunbrella fabric that repels coffee stains.
Don’t waste the space below. Lift-top storage hides rarely used appliances, while woven baskets keep throws handy. For smaller kitchens, a counter-height bistro table doubles as casual dining and prep space.
Practical touches make the nook work harder:
- USB outlets tucked under the bench lip keep devices charged
- Mix-and-match throw pillows add seasonal color without commitment
- Wall-mounted sconces save table space while adding ambient light
This cozy corner became the soul of my home, where morning coffee rituals and late-night chats unfold. For more inspiration, explore these cottage kitchen ideas that blend charm with everyday life.
The nook’s farmhouse vibe comes through in the distressed wood table and gingham cushions. What began as unused space now hosts more memories than my dining room—proof that thoughtful design changes how we live.
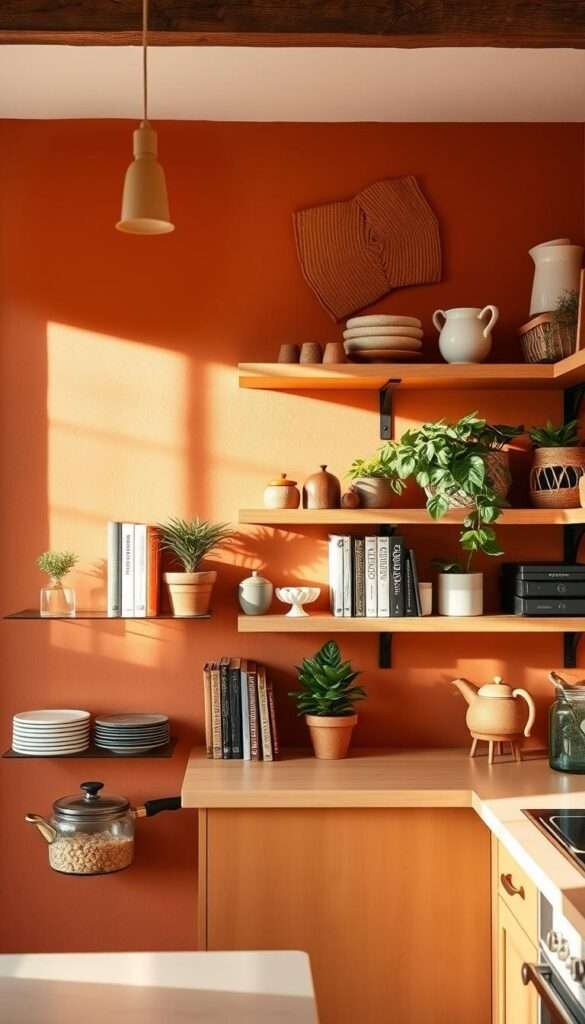
11. Paint Walls in Earthy or Soft Neutral Tones
Earth-toned walls became the unexpected hero of my kitchen makeover. A coat of Farrow & Ball’s “Setting Plaster” turned cold white surfaces into warm, inviting backdrops. The change cost under $100 but impacted the entire look.
Flat finishes hide imperfections beautifully, while eggshell offers subtle sheen for easier cleaning. I tested both on a sample board before committing. The matte texture of flat paint enhanced my space’s cozy feel.
Sage green creates calming energy near cooking areas. For drama, try a black accent wall behind open shelving. My friend used this trick to define her dining nook without structural changes.
| Finish Type | Best For | Maintenance |
|---|---|---|
| Flat Matte | Hiding flaws, rustic styles | Spot clean only |
| Eggshell | Active families, modern spaces | Wipes clean easily |
Always sample colors at different times of day. I painted tester pots directly onto my wall to observe light changes. Benjamin Moore’s color-matched primer ensured true color representation with fewer coats.
Consider adjacent rooms when selecting hues. My kitchen flows into the living area, so I chose tones that complement both spaces. Soft neutrals create harmony, while still letting each room shine.
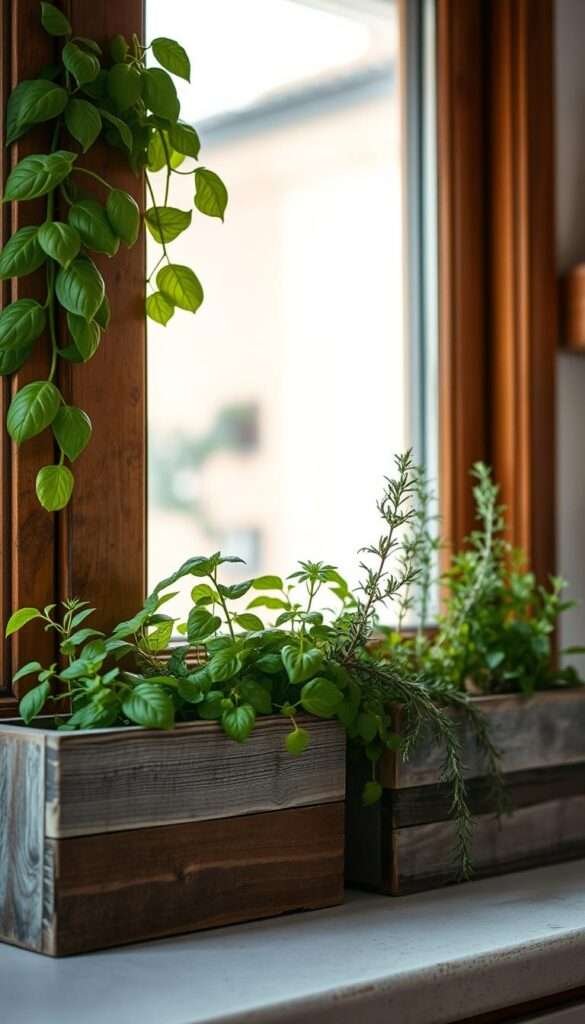
12. Add Greenery for Freshness and Life
The scent of fresh basil from my windowsill garden made me realize plants transform more than just decor—they change how a space feels. Living elements bring warmth and movement to static surfaces. Even small touches like propagated cuttings in vintage bottles add organic texture.
Windowsill Herb Gardens
Reclaimed wood planters add rustic charm while keeping herbs within easy reach. I repurposed an old belt into a leather hanger for my trailing rosemary—it brings life to blank wall spaces. For spring, swap evergreen plants for seasonal blooms like lavender or chamomile.
Low-maintenance options thrive in kitchen conditions:
- Snake plants purify air and survive irregular watering
- Pothos vines trail beautifully from open shelves
- Spider plants produce baby offshoots for easy sharing
Create a propagation station with clear glasses on the windowsill. Watching roots develop adds daily wonder while expanding your plant collection for free. Change water weekly to prevent algae buildup.
Safety note: Avoid toxic varieties like philodendron near food prep zones. The ASPCA lists pet-safe options if furry friends explore countertops. Always research before introducing new plants.
For vacations, self-watering spikes keep soil moist for up to two weeks. I use terra cotta versions that slowly release water from wine bottles. Macrame hangers free up counter space—YouTube tutorials make knotting simple.
Greenery isn’t just decoration; it’s living art that evolves with your home. Start with one resilient plant and let nature do the rest.
13. Upgrade Your Faucet for Instant Polish
Gold fixtures weren’t my usual choice, but they became the jewelry my kitchen didn’t know it needed. My brushed brass faucet added warmth to cool marble counters, proving hardware can redefine a space’s entire look. The change cost less than a weekend restaurant budget but delivered daily luxury.
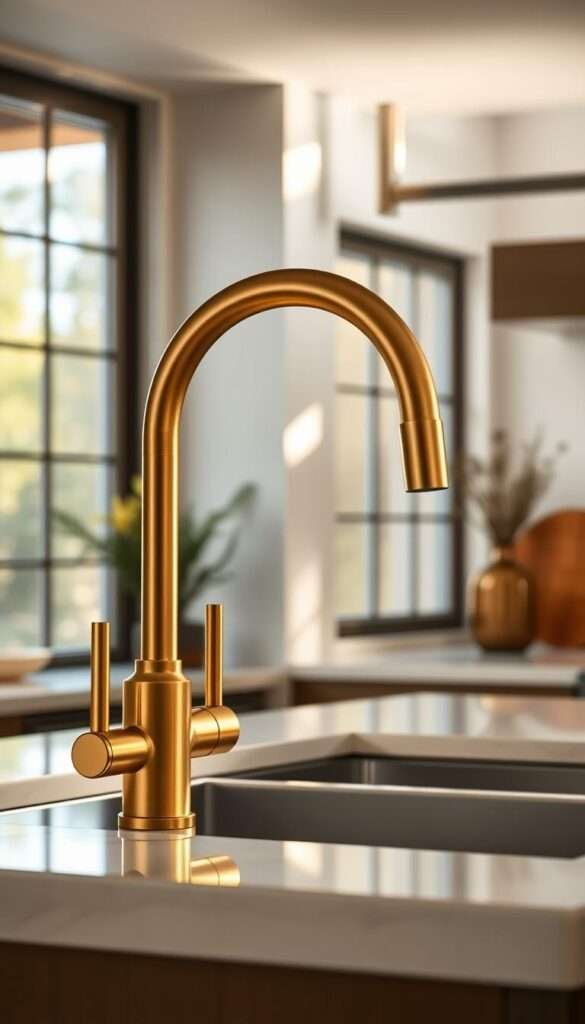
Matte black makes a bold statement in modern spaces, while polished nickel suits transitional designs. I chose a bridge-style faucet for vintage charm—its cross handles recall early 20th-century elegance. Single-lever models offer streamlined convenience, especially with Moen’s MotionSense technology that activates with a tap.
Water efficiency matters. Look for 1.8 GPM flow rates that conserve without sacrificing pressure. My Delta Touch2O faucet saves 30% more water than older models while offering temperature memory. Professional installation ensures leak-free performance, but many diy enthusiasts handle swaps with basic tools.
| Finish | Best For | Maintenance |
|---|---|---|
| Brushed Gold | Warm color palettes | Wipe with microfiber |
| Matte Black | Modern contrast | Avoid abrasive cleaners |
Complete the style with matching things like soap dispensers and towel rings. I sourced oil-rubbed bronze accessories from Etsy to complement my faucet’s undertones. For renters, temporary adhesive hooks hold coordinating hand towels without damaging surfaces.
This small change elevated my daily routine. Now, even washing vegetables feels like interacting with functional art. Start with the faucet—it’s the centerpiece that ties all other elements together.
14. Create a Coffee or Tea Station
Morning coffee rituals became sacred when I carved out a dedicated station—now it’s my favorite corner of the house. This small space blends functionality with personality, turning daily routines into moments of delight. Whether you’re a latte artist or tea connoisseur, a curated setup elevates the experience.
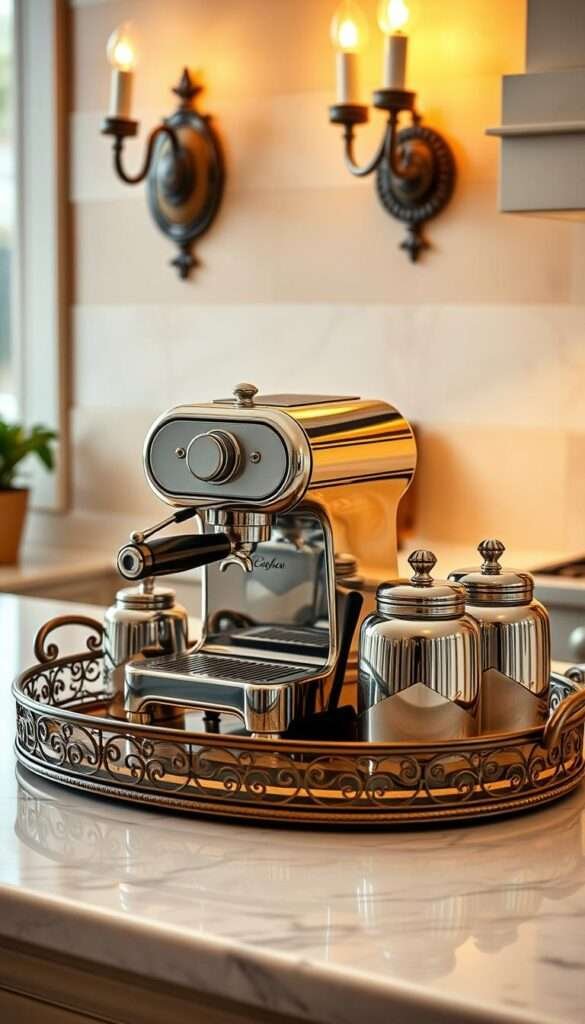
Organization with Style
Decorative trays offer a functional way to corral essentials while adding visual appeal. My bamboo tray keeps daily things accessible: Fellow’s Atmos canisters for beans, a ceramic creamer, and artisan mugs. For small kitchens, wall-mounted pegboards maximize vertical space with hooks for measuring spoons and towels.
Smart appliances integrate seamlessly. The Breville Barista Touch remembers grind settings, while smart kettles like Cosori’s sync with phone alarms. Always check outlet requirements—many prosumer machines need 20-amp circuits. Local roasters like Intelligentsia or Stumptown offer subscription plans for fresh deliveries.
| Station Type | Best For | Key Features |
|---|---|---|
| Minimalist Tray | Small kitchens | Portable, easy to clean |
| Repurposed Furniture | Vintage lovers | Hidden storage, character |
| Smart Coffee Bar | Tech enthusiasts | Voice control, scheduling |
Thoughtful design choices make the station work harder:
- USB outlets built into drawers charge devices while keeping counters clear
- Magnetic spice tins on the fridge side hold flavored syrups
- Small slate boards label rotating single-origin beans
This corner delivers professional-grade coffee at home while reflecting personal taste. Start with a tray and expand as your ritual evolves—every great station begins with that first perfect cup.
15. Incorporate Artwork for Personality
Blank walls in my kitchen felt impersonal until I discovered the power of curated artwork. A gallery wall above my farmhouse sink became the unexpected focal point that tied my whole design together.
For humid environments, choose acrylic instead of glass to prevent condensation damage. I framed vintage cookbook pages in museum-quality UV-resistant frames to preserve their color.
Etsy offers incredible food-themed art from independent artists. My favorite finds include watercolor herb prints and minimalist coffee sketches. These pieces add style while celebrating kitchen rituals.
Renters can use Command Strips for damage-free hanging. The large picture-hanging varieties securely hold frames up to 16×20 inches. Always test weight limits before final placement.
Try these gallery wall layouts for your home:
- Grid pattern for modern symmetry
- Organic cluster for eclectic charm
- Vertical column for narrow spaces
Keep artwork at least 24 inches from cooking surfaces to avoid grease splatter. Wipe frames monthly with a microfiber cloth to maintain their fresh look.
16. Your Cozy Kitchen Awaits—Start Small and Enjoy the Process
Six months ago, my kitchen felt stuck in another era—until small changes sparked a complete transformation. Design isn’t about perfection; it’s crafting a space that reflects your daily life. Focus on high-impact updates first, like painting cabinets or swapping lighting.
Begin with three manageable projects. My first steps? Fresh hardware, a statement rug, and open shelves. Seasonal updates keep the kitchen evolving—swap textiles in summer, add warm layers in winter.
Resources that helped me:
- Annie Sloan Chalk Paint for cabinet makeovers
- Etsy artisans for custom floating shelves
- Ruggable’s machine-washable kitchen rugs
Remember, great things grow from small starts. Your dream kitchen begins with one intentional change.