Table of Contents
ToggleI remember walking into my first apartment years ago. The kitchen was tiny—barely enough room to turn around. But with smart choices, I transformed it into a cozy, functional space that felt bigger than it was.
Compact kitchens present unique challenges. Every inch counts when balancing style and practicality. Through trial and error, I discovered how strategic design choices can create both efficiency and personality in tight quarters.
Vertical storage became my best friend. Open shelving kept essentials handy while making walls work harder. A compact island added prep space without crowding the floor. These solutions prove small doesn’t mean sacrificing style or function.
In this guide, I’ll share insights from designing dozens of petite kitchens. We’ll explore lighting tricks, reflective surfaces, and multi-functional storage ideas that maximize every square foot. Because even the coziest cooking space can feel spacious with the right approach.
1. Transform Your Small Kitchen with These Essential Decor Accents
Designing a compact cooking space taught me how impactful decor can be. It’s not just about aesthetics—smart design choices elevate functionality while making small spaces feel larger.

Why decor matters in compact spaces
In a tiny kitchen, every detail counts. Warm tones and layered textures create perceived coziness, while clutter-free surfaces enhance usability. Studies show 68% of homeowners prefer decor that serves dual purposes, like stylish baskets hiding utensils.
Take designer Brie Williams’ approach: she uses narrow appliances and vertical storage to maximize efficiency. Her kitchen proves that even the tightest layouts can blend style with function seamlessly.
Balancing style and functionality
Gary McBournie’s contrasting island color trick adds depth without crowding. Stick to 3-4 complementary materials—like wood shelves with metal accents—to maintain visual cohesion.
Remember, kitchen design principles here focus on harmony. A patterned rug defines zones, while glass-front cabinets keep essentials accessible yet display-worthy. The goal? Make small work smarter, not harder.
2. Open Shelving for Airy Charm and Easy Access
Nothing opens up a cramped cooking space like well-planned open shelving. When I swapped my upper cabinets for floating shelves, the transformation was immediate—more light, better airflow, and everything within easy reach.

Designer Helen Norman demonstrates this perfectly in her projects, pairing glass pendant lights with wood shelves to create warm, functional displays. The key lies in balancing practicality with visual appeal.
Choosing the right materials: wood vs. metal
Through trial and error, I’ve found material choice makes all the difference. Wood shelves bring warmth but require more maintenance, while metal offers sleek durability. Consider these factors:
- Wood: Adds rustic charm (needs occasional refinishing)
- Metal: Modern and sturdy (can show fingerprints)
- Mixed media: Wood tops with metal brackets combine both worlds
For my own kitchen, I chose reclaimed oak shelves—they hide minor wear beautifully while complementing my cutting board collection.
Styling tips to avoid clutter
The biggest mistake I see? Overcrowding shelves with mismatched items. Follow this display formula: 70% everyday essentials, 30% decorative accents. Shelf risers create vertical space for spice jars or small plants.
Group similar items in odd numbers—three ceramic canisters or five stacked bowls create rhythm. Leave breathing room between objects, and rotate seasonal pieces to keep the look fresh without overwhelming the space.
Remember: open shelving should feel curated, not chaotic. When styled right, it becomes both storage solution and design statement.
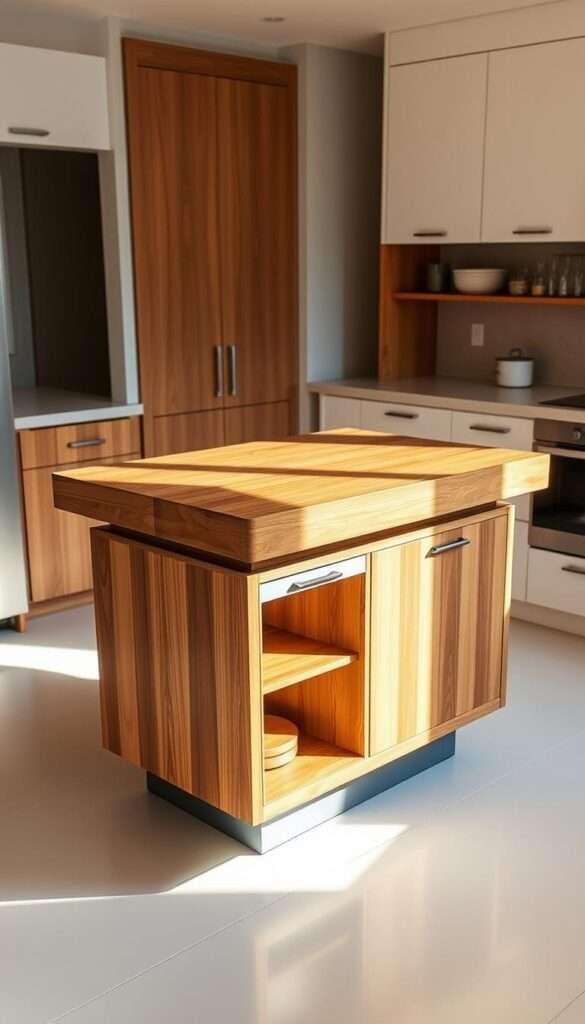
3. Compact Kitchen Islands That Maximize Space
Kitchen islands aren’t just for spacious homes—my 90-square-foot kitchen proves even the tiniest spaces can benefit from smart island solutions. The right design adds prep space, hidden storage, and even casual seating without crowding. I’ve tested everything from industrial carts to repurposed furniture to find what truly works.
Rolling vs. stationary islands
After trying both types, I learned mobile islands offer flexibility that fixed ones can’t match. My stainless steel cart with locking wheels moves from cooking zone to dining area in seconds. For tight spaces, industrial table islands at 3ft height optimize narrow walkways while providing full functionality.
Stationary islands shine when you need permanent counter space. Studio OSKLO’s curved design taught me how rounded edges improve traffic flow—no sharp corners to navigate around. Just remember: maintain 36″-42″ clearance on all sides for comfortable movement.
Multi-functional island designs
The best compact kitchen island serves multiple purposes. My butcher block top handles meal prep by day and transforms into a buffet surface when entertaining. Below, pull-out drawers store everything from charging stations to knife blocks—vertical storage I access without bending.
For budget-friendly options, I repurposed a vintage dresser with quartz countertop. The drawers now hold linens, while the surface provides extra workspace. As designer Gary McBournie suggests, mixing materials like wood and metal creates visual interest without sacrificing function.
Whether you choose mobile or fixed, focus on how the island makes your space feel. Properly scaled solutions should enhance—not hinder—your kitchen’s workflow and aesthetic.
4. Clever Vertical Storage Solutions
Vertical storage became my secret weapon for making a compact kitchen feel spacious and organized. By utilizing wall space creatively, I gained back precious square footage while adding personality to my cooking area.
Pegboards for customizable organization
My pegboard installation changed everything. Slatwall panels accommodate various hooks, letting me rearrange tools as needs change. Copper cookware hangs beautifully, doubling as decor while saving cabinet space.
- Weight capacity: Drywall anchors support 25 lbs, while stud-mounted boards hold 50+ lbs
- Material choices: Painted steel offers durability, while stained wood adds warmth
- Creative alternatives: Magnetic knife strips display blades like functional art
| Option | Cost | Install Difficulty | Customization |
|---|---|---|---|
| DIY Plywood | $35+ | Moderate | High |
| Premium Metal | $120+ | Easy | Medium |
| Slatwall System | $75+ | Hard | High |
Hanging pot racks to free up cabinets
Ceiling-mounted racks liberated my lower cabinets for bulkier items. I learned to secure heavy cast iron with locking hooks after one close call. The visual impact surprised me—my copper collection became a focal point.
For renters or low ceilings, wall-mounted bars work wonders. Position them near cooking stations for efficiency. Pro tip: Paint pegboards to match your backsplash for a seamless, built-in look that expands visual space.
Vertical solutions prove that smart design isn’t about having more space—it’s about using what you have better. My walls now work harder than my floor ever did.
5. Light and Bright Color Palettes
Color transformed my cramped cooking space more than any other design element. Strategic hues create optical illusions—expanding walls visually while setting the entire room’s mood. The right palette makes compact areas breathe while reflecting precious light.

Best paint colors to expand visual space
Light Reflectance Value (LRV) matters more than you’d think. Colors scoring 60+ on the LRV scale bounce back the most light. Benjamin Moore’s Whispering Spring (LRV 67) delivers this effect with its soft green undertones.
For bold personalities, kiwi-green walls add playful flair without shrinking the room. Blue-gray cabinets create serene spaces when paired with white countertops. My go-to combination? Warm ivory upper walls with pale oak lower cabinets for balanced warmth.
Accent walls for depth without overwhelm
Strategic contrast adds dimension where you need it most. Designer Ashley Maddox proves this with her signature white-and-dark contrast technique. Focus accent walls behind open shelves or islands to draw the eye outward.
Renters can achieve similar effects with removable wallpaper. I’ve used textured grasscloth patterns to add interest above my sink area. The trick? Keep the accent area under 30% of total wall space for proportional impact.
| Color Strategy | Best For | Visual Effect |
|---|---|---|
| Monochromatic | Ultra-compact spaces | Seamless flow |
| Complementary | Defining zones | Subtle contrast |
| Triadic | Open layouts | Dynamic energy |
Remember, your palette should enhance how the space feels. Test swatches at different times of day—what looks airy at noon might feel cavernous by evening lamplight.
6. Statement Backsplashes with Personality
The moment I installed my first patterned backsplash, the entire kitchen’s energy shifted. What began as a functional wall protector became the room’s focal point, proving that even modest spaces deserve bold style statements. Whether you prefer timeless subway tiles or vibrant geometrics, the right choice elevates both aesthetics and functionality.
Classic subway tile versus daring patterns
Subway tiles offer clean versatility—their rectangular shape creates subtle movement when laid in herringbone or vertical stacks. For my cottage kitchen, I paired white 3×6 tiles with dark grout for contrast that pops.
Bold patterns demand more consideration but deliver greater impact. Moroccan zellige tiles add organic texture, while hexagonal designs modernize traditional spaces. Remember: busy prints work best when balanced with solid countertops and cabinets.
Budget-friendly alternatives with high impact
Peel-and-stick decals changed my rental home game completely. Modern vinyl options mimic cement tile or marble at 10% the cost. I recently installed geometric patterns behind my stove—the heat-resistant material withstands splatters while adding artistic flair.
Consider these material comparisons for lasting decor:
- Ceramic: Affordable and durable (needs sealed grout)
- Glass: Reflects light beautifully (shows water spots)
- Metal: Industrial edge (requires polishing)
| Backsplash Type | Cost Per Sq.Ft | Installation Time | Best For |
|---|---|---|---|
| Premium Tile | $25-$45 | 2-3 days | Permanent upgrades |
| Peel-and-Stick | $15-$30 | 2 hours | Rentals/temporary spaces |
| Painted Chalkboard | $10-$20 | 1 day | Creative customization |
Pro tip: Continue your backsplash behind open shelves for a cohesive look. For DIYers, use spacers when laying tile to achieve professional grout lines. Explore cottage-inspired tile patterns that maximize small wall areas with big visual impact.
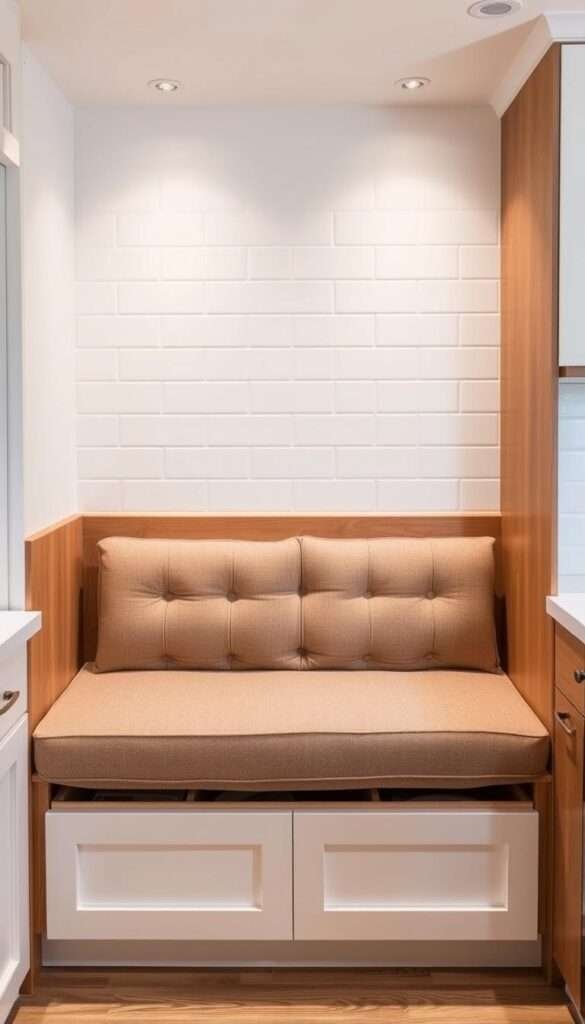
7. Space-Saving Seating: Stools and Benches
Finding seating that fits my compact kitchen felt impossible until I discovered space-saving solutions. The right choices keep floor areas clear while adding function and style. Through trial and error, I learned what works best in tight quarters.
Backless stools for tight corners
Swivel stools with slim profiles became my go-to for 36″ counters. The ideal height matches standard counter depth, allowing comfortable use without crowding walkways. Rounded edges prevent bumped knees in narrow spaces.
Material choices matter for durability. Indoor/outdoor fabrics withstand spills, while metal legs offer stability. Designer Liz Dutton’s antique table conversion proves even vintage pieces can serve dual purposes as prep surfaces and casual seating.
Built-in banquettes with hidden storage
Custom banquettes transformed my awkward corner into a cozy breakfast nook. The lift-up seat reveals ample room for rarely used appliances. This approach maximizes functionality while keeping the space feeling open.
Consider these bench specifications:
- Depth: 18-22″ for comfortable seating
- Height: 17-19″ pairs with standard tables
- Fabric: Performance-grade textiles resist stains
| Seating Type | Space Required | Storage Capacity | Best For |
|---|---|---|---|
| Backless Stools | 24″ clearance | None | Quick meals |
| Built-in Banquette | 36″ corner | 15+ cubic ft | Family dining |
| Folding Chairs | 18″ when stored | Minimal | Occasional use |
Mobile islands with see-through bases maintain visual flow near seating areas. For ultimate efficiency, combine banquettes with pull-out tables that disappear after meals. The right seating solution should enhance—not restrict—your kitchen’s workflow.
8. Mirrors and Reflective Surfaces to Amplify Light
The discovery that mirrors could double my kitchen’s perceived size changed my entire design approach. Strategically placed reflective surfaces create brightness where natural light is limited, making compact kitchens feel instantly more open.

Strategic mirror placement
Positioning matters more than size when using mirrors to enhance space feel. Opposite windows, they bounce sunlight deeper into the room, while narrow panels above counters brighten work areas. IKEA’s SATSUMAS mirror panels offer affordable solutions for renters.
Consider these placement strategies:
- Task zones: 18″ wide mirrors above prep areas improve visibility
- Dark corners: Angled mirrors redirect existing light sources
- Safety note: High-gloss lacquer cabinets provide reflection without breakage risk
Glossy finishes that bounce light
Becca Interiors’ glossy tile solution demonstrates how shine transforms spaces. Her shiny black backsplash reflects 70% more ambient light than matte surfaces. For similar effects:
| Material | Light Reflectance | Best Application |
|---|---|---|
| Glass tile | 85-90% | Backsplashes, accent walls |
| Polished quartz | 75-80% | Countertops, shelves |
| Metallic paint | 60-65% | Cabinets, trim |
Maintain balance—limit glossy surfaces to 40% of walls to prevent visual overwhelm. When executed well, reflective decor creates kitchens that feel as bright as they look, proving good design can literally shine in small spaces.
9. Layered Lighting for Warmth and Function
The right lighting layers made my compact kitchen feel twice its actual size. Three strategic sources—ambient, task, and accent—work together to eliminate shadows while adding depth. This approach solves both visibility issues and spatial constraints.

Pendant lights over islands
Clear glass pendants reduce visual clutter while directing light precisely where needed. Hang them 30-36″ above counter surfaces for optimal illumination without glare. I chose 2700K bulbs for warm, inviting tones that complement my wood finishes.
Consider these pendant options:
- Mini sizes: 8-10″ diameters suit narrow spaces
- Adjustable cords: Customize heights for multi-level islands
- LED clusters: Energy-efficient with 50,000-hour lifespans
Under-cabinet task lighting
Motion-sensor LED strips transformed my prep areas. They consume 75% less energy than halogen bulbs while providing shadow-free chopping conditions. Place them toward the cabinet front to avoid countertop glare.
Compare lighting types:
| Type | Cost/Year | Brightness |
|---|---|---|
| LED Tape | $12 | 450 lumens/ft |
| Halogen | $48 | 350 lumens/ft |
Dimmers offer adjustable ambiance from bright morning cooking to soft evening moods. This layered design approach proves good lighting isn’t just functional—it’s transformative for small kitchen spaces.
10. Textured Rugs to Define Zones
A well-placed runner solved both my cold feet and design dilemmas. These versatile floor coverings create visual boundaries in open layouts while adding warmth underfoot. My favorite transforms the cooking area into a defined workspace without permanent changes.

Washable materials for practicality
Spills are inevitable, but stains don’t have to be. After testing various options, I found polypropylene rugs withstand daily wear while maintaining vibrant colors. The material comparison reveals clear winners:
- Polypropylene: Budget-friendly and machine-washable (lasts 3-5 years)
- Wool: Natural fibers feel luxurious (requires professional cleaning)
- Indoor/outdoor blends: UV-resistant for sunlit spaces (may feel rough)
For renters, washable options offer color commitment-free solutions. A baking soda sprinkle before vacuuming keeps fibers fresh between deep cleans.
Patterns that hide spills
Busy trellis designs camouflage crumbs better than solid colors. My Moroccan-patterned rug survived tomato sauce disasters that would ruin plain alternatives. Consider these styling strategies:
| Pattern Type | Camouflage Ability | Style Pairing |
|---|---|---|
| Geometric | Excellent | Modern kitchens |
| Floral | Good | Cottage spaces |
| Abstract | Moderate | Eclectic decor |
Non-slip pads prevent slips while protecting floors. For cohesive style, match rug tones to cabinet hardware or backsplash accents. The right floor covering elevates both function and aesthetic in compact kitchen spaces.
11. Floating Shelves for Display and Storage
My kitchen walls transformed when I swapped bulky cabinets for floating shelves. The open design created airy storage while turning everyday items into display-worthy accents. This simple change made my compact space feel larger and more personalized.
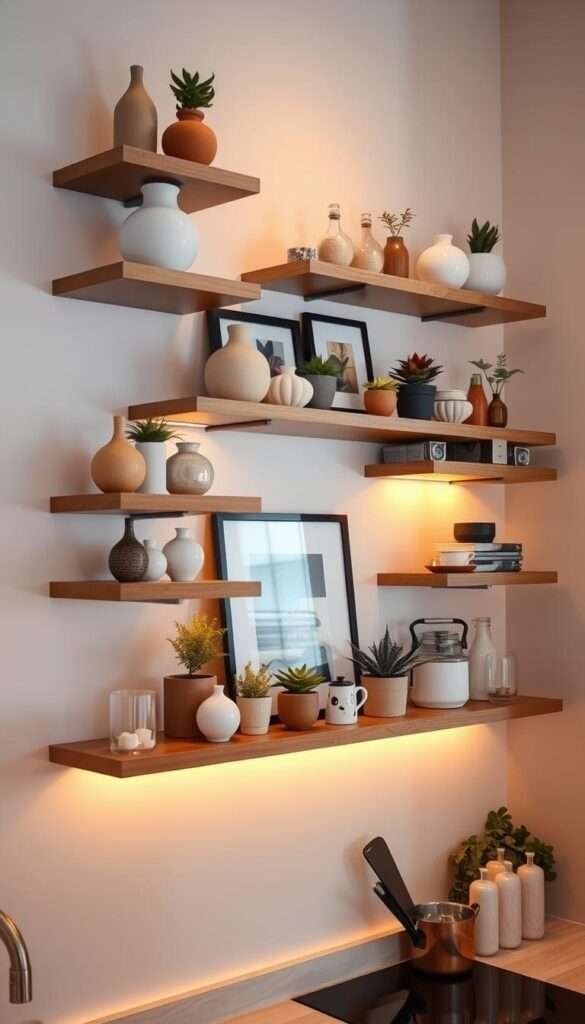
Curating shelf vignettes
Clara Jung’s light-enhancing shelves inspired my approach. She places collections near windows to catch natural light. The triangle composition technique creates balance—group items in odd numbers with varying heights.
Consider these styling strategies:
- Weight limits: Masonry installations hold 50+ lbs vs. drywall’s 25 lb capacity
- Thematic displays: Seasonal rotations keep the look fresh without clutter
- Childproofing: Museum putty secures delicate pieces safely
Mixing practical items with decor
Open shelves shine when they blend function and style. My formula: 60% daily-use items, 30% decorative accents, 10% negative space. Cookbooks stand vertically beside ceramic canisters for visual rhythm.
| Display Type | Functionality | Visual Impact |
|---|---|---|
| Utensil crocks | High | Medium |
| Potted herbs | Medium | High |
| Art objects | Low | High |
Floating shelves prove that wall space can work harder. They offer storage solutions while adding personality to compact kitchens. The key lies in balancing practicality with curated style.
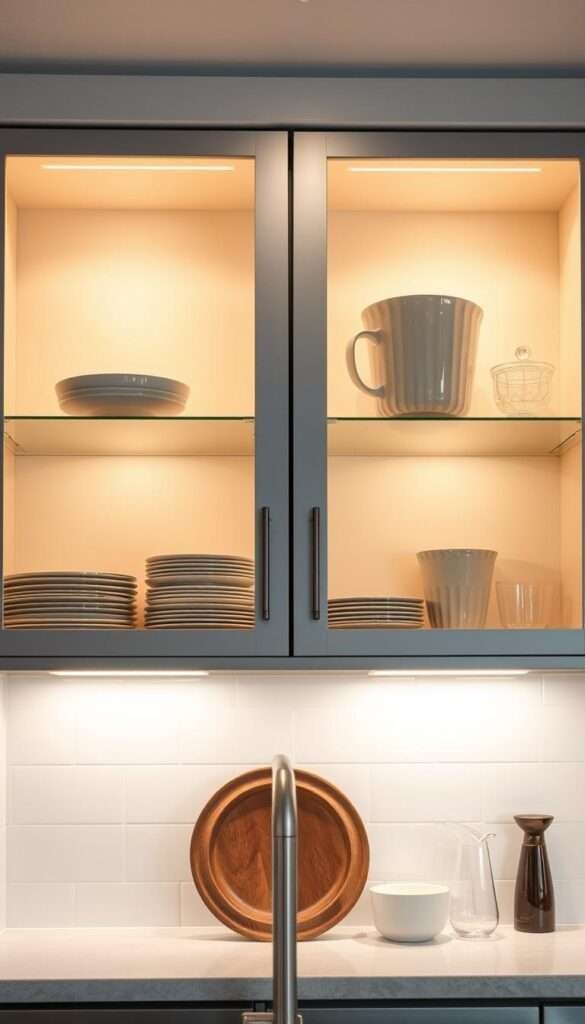
12. Glass-Front Cabinets to Showcase Dishware
Glass-front cabinets revealed an unexpected benefit in my kitchen makeover—they turned functional storage into a design feature. By displaying carefully curated items, these transparent doors add depth while keeping essentials accessible. They prove that even practical elements can enhance your home‘s aesthetic.
Displaying heirlooms vs. everyday pieces
My grandmother’s floral china gained new appreciation when displayed behind glass. For daily-use items, I arrange stacks by color—white plates behind clear glass, colorful mugs in frosted sections. This balance between special and practical creates a lived-in yet intentional look.
Consider these display strategies:
- Special collections: Use museum gel to secure fragile heirlooms
- Everyday items: Group by function (coffee station, baking essentials)
- Mixed displays: Layer cake stands behind frequently used bowls
Lighting inside cabinets for drama
Interior lighting transforms glass cabinets from simple storage to dramatic focal points. LED strip installations along the top edge provide even illumination, while puck lights highlight specific collections. My warm 2700K bulbs make white dishes glow against dark wood interiors.
| Lighting Type | Installation | Best For |
|---|---|---|
| LED strips | Top/bottom edges | Uniform brightness |
| Puck lights | Ceiling mounts | Accent lighting |
| Rope lights | Perimeter framing | Budget-friendly glow |
Designer Alexandra Kaehler demonstrates how lighting elevates ordinary dishware. Her glass-front storage solutions blend decor with function, proving that beautiful organization enhances compact kitchens. Whether displaying heirlooms or daily essentials, illuminated cabinets create depth and personality.
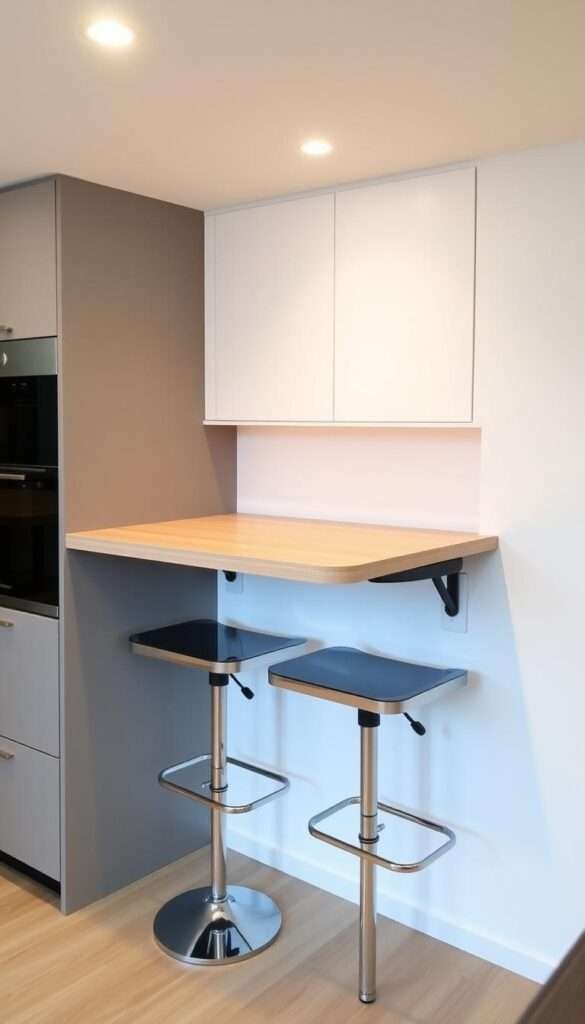
13. Fold-Down Tables for Flexible Dining
The moment I discovered fold-down tables, my tiny kitchen gained a dining area I never thought possible. These space-saving solutions transform unused wall areas into functional surfaces that disappear when not needed. Murphy-style designs particularly impressed me with their seamless integration into compact layouts.
Wall-mounted designs that maximize functionality
Quality hinges make all the difference in fold-down tables. After testing various models, I recommend 150lb+ capacity units with automatic locking mechanisms for safety. Scratch-resistant laminates withstand daily use while maintaining their finish.
Consider these material comparisons:
| Material | Durability | Maintenance | Cost |
|---|---|---|---|
| Hardwood | Excellent | Seasonal oiling | $$$ |
| Laminate | Good | Wipe clean | $ |
| Metal | Superior | Occasional polish | $$ |
Creative integration with bar seating
Pairing fold-down tables with backless stools creates instant dining nooks. I positioned mine at standard counter height (36″) for seamless transitions between prep and meal times. The IKEA NORBERG model proves budget-friendly options can offer both style and function.
For multi-use flexibility, consider these setups:
- Craft station: Lower the table for projects, then fold up after
- Breakfast bar: Combine with wall-mounted stools for compact seating
- Prep extension: Use as temporary counter space when cooking
These innovative solutions demonstrate how thoughtful design can create dining areas in even the most space-challenged kitchens. The right fold-down table becomes an invisible asset that appears exactly when needed.
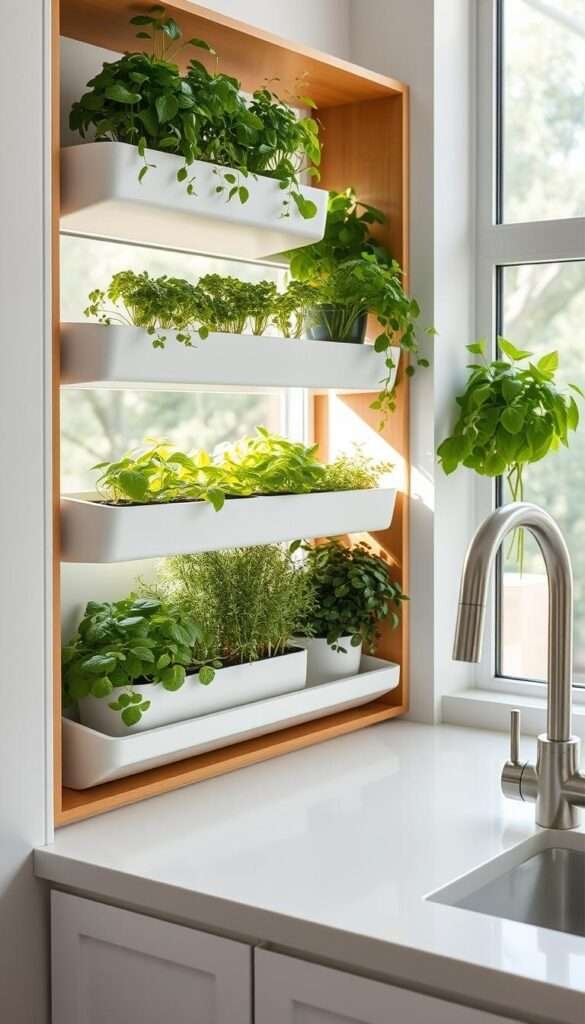
14. Herb Gardens for Freshness and Greenery
Vertical greenery became my unexpected solution for adding life to tight cooking spaces. What began as a single basil plant evolved into a thriving indoor garden that enhances both my meals and kitchen decor. These living accents bring nature indoors while maximizing every inch of available space.
Windowsill planters that thrive
South-facing windowsills offer ideal conditions for most culinary herbs. My rosemary and thyme flourish with just 6 hours of daily sunlight. For darker spaces, LED grow lights provide supplemental illumination.
Consider these sunlight requirements:
| Herb | Daily Sun Needs | Water Frequency |
|---|---|---|
| Basil | 6-8 hours | Every 2 days |
| Mint | 4-6 hours | Daily |
| Oregano | 6+ hours | Every 3 days |
Self-watering planters with wick systems prevent overhydration. I use ceramic pots with matching colors to maintain a unified style throughout my kitchen.
Space-saving hydroponic systems
Vertical gardens revolutionized how I grow herbs in limited areas. The Urban Cultivator’s countertop model fits perfectly next to my prep station, yielding fresh greens year-round. Its built-in irrigation makes maintenance effortless.
For pest control, these natural solutions work wonders:
- Neem oil spray: Deters aphids without chemicals
- Companion planting: Chives repel pests from nearby herbs
- Diatomaceous earth: Controls crawling insects safely
These living decor items prove that even the most compact kitchens can host productive gardens. The right system turns walls and windows into sources of fresh flavor and visual appeal.
15. Coordinated Containers for a Streamlined Look
Glass jars lining my shelves became unexpected decor heroes in my kitchen makeover. What started as practical storage evolved into a display of personal style. Uniform containers create visual calm while keeping everyday items accessible.
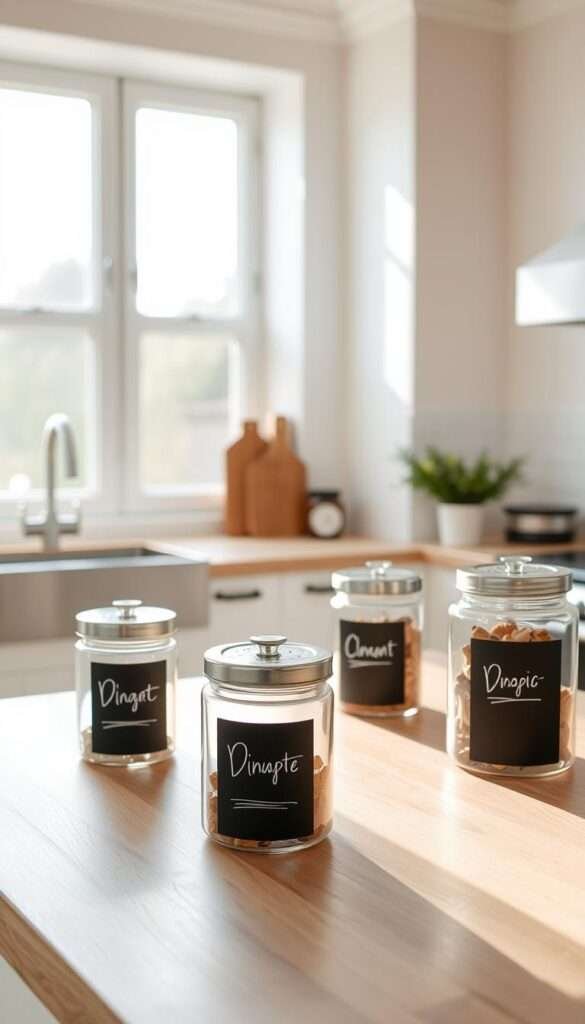
Matching canisters and jars
Glass containers create purposeful displays that blend function with aesthetics. I prefer square jars—they maximize shelf space better than round ones. The material choice impacts both look and freshness:
- Airtight options: Perfect for flour and sugar (prevents pests)
- Decorative choices: Ceramic canisters add texture to open shelves
- Clear vs. opaque: Transparent shows contents, colored hides clutter
Bulk storage from Costco becomes manageable with uniform containers. My pro tip? Use child-lock lids for safety without sacrificing style.
Labeling systems for organization
Labeled bins enhance functionality while maintaining cohesive decor. Chalkboard tags offer flexibility for rotating contents, while embossed metal labels create permanent elegance.
Consider these categorization methods:
| System | Best For | Maintenance |
|---|---|---|
| Color-coding | Visual learners | Low (permanent) |
| Chalkboard | Changing inventories | Medium (weekly updates) |
| Icon-based | Multilingual households | Low (universal symbols) |
Group by food categories—all baking supplies in navy containers, breakfast items in cream. This system makes cooking intuitive while keeping your kitchen magazine-ready.
16. Your Inviting Small Kitchen Awaits—Start Styling Today!
Transforming my cramped cooking area felt overwhelming until I took it one step at a time. Start with one change—open shelves or a light-reflecting backsplash—then build gradually.
Remember these ideas that worked for me: vertical storage saves floor space, layered lighting adds depth, and multifunctional furniture maximizes every inch.
My biggest lesson? Resist overcrowding. Early on, I stuffed shelves with too many items, making my home feel chaotic. Edit displays until they feel balanced.
Grab my free checklist to track progress. Share your makeover results—I’d love to see how these decor strategies work in your unique space!