Table of Contents
ToggleI still remember a frantic weeknight when I needed a meal that felt special but came together fast. I wanted the crispy crust, warm sauce, and gooey cheese without a sink full of oil or late-night cleanup. That memory shaped this recipe and how I teach it.
In about 30 minutes you get juicy, breaded cutlets from the oven at 400°F. I explain the exact tools, the pans and thermometer I use, and why pounding breasts to even thickness matters for reliable time and tenderness.
Expect a clear ingredient table with cups and teaspoons, step-by-step breading and baking cues, plus pro tips for broiling cheese or using an air fryer at 400°F for 6–8 minutes. I also cover safe pull temps (160°F then rest to 165°F), storage (2–4 days refrigerated, freeze 3 months), and reheating so the crust stays crisp.
My Story With This Italian-American Classic
Weeknights taught me to strip this classic down to what matters: crisp crust, bright sauce, and melt-in-your-mouth cheese. I wanted a reliable path to that comfort without long prep or heavy fat.
How I make baked chicken parm weeknight-easy
I keep the steps short. I set up a shallow bowl for the breading station, mix panko with grated parmesan, and season the crumbs with a pinch of garlic powder and pepper.
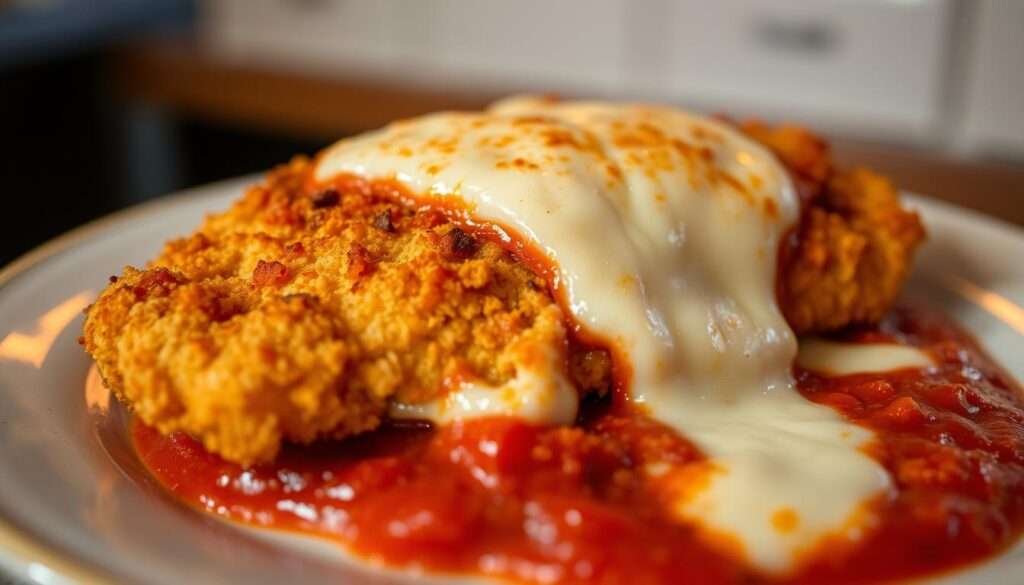
I coat thin breasts, place them on a lightly oiled baking sheet so olive oil helps the crumbs brown, then bake at 400°F about 15 minutes. After a short rest I add a cup of marinara sauce and mozzarella, then return to the oven just until cheese melts and the internal temp hits 160°F for carryover cooking.
The present-day twist: crisp, cheesy, oven-baked comfort
Using panko and a touch of oil gives a fried texture without splatter or extra fat. I sometimes use egg whites to help the mixture cling if I need extra adhesion.
- I favor a quality jarred sauce like Rao’s when time is tight.
- Sliced mozzarella gives a rustic pull; shredded melts faster.
- Want a quick guide? Try this chicken parmesan recipe for an easy weeknight finish: chicken parmesan recipe.
Why You Will Love This Recipe
On busy nights I want a dinner that feels indulgent but doesn’t steal my evening. This baked chicken parmesan hits that mark: big flavor, crispy texture, and little cleanup.
Crispy "fried" texture without deep-frying
The panko-parmesan crust browns in the oven and gives a golden crunch you expect from a fry. I use just a touch of oil so the crumbs crisp without excess fat.
Ready in about 30 minutes with minimal mess
Most cooks finish this in roughly 30 minutes at 375–400°F. The oven does the heavy lifting, so I tidy while the pieces bake and the cheese melts.
Lightened-up ingredients, big flavor
Measured oil and a bright jarred sauce keep each piece juicy while trimming fat. A little parmesan and fresh mozzarella go a long way for richness.
Flexible sides for fiber or low carbs
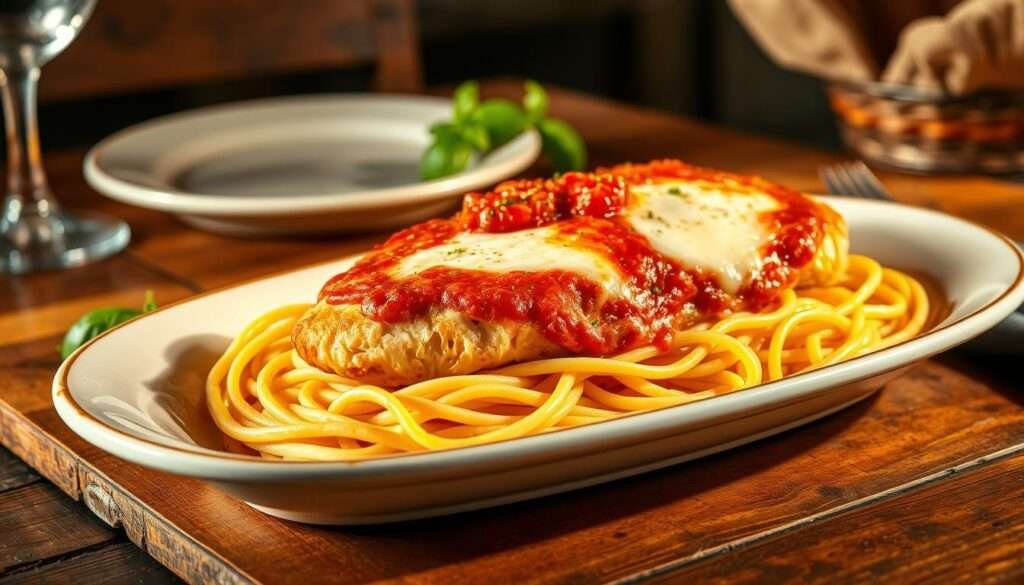
- I serve it over whole wheat spaghetti for extra fiber.
- For fewer carbohydrates I choose zucchini noodles or roasted spaghetti squash.
| Side | Carbohydrates | Why I Pick It |
|---|---|---|
| Whole wheat spaghetti | Higher (more fiber) | Adds fiber and a classic pairing |
| Zoodles | Low | Light, low-carb option that shortens total minutes |
| Roasted spaghetti squash | Moderate (more fiber) | Roasted texture pairs well with sauce and cheese |
This is a parmesan recipe I return to when I want big payoff with minimal fuss.
Tools and Preparation
Good tools and a simple setup cut stress and speed up every step of this recipe. I walk through what I lay out first so your evening stays calm and the crust comes out crisp.
Preheat oven and set up your breading station
I preheat oven to 375–400°F so the heat is steady when the breaded chicken hits the pan. A stable oven helps browning and reduces cooking guesswork.
My breading station runs left to right: raw chicken, whisked egg or whites, crumbs mixed with grated parmesan, then the ready sheet. I use shallow bowls or pie plates so the mixture clings evenly.

Baking sheet vs. dish: how to choose
A rimmed baking sheet encourages air flow and a crisp bottom. I brush the sheet lightly with olive oil to mimic shallow frying and prevent sticking.
A ceramic or glass dish holds more sauce and gives a saucier finish but may soften the crust. For extra crispness I lift pieces on a wire rack set over the sheet.
- I use a meat mallet to pound breasts to even thickness for uniform cooking.
- An instant-read thermometer keeps me from overcooking; I pull around 160°F to rest to 165°F.
- For easier cleanup, I sometimes line the sheet with foil, though direct contact on an oiled sheet browns best.
| Tool | Importance | How I Use It |
|---|---|---|
| Rimmed baking sheet | High | Air circulation for a crisp crust; brush with olive oil before baking |
| Ceramic or glass dish | Medium | Holds more sauce for a saucier finish but softens the breading |
| Shallow bowls / pie plates | High | Efficient dredging of egg and crumb mixture for even breading |
| Instant-read thermometer | High | Prevents dryness; pull at ~160°F then rest to 165°F |
| Meat mallet & wire rack | Medium | Pound breasts evenly; rack adds airflow for extra crispness |
Exact Ingredients for Baked Chicken Parm
Before I list ingredients, let me make shopping and prep truly fail-proof for tonight’s dinner. The table below gives exact cups, teaspoons, and sensible swaps so you can shop fast and start cooking.
Ingredient list with measurements and notes
| Ingredient | Amount | Notes |
|---|---|---|
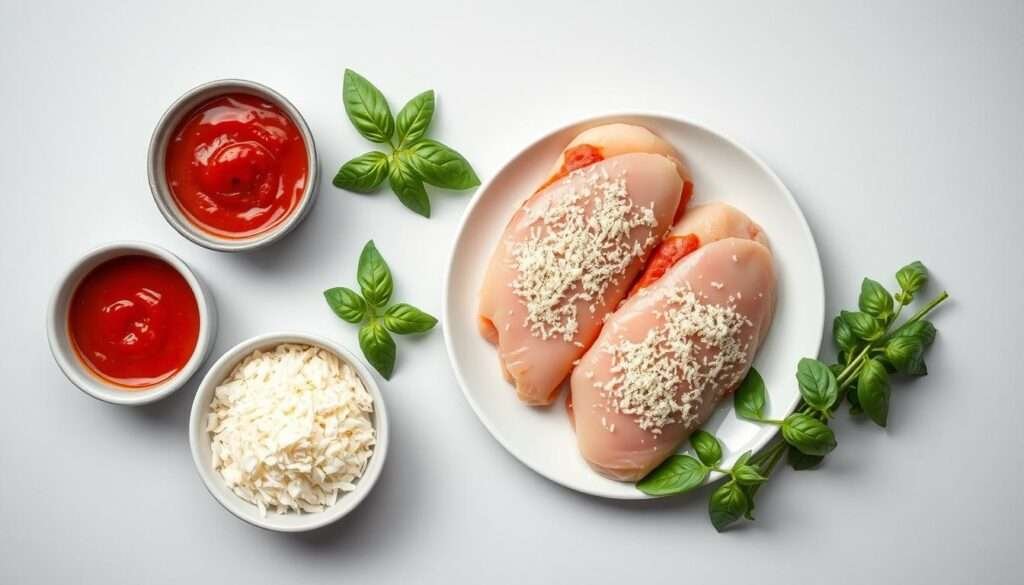
| Chicken breasts | 2 large (≈12 oz each) | Pound to ~½” thickness for even cooking across the sheet. |
| Italian seasoned bread crumbs + panko | ½ cup breadcrumbs + ¼ cup whole wheat panko | Panko adds crunch; mix for crispness and adhesion in the bread crumb mixture. |
| Grated Parmesan | ¼ cup | Add 1 tbsp extra for more savory depth (parmesan recipe tip). |
| Eggs or egg whites | 2 egg whites or 1 whole egg | Use whole eggs and ¼ cup flour for a classic three-bowl dredge if preferred. |
| Marinara sauce | ½ cup + extra 1 cup to serve | Use a quality jar like Rao’s; ~2 tbsp sauce per cutlet on top. |
| Mozzarella (part-skim) | ~4 oz | Slices or shredded—portion ~2 oz per breast for even melt. |
| Seasoning | Garlic powder ¼ teaspoon, black pepper ¼ teaspoon | Parmesan and sauce add salt; adjust if sensitive. |
| Olive oil | Brush pan with 1–2 teaspoons | Helps browning with minimal added fat. |
| Optional swaps | Gluten-free crumbs, provolone, or thigh meat | Listed for dietary needs or texture changes. |
Keep ingredients in labeled bowls and line your sheet or rack before you start. Small choices—crumb ratio, oil amount, and sauce per piece—make this version reliably crisp and flavorful.
Baked Chicken Parmesan
I rely on a simple rhythm—prep, bread, bake, top—to make this classic reliably great every time.
Step-by-step instructions
First, preheat oven to 400°F and set a rimmed baking sheet with a light brush of oil so the coating crisps. Split and pound breasts to about 1/2 inch for even cooking.
Prep the coating
In a shallow bowl whisk 2 egg whites until lightly foamy. In a second bowl mix 1/2 cup seasoned crumbs + 1/4 cup panko + 1/4 cup grated parmesan + 1/4 tsp garlic powder + 1/4 tsp black pepper.
Dredge and bake
- Dip each cutlet in the egg whites, let excess drip, then press into the bread crumb mixture so crumbs adhere.
- Place on the prepared sheet and bake about 15 minutes, until an instant-read thermometer reads roughly 160°F.
- Spoon ~2 tablespoons sauce on each, top with ~1 oz mozzarella, and return to the oven 3–5 minutes until cheese melted and edges brown.
Air fryer option & doneness
For an air fryer, cook at 400°F for 6–8 minutes, flip, add sauce and cheese, then 2–3 minutes more. Pull at 160°F and rest to 165°F; clear juices and no pink center are your cues.

| Step | Temp / Time | What to watch for | Notes |
|---|---|---|---|
| Preheat & prep | 400°F / 0 minutes | Oven fully hot | Brush rimmed baking sheet with oil |
| Bake cutlets | 400°F / ~15 minutes | Thermometer ~160°F | Even 1/2″ breasts cook reliably |
| Top & finish | 400°F / 3–5 minutes | Cheese melted, edges crisp | Broil 1–2 minutes for color |
| Air fryer method | 400°F / 6–8 + 2–3 minutes | Golden, cheese melted | Flip halfway for even browning |
Pro Tips to Nail the Texture and Flavor
Nailing texture and flavor comes down to a few small habits I use every time. These tips keep the crust crisp, the interior juicy, and the sauce bright.

Use an instant-read thermometer
I trust an instant-read and pull the meat at about 160°F. A short rest brings it to 165°F without extra fat loss or dryness.
Get the coating to stick and stay crisp
Pat breasts dry, dredge thoroughly, and press the crumbs so they adhere. Let pieces rest 2–3 minutes before topping to avoid steam softening the crust.
Balance crunch and coverage
I mix panko with traditional bread crumbs so you get crunch plus good coverage. A light brush of oil on the pan helps browning without adding excess fat.
Cheese and sauce choices
Part-skim mozzarella melts well with less fat, fresh mozzarella gives silky pockets, and provolone adds savory depth. A quality marinara—kept warm—elevates the whole plate.
| Cheese | Texture | Why I use it |
|---|---|---|
| Part-skim mozzarella | Even melt | Lower fat, classic pull |
| Fresh mozzarella | Soft puddles | Luxury texture, more moisture |
| Provolone | Slightly sharp | Adds savory flavor |
Substitutions and timing
For gluten-free, swap in GF crumbs one-for-one and follow the same technique. Thighs or tenders work well; expect a few extra minutes and verify temperature rather than relying on time.
For the full method and exact timings I use, see my full recipe.
Serving Ideas That Fit Your Mood
When dinner needs to comfort and adapt, I pick pairings that match the mood and the time I have. A few simple swaps change the plate from classic comfort to lighter fare without extra work.

Whole wheat spaghetti or classic pasta night
I twirl whole wheat spaghetti with a little warmed marinara and nestle the chicken parm on top. This adds fiber and a familiar feel. If I’m short on minutes, I boil pasta while the main bakes so everything finishes together.
Zucchini noodles or roasted spaghetti squash
For a lighter plate I sauté zucchini noodles briefly so they stay toothsome, then top with hot sauce and mozzarella. Roasted spaghetti squash soaks up juices and lowers carbohydrates compared with regular pasta.
Italian roasted vegetables and simple salads
Roasted broccoli, asparagus, and peppers add color and extra fiber. A green salad with lemon vinaigrette keeps the meal bright and lets the parmesan and cheese melted on top shine. I keep a warm cup of extra sauce to spoon over the plate and finish with fresh basil.
| Goal | Pairing | Why |
|---|---|---|
| Comfort | Whole wheat spaghetti + garlic bread | Classic texture and extra bread for sauce |
| Light | Zoodles or roasted squash | Lower carbohydrates, still satisfying |
| Fresh balance | Roasted veg + salad | Adds fiber and brightness |
Storage & Reheating Instructions
I learned that proper storage makes reheating feel almost like freshly made. Store leftovers in an airtight container and plan to eat them within 2–4 days for best texture and flavor.
For longer storage, freeze portions up to 3 months. Thaw overnight in the fridge before reheating so the interior heats evenly.
Reheat by appliance
- Oven: Preheat to 350°F. Place pieces in a covered dish and heat 25–30 minutes. Uncover for a few minutes so edges re-crisp and the cheese melted layer bounces back.
- Air fryer: Heat at 350°F for 5–8 minutes. Check halfway so the coating crisps without drying. Use a lightly oiled sheet or basket liner if you like.
- Stovetop: Warm over medium in a skillet with a lid. A short steam keeps the interior juicy and melts the cheese.
- Microwave: Reheat in 30–60 second intervals for 2–3 minutes total, rotating between bursts. Brush a tiny amount of oil if the surface seems dry.
I keep a small cup of warm marinara on the side to add moisture before serving. Sliced cold pieces also make an easy salad topping for next-day lunches.
| Method | Temp / Minutes | Best note |
|---|---|---|
| Oven (covered) | 350°F / 25–30 minutes | Cheese melted and crisp edges after uncovering |
| Air fryer | 350°F / 5–8 minutes | Fast crisp without extra oil |
| Microwave / Skillet | 2–3 minutes / medium heat | Use intervals or lid to keep it juicy |
For make-ahead dinners and swaps, consider my make-ahead option to plan portions and containers ahead of time.
Quick Nutrition and Timing Snapshot
I like a quick at-a-glance guide so the oven and the clock work together. Use this short block to plan sides, timers, and serving portions without scrolling back through the full method.
Cook time, temp, and serving size at a glance
Keep a timer set and an instant-read thermometer nearby. Pull the cutlets slightly early and let carryover finish the final degrees for best juiciness.
- Oven: 400°F main bake, with a short finish to melt and brown the top.
- Estimated minutes: ~15 minutes initial bake, plus 3–7 minutes after topping depending on thickness and cheese.
- Internal temp: pull at ~160°F; resting brings it to 165°F for a safe, juicy result.
- Serving size: plan one breaded cutlet per person with extra sauce on the side.
- Air fryer option: 400°F for 6–8 minutes, then 2–3 minutes after adding toppings.
| Item | Time / Temp | Notes |
|---|---|---|
| Bake | 400°F — ~15 minutes | Watch for golden edges; thickness affects minutes. |
| Finish (cheese & sauce) | 400°F — 3–7 minutes | Broil 1–2 minutes if you want extra color. |
| Nutrition (typical) | ≈381–535 kcal per serving | Varies by cheese and oil; part-skim mozzarella keeps it lighter. |
This compact snapshot helps me time sides and set a single alarm for plating. If you want a printable cheat sheet, fold these figures into your next chicken parmesan recipe note card.
Final Thoughts & More Recipes to Try from cuisines-corse.com
I keep returning to this method because it reliably gives a crisp crust and melty topping. This baked chicken parmesan feels like comfort food but moves fast enough for weeknights.
Use tenders or thighs if you prefer, a quality marinara sauce, and measured cheese to lift every bite. A simple parmesan recipe tweak—swap fresh mozzarella or provolone—changes the mood without extra work.
Store leftovers in a snug container and reheat using the oven or air fryer for best texture. If you liked this chicken parm, try these from cuisines-corse.com:
Chicken Piccata • Chicken Milanese • Baked Eggplant Parmesan • Chicken Marsala • Chicken Cacciatore • No Knead Focaccia
I hope you bookmark this recipe and make it your own—there’s room to riff with cheese, crumbs, and sides while keeping the technique that works.